Welcome to the Wynncraft Wiki Editors Guide! Below is all of the information required to create and edit pages.
The Basics of Wiki Editing
Let’s suppose you are interested in adding a new page.
» Step 1: You will need to find the page which you want to edit. This can be achieved by searching the page name in the search-box at the top right. If the page exists, proceed to step 2. If the page does not exist, click the red hyper-link in bold quotes at the top of the page.

Above: New Page was searched and a page of that name can be created by clicking on the Red Hyper-Link
» Step 2: If the page you want to create already exists, either click “Edit” or “Edit Source” to the left of the search bar in the top right. If the page doesn’t exist and you followed step 1 correctly, you should already be in the editing mode.
» Step 3: Once you're in the editing mode there are two options Visual Editing and Source Editing. You can change modes by clicking on the drop-down arrow in the top right of your editing window. The drop down is marked by the icon of a pencil.
» Notes:
- If you are creating a new page it is recommended to find a similar page to base your work off, this way the wiki will be more consistent and therefore easier to use.
The Visual Editor - Beginner's Guide
If you have chosen the Visual Editing Mode in step 3, you will be presented with a large box to type in, some basic text editing tools on the top, and some page options in the top right.
» Notes:
- The text box is used to add/change/remove any text on the page.
- The tools in the toolbar are used to style the text in any way.
Adding Templates
Templates are a vital part of every wiki, and the Wynncraft Wiki is no exception. There is a vast array of templates to choose from which are available on the templates page
.
» Insertion:
- In the toolbar, click “Insert”.
- Click “Template”.
- Specify the name of the template (e.g “Infobox/Mob”)
The most useful templates are Infoboxes, many of which are pre-built especially for this wiki. Below are guides on a select few.
Mob Infobox
| Zombie Pigman | |
[[File: |275px]] |275px]]
| |
| Type | Hostile |
|---|---|
| Level | 8 |
| Health | 35 |
| AI Type | Unknown |
| Location | |
| Location | Pigman Cave |
| Drops | |
| Pigman's Meat | |
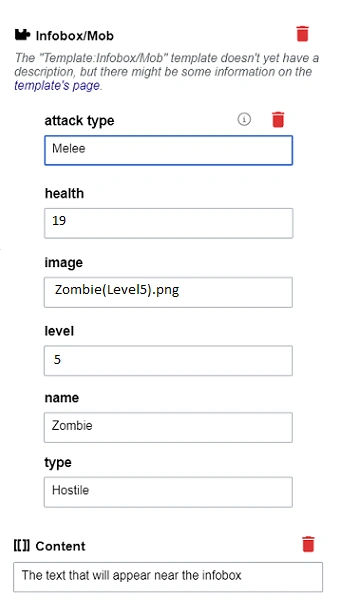
To add the Mob infobox, types ‘Infobox/Mob’ into the template box, then click ‘Add’. Now input the field ‘name’ and give it the value of the mob's name, for example ‘Zombie Pigman’. Now under the add more information section you can add the fields type, level, location, health, damage and drops and give them the appropriate values. The final field to add is ‘image’, in order to use this you must upload an image here. Once that has been completed the image field can be filled with the image link in the following format: [[File:Filename.extension]]. For Example, to use the image Pigman.png you would define it as [[Pigman.png]].
Knowing all this we could use the following settings to create the example to the right.

» Notes:
- While there is a template for Mob information, the wiki administration has deemed it unnecessary for all mobs to be documented on the wiki. Therefore, only important mobs, quest bosses and dungeon bosses should be documented. Pages for a groups of mobs can also be made for example all Pigman types can be found on the same page.
Location Infobox
To use the location infobox you must input ‘Infobox/town’ into the template box and use the mandatory fields name, type, image, caption, xcoordinate, ycoordinate, acesspoints and minlevel. You could also use the optional fields armorlevel, weaponlevel, potionlevel, othermerchants, otherutilities, startquestnames, involvedquestnames, biome, conditions, islandsize, docks, mobs, boss, uses, requirements and otherinfo. All of the uses for these fields can be found on the template page.
NPC Infobox
To use the NPC infobox you must input ‘Infobox/NPC’ into the template box and use the fields name, image, xcoordinate, zcoordinate, location and quest. All of the uses for these fields can be found on the template page.
Merchant Infobox
To use the merchant infobox you must input ‘Infobox/Merchant’ into the template box and use the fields name, image, type, xcoordinate, zcoordinate, location, total and variations. All of the uses for these fields can be found on the template page.
Location Box
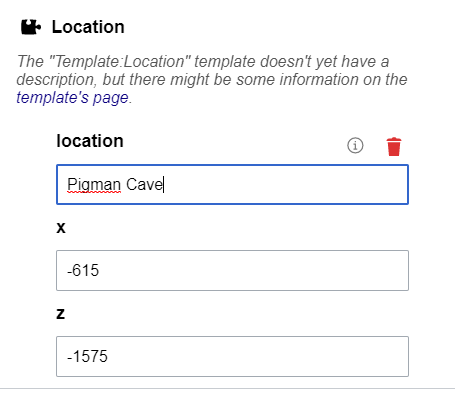
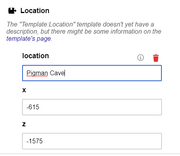
The location box allows for an easy to read box to show the location of something. To use the location box simply input ‘location’ into the template box. Then use the fields any of the fields location, x, y and z. So therefore the following settings would generate the Location box below.
Above: The settings for the Location Box below..
| Location | Pigman Cave | X | -615 | Z | -1575 | Wynncraft Map |
Page Options
In the toolbar you will find a hamburger menu, once clicking on that it will reveal A few items. The most prominent of which is options, in this menu you can add categories to the page, create a redirect to another page and more options that can modify the page.
Finishing Up
Once you are happy with your newly edited page you can click the blue ‘Save changes’ button, here you can add a good, detailed summary of your changes and hit ‘Save changes’. From there your edit is live! You can see your page in the recent changes section as well as the page itself.
The Source Editor - Expert’s Guide
If you have chosen the Source Editing Mode in step 3, you are enabled to edit the raw source code of the page. The official name of the wiki’s source code is Wikitext or wiki markup coding language.
» Notes:
- The small and simple toolbar at the top has some text editing tools, a file embedder and some other options.
- Above that there is a Preview and a Changes tab, these do exactly what they say.
Adding Templates
In source editing mode, adding templates is a completely different process. You must use source code, which is usually available on each template page (the collection is found here ). Below is an example using the Mob Infobox of a Pigman.
Mob Infobox
| Zombie Pigman | |
| [[File:|275px]]
| |
| Type | Hostile |
|---|---|
| Level | 8 |
| Health | 35 |
| AI Type | Unknown |
| Location | |
| Location | Pigman Cave |
| Drops | |
| Pigman's Meat | |
The mob infobox source code is located at its template page and can be input into a page by using it like the following:
{{Infobox/Mob
|name=Zombie Pigman
|level=8
|type=Hostile
|image=[[File:Pigman.png|200px]]
|location=[[Pigman Cave]]
|drops=[[Pigman's Meat]]
|health=35
}}
Which would yield the Infobox displayed to the right.
Creating Tables
Tables can be used in many circumstances in many pages. Tables can be constructed using the following steps below and for extra information on tables you can go to the Gamepedia Help Page on Tables.
Starting Off
When making a table, it's quite simple to use copy and paste. To start your table off, use this code:
{| class="wikitable sortable"

|}
Headers
This will start your code for table making. Now you can add optional headers to your table by adding to the code written above, we can make it:
{| class="wikitable sortable"
!Header 1
!Header 2
|}
The above code would create:
| Header 1 | Header 2 |
|---|
Inputting Data
Now it's time to add data to your table, this can be done by adding to the code above to make it:
{| class="wikitable sortable"
!Header 1
!Header 2
|-
|Data1
|Data2
|}
Which would add the data under the respective headers, so it would look as follows:
| Header 1 | Header 2 |
|---|---|
| Data1 | Data2 |
More data can be added by adding to the bottom. Then the code would look like this:
{| class="wikitable sortable"
!Header 1
!Header 2
|-
|Data1
|Data2
|-
|Data3
|Data4
|}
Which would add the data below and look like this:
| Header 1 | Header 2 |
|---|---|
| Data1 | Data2 |
| Data3 | Data4 |
Adding a Title
You can add a title which spans over the entirety of the top of the table by adding this to the code:
|+ Table Title
So if this was added to the code above to make this:
{| class="wikitable sortable"
|+Table Title
!Header 1
!Header 2
|-
|Data1
|Data2
|-
|Data3
|Data4
|}
It would create:
| Header 1 | Header 2 |
|---|---|
| Data1 | Data2 |
| Data3 | Data4 |
General Formatting
There are some general formatting techniques for use in all pages for example:
- To create a bullet point use a * and it will turn into a point
- To create a numbered list use a # in front of the items that need to be listed
- Use : to create an indent
- Use <br /> to create a new line
- Use <nowiki> to use symbols that are used by the Wiki Markup Language.
- You can also use most HTML formatting tags
Adding Categories
Categories can be added to a page using the following format:
- [[Category:<category name>]]
For example to add something to the mobs category add:
- [[Category:Mobs]]
Some basic categories are:
- Mobs
- Merchants
- NPCs
- Locations
- Armour
- Town
- City
- And more located here
Finishing Up
Once you have complete you edits ensure that you click the preview button at the bottom of the page and thoroughly go over the page ensuring it makes sense, there are no typos, broken templates or formatting. After this you can put in a description of your edit in the 'Summary' text box at the bottom and then click the blue 'Save Changes' button.
Finalizing
Assuming you had no trouble understanding this document, you are prepared to start your wiki editing journey. Please be sure to read the Community Portal.
If you are struggling to find a page to help edit you can:
- Use the search bar to find new pages.
- Visit the Wanted Pages Section.
- Visit the Oldest Pages Section
- Visit the Stub Pages Category
Happy Editing,
Your fellow Wynncraft Wiki Editors and Administration Team
Tips and Tricks
Below are some wiki editing tips and tricks submitted by fellow contributors, feel free to check them out and add more!
- Don't be upset if someone changes you work, it all ends up for the better and help the wiki be more vast and useful
- If you are not sure weather to change something or not, post a question on the Community Portal by pressing the ‘+’ in the top right corner of the page.
- Remember to use the Templates, they are the most useful tool in wiki contributing and a list can be found here
- Don't be afraid to edit a page and help contribute new information is almost always accepted and you many know something no-one else does
- For extra help on wiki editing in general visit the gamepedia help wiki and search your query
- Help on the wiki markup language can be found here