(Added rol here) Tag: Visual edit |
NightSlasher2 (talk | contribs) No edit summary Tag: Visual edit |
||
| (36 intermediate revisions by 14 users not shown) | |||
| Line 1: | Line 1: | ||
| + | |||
| + | {{outdated}} |
||
This is a page for a general introduction to Wynncraft and its mechanics. You can find out more about individual mechanics on their respective pages. |
This is a page for a general introduction to Wynncraft and its mechanics. You can find out more about individual mechanics on their respective pages. |
||
| + | |||
==Introduction to Wynncraft== |
==Introduction to Wynncraft== |
||
| − | [[Wynncraft]] is a magical fantasy land created by CraftedMovie. It is filled with many wonders and things to discover. As you journey you will find everything from harmless animals to dangerous and very powerful foes. '''Please read the [ |
+ | [[Wynncraft]] is a magical fantasy land created by CraftedMovie. It is filled with many wonders and things to discover. As you journey you will find everything from harmless animals to dangerous and very powerful foes. '''Please read the [https://www.wynncraft.com/rules Rules] before playing on the server''' and follow them. The game world is operated and moderated by the [[Wynncraft Staff]]. |
You, as the player, are a soldier sent to Wynn to help fight the corruption. You start the game near the border of the Wynn province. In the first quest, [[King's Recruit]], you have to reach the Ragni Castle. After finishing the tutorial you are free to explore the world however you desire. |
You, as the player, are a soldier sent to Wynn to help fight the corruption. You start the game near the border of the Wynn province. In the first quest, [[King's Recruit]], you have to reach the Ragni Castle. After finishing the tutorial you are free to explore the world however you desire. |
||
This guide entails many of the basic mechanics of Wynncraft. For more info on each one, see their individual pages. |
This guide entails many of the basic mechanics of Wynncraft. For more info on each one, see their individual pages. |
||
| + | |||
| + | First thing you want to do is stop using this wiki and go on over to https://wynncraft.wiki.gg/wiki/Wynncraft_Wiki which is the official and better wiki to use |
||
==Joining the Server== |
==Joining the Server== |
||
| Line 29: | Line 34: | ||
Each class has different weapons, spells, and base stats. Wynncraft offers five main classes: [[Mage]], [[Warrior]], [[Archer]], [[Assassin]], and [[Shaman]]. [[Ranks#Purchasable Ranks|Donors]] unlock reskinned classes, which have different visual effects: the [[Dark Wizard]], [[Knight]], [[Hunter]], [[Ninja]] and [[Skyseer]]. |
Each class has different weapons, spells, and base stats. Wynncraft offers five main classes: [[Mage]], [[Warrior]], [[Archer]], [[Assassin]], and [[Shaman]]. [[Ranks#Purchasable Ranks|Donors]] unlock reskinned classes, which have different visual effects: the [[Dark Wizard]], [[Knight]], [[Hunter]], [[Ninja]] and [[Skyseer]]. |
||
| + | * [[Mage]]: Uses [[Wands]] to cast powerful spells. It can use Meteors which deal a decent amount of damage each, but has a slow spell attack speed (Around 1 Meteor a second past level 36, 3 seconds before). Mage is considered a lacking class before unlocking the Meteor spell. However, due to its Heal spell, Mage's survivability is far and beyond almost all other classes apart from Shaman. Due to its power and how easy it is to play, it is considered the "noob" or "beginner" class. |
||
| − | * [[Mage]]: Uses [[Wands]] to cast powerful spells, from healing to calling down meteors. |
||
| + | * [[Warrior]]: A tank class with the highest defense modifier. However keep in mind it has no healing spell, unlike Mages and Shamans. Their Spell DPS is decent, though nothing special, and is focused around dispersing crowds with large knockback, AoE attacks, basically the opposite of Shaman. Their playstyle is similar to Assassin. Their weapons are [[Spears]]. However, a popular way of playing Warrior is Tierstack, where you stack 6+ Bonus Attack Speed Tiers on a Super Slow weapon. Thanks to how tanky Warrior is, players can stay close to the enemy, dealing massive DPS while taking minimal damage. |
||
| − | * [[Warrior]]: A tank class with the highest defense modifier. Their weapons are [[Spears]]. |
||
| + | * [[Archer]]: A ranged class that uses [[Bows]]. The Archer excels at long range and has amazing damage, which compensates for its low base defense. Its Spell DPS is one of the highest alongside Assassin, and once unlocking the Escape upgrade, it has the fastest average movement speed out of all classes. Furthermore, its Mythic weapons and Major IDs are among the most powerful in the game. Almost all of its spells deal large knockback. |
||
| − | * [[Archer]]: A ranged class that uses [[Bows]]. The Archer excels at long range, but isn't too durable. |
||
| − | * [[Assassin]]: Uses [[Daggers]] and is a class focused on |
+ | * [[Assassin]]: Uses [[Daggers]] and is a class focused on dealing burst damage. Although it has to get very close to enemies, it can deal incredible damage alongside Archer. It is a good class for immobilizing and blinding enemies, unless there's Crowd Control Immunity (CCI) which is explained below. It is also an excellent class to learn how to spell cycle as all of its spells are viable for combat. Due to its strengths, Assassin often easily breezes through bosses but is hard to level up without running many Dungeons. |
| − | * [[Shaman]]: A [[Reliks|Relik]]-wielding class |
+ | * [[Shaman]]: A [[Reliks|Relik]]-wielding class. It lacks defense similarly to the Archer, but makes up for it with healing from its totem. Its Aura spell can completely incapacitate mobs if it's spammed enough. Due to its specialization in AoE attacks, Shaman is the best class for speed-levelling and crowd control. However, its lack of defense makes it difficult to solo bosses or dungeons. Shaman also does not have spells that can be casted in a cycle, instead relying on Aura and many basic attacks to kill most tanky enemies. |
| + | |||
| + | ===Multiple classes=== |
||
| + | Players may have different classes, each with different progress. They may switch between them using <code>/class</code> command. Each class is completely separate from the rest except [[Bank]], [[Trade Market]] and [[Guilds|guild]], [[Ranks|rank]] and friends. |
||
| + | |||
| + | ==Compass (Not the 7th slot)== |
||
| + | Between your health and mana, and between the coordinates between those, there is a letter. This letter indicates which way you are facing. N = North, E = East, and so on. This can be very useful for questing, since NPCs will sometimes say directions relative to the compass. |
||
==Experience Points== |
==Experience Points== |
||
{{main|Experience Points}} |
{{main|Experience Points}} |
||
| − | Experience points are gained by killing mobs, |
+ | Experience points are gained by a number of things, including [[Dungeons|Dungeon]] completions, killing mobs, doing [[Quests|quests/mini-quests]], doing [[Discoveries]]/[[Secret Discoveries]], [[Raids]], and opening the Forgery chest after running a selective amount of Corrupted Dungeons Progression from one level to the next is indicated by the green bar above the hotbar. |
| − | After a certain amount of experience is acquired, your character will level up, and you will receive a chat message about what you have unlocked (e.g. a quest or spell upgrade). |
+ | After a certain amount of experience is acquired, your character will level up, and you will receive a chat message about what you have unlocked (e.g. a quest or spell upgrade). |
| + | |||
| + | When you kill a mob, the number of experience points awarded is indicated above the slain mob. Killing mobs closer to your level will award more experience points as opposed to mobs with different levels than what level you are. |
||
| + | |||
| + | the EXP you get from quests/mini-quests is unaffected by XP bonus found on certain items and XP potions/crafted consumables. |
||
| + | |||
| + | Gear with the [[Identifying|XP Bonus]] identification can increase the amount of XP you receive. It can prove to be useful when you run out of quests and need to level up, which makes it wise to keep gear with XP bonus if you find them. An example of XP bonus gear is Adventurer's Set, which has a 50% XP bonus in its set bonus, making it a very good set to level up classes with. |
||
| + | |||
| ⚫ | |||
| + | |||
| + | === Skill Points === |
||
| + | On certain gear, you'll sometimes see certain Skill Point bonuses. How they change your build is listed below. |
||
| + | |||
| + | * Strength: Changes your amount of Strength. |
||
| + | * Dexterity: Changes your amount of Dexterity. |
||
| + | * Intelligence: Changes your amount of Intelligence. |
||
| + | * Defense: Changes your amount of Defense. |
||
| + | * Agility: Changes your amount of Agility. |
||
| + | |||
| + | === Other Identifications. === |
||
| + | Keep in mind the Identifications here do not include the identifications from Crafted Items. |
||
| + | * Health: It sometimes shows on pieces of gear on the Identifications side (below where you would see the requirements for using gear), it is basically just additional Health and is there since the rolls can vary when you identify it. |
||
| − | Gear with the [[Identifying|XP Bonus]] identification can increase the amount of XP you receive, but Quest XP is not affected by any bonuses. |
||
| + | * Health Regen %: It multiplies Raw Health Regen/Natural Health Regen by the Health Regen % you have. Having below -100% Health Regen does not flip negative raw health regen, and having 100% or above Health Regen % nullifies all -Health Regen. |
||
| + | * Health Regen Raw: It changes your health regeneration by a raw amount and is affected by Health Regen %. |
||
| + | * Walk Speed: Multiplies your speed by the percentage of Walk Speed you have. |
||
| + | * Mana Regen: Gives a certain amount of mana every 4 seconds based on the Mana Regen you have. |
||
| + | * Mana Steal: It is an ID that has a chance to trigger on melee hits. The chance of getting mana per hit depends on your attack speed. |
||
| + | * XP Bonus: Changes the XP you get from mobs/dungeons. It gives a percentage of the original XP you'd get from mobs added onto the XP you already get from mobs. |
||
| + | * Loot Bonus: Increases the amount of loot you can get from chests and mobs. |
||
| + | * Stealing: Gives a chance to get emeralds from mobs, and is affected by attack speeds. |
||
| + | * Poison: It triggers upon hitting a mob, and spreads for 3 seconds and stops giving poison unless you hit again. |
||
| + | * Attack Speed Bonus: It changes the attack speed of your weapon. |
||
| + | * Reflection: Gives a chance for giving back damage when a player is hit by a spell. The chance of reflection triggering is equivalent to the amount of reflection you have. |
||
| + | * Thorns: The same thing as Reflection but it applies for Melee hits. |
||
| + | * Exploding: Gives mobs a chance to explode on death. Other mobs hit by the explosion take what would be the damage of one melee hit. |
||
| + | * -Spell Cost Raw: It reduces your spell costs by a raw amount. For example, if you have a 4 mana cost spell, and used an item with -1 cost in that spell, the spell would then cost 3 mana. |
||
| + | * -Spell Cost %: It reduces your spell costs but with a percentage. You can use [[wcforum:threads/spell-cost-guide-reference-chart.268079/|this]] to calculate how much less your spells cost with -spell cost %. |
||
| + | * Sprint: It changes the duration of your sprint bar. |
||
| + | * Sprint Regen: It changes how fast you can regenerate your Sprint Bar. |
||
| + | * Jump Height: Increases the amount you can jump. It is like the Jump Boost effect in Minecraft Singleplayer. |
||
| + | *Elemental Defense: The same thing as Health Regen % except it applies to Elemental Defenses. |
||
==Skill Points and Elements== |
==Skill Points and Elements== |
||
| Line 53: | Line 103: | ||
* '''Strength''' increases the amount of damage the player deals and increases your {{Element|Earth}} damage. |
* '''Strength''' increases the amount of damage the player deals and increases your {{Element|Earth}} damage. |
||
* '''Dexterity''' increases the player's chance to do +100% base damage (not actually double) on a hit and increases your {{Element|Thunder}} damage. |
* '''Dexterity''' increases the player's chance to do +100% base damage (not actually double) on a hit and increases your {{Element|Thunder}} damage. |
||
| − | * ''' |
+ | * '''Intelligence''' reduces the cost of spells and increases your {{Element|Water}} damage. |
* '''Defense''' reduces the damage the player takes and increases your {{Element|Fire}} damage. |
* '''Defense''' reduces the damage the player takes and increases your {{Element|Fire}} damage. |
||
* '''Agility''' increases the player's chance to dodge an attack and increases your {{Element|Air}} damage. |
* '''Agility''' increases the player's chance to dodge an attack and increases your {{Element|Air}} damage. |
||
| Line 61: | Line 111: | ||
* '''Defense''' - mobs with this stat will receive less damage from attacks of the respective element. |
* '''Defense''' - mobs with this stat will receive less damage from attacks of the respective element. |
||
* '''Weakness''' - mobs with this stat will receive more damage from attacks with the respective element. |
* '''Weakness''' - mobs with this stat will receive more damage from attacks with the respective element. |
||
| + | |||
| + | Strength and Dexterity give damage based on the base damage of your weapon. To calculate the base damage on weapon, you have to multiply the damage on it multiplied by how many times you can use a melee hit. You can use [[Weapons#Attack%20Speed|this]] to find out how many times you can use a melee hit with the attack speed of your weapon. Strength in the compass will say it gives % more damage, but it scales from the base, so the additional damage is a percent (listed in compass) of the base damage of your weapon. To calculate additional damage in one melee hit, you should do the base damage divided by the amount of melee hits posssible and with the result multiplied with the percentage of the additional damage shown in compass. For example, with a Super Slow 300 Base damage weapon and 68 Strength, the additional damage since Strength has 50% more damage (additive, like what'd you see on armor) would be (300 / 0.51) * 50%, which would be 300 more damage per hit with those stats. If you were to use the weapon and use a 250% spell multiplier (check the Wikis' of each Class if you don't know what it is), the base damage of that spell would be 750, and with 68 Strength you would have an addition 750 * 50% damage in that spell, or 325 more damage in that 250% spell multiplier spell. |
||
| + | |||
| + | Dexterity adds 100% Spell Damage, or 100% Melee damage if you are going Melee. The extra Spell and Melee damage are like what'd you would see on armor. and Dexterity is also scaled from the base. If Dexterity were to trigger in 1 melee hit, the damage it would bring is the base damage of your weapon divided by the amount of melee hits a second. For example, having a Super Slow weapon with 300 base and having Dexterity trigger on a melee hit would give 300 / 0.51 more damage to the melee hit, giving approximately 600 more damage on that melee hit. In Spell, the base damage of your weapon is multiplied by the Spell Multiplier, and than scaled by Dexterity. If you used a Spell with a 250% Spell Damage Multiplier with 300 base, you would have a 750 base in that Spell. Dexterity triggering in that spell will give an extra 750 damage. |
||
| + | |||
| + | Intelligence reduces your spell costs. If you had a 6 mana arrow storm and have 29 intelligence, you have 5 arrow mana storms, and 1 reduced mana cost on bomb. If you want to see how much spell costs are reducted by a certain amount of int, you can see this [https://www.wynndata.tk/mana/ Mana table]. For example, having 68 Intelligence halvens all spell costs costing an even number with no Intelligence or Spell Cost items. |
||
| + | |||
| + | Defense/Agility increase your effective HP, and depending how much you spend into them, you can be a lot tankier. |
||
| + | |||
| + | If you want to see how much tankier you are, you can use [https://wynnbuilder.github.io/ Wynnbuilder] and it'll show your EHP '''(EHP stands for Effective HP, which is your health factoring in Defense (and sometimes Agility)''' skill points or you can follow the formula below. |
||
| + | |||
| + | '''Health / 1 - (Percentage of damage absorbed by Defense) / Percentage of extra Damage taken from mobs relative to a 100% Base Defense (Or multiplied by the percentage of damage absorbed from mobs)'''. If you want to factor in Agility, you can do '''Health / 1 - (Percentage of damage absorbed by defense) / 1 - (Percentage of damage absorbed by Agility) / Percentage of extra Damage taken from mobs relative to a 100% Base Defense.''' For an example, if you are a Shaman, with 4500 HP and 68 Defense, as 68 Defense has a 50% damage reduction, and Shaman takes 1.5 times the damage from mobs, so the formula would be 4500 / 0.5 / 1.5, would would be 6,000 EHP. |
||
| + | |||
| + | Base defenses for each class. It is going by relative to Assassin since Assassin has a 100% Base Defense. This doesn't include Assassin since this is relative to Assassin. |
||
| + | * Shaman - 50% more damage from mobs compared to Assassin |
||
| + | * Archer - 40% more damage from mobs compared to Assassin |
||
| + | * Mage - 20% more damage from mobs compared to Assassin |
||
| + | * Warrior - 20% less damage from mobs compared to Assassin |
||
| + | |||
| + | The base defenses are like additional damage for how far it is from 100% base defense. It is like since 60% Base Defense is 40% short from 100% base defense, so a class with 60% Base Defense (Archer) takes 40% more damage. |
||
| + | |||
| + | |||
| + | When you are levelling a character, it is recommended you first fill out your gear skill point requirements, and put remaining skill point into intelligence and defense after level 29 (Before 29, remaining skill points into Defense). You should put 50% of your remaining skill points into intelligence and defense. If you see you have a useful intelligence threshold 10 skill points away after seeing how much intelligence you have after adding up your current intelligence points with 50% of your remaining sp, then you should get to that threshold and put skill points into defense. You can look at [https://www.wynndata.tk/mana/ this table] for the intelligence thresholds. It is also recommended to stay away from items with a Strength or/and Dexterity requirement when levelling up. You can use Strength or Dexterity requiring items if they're really good and worth using for a Strength/Dexterity/Strength and Dexterity requirement. |
||
| + | |||
| + | It is also not recommended to put tier 4 or higher powders on a weapon before around level 60 since you can change gear fairly quickly. Putting powders like Tier 3 or lower can work however if you want to use some spare powders. You shouldn't powder armor too for the same reason. The change in elemental defense too is barely noticeable by most people for armors. |
||
==Quests== |
==Quests== |
||
{{main|Quests}} |
{{main|Quests}} |
||
| − | Quests are tasks that you can do in order to get XP and [[Emeralds]]. The contents of a quest may vary from simply collecting materials to traveling through time or finding ruins of ancient civilizations. Quests range in difficulty and duration, with the greater challenges giving a greater reward. Some, but not many quests may require teamwork to complete the quest, and some require you to think outside the box. |
+ | Quests are tasks that you can do in order to get XP and [[Emeralds]]. The contents of a quest may vary from simply collecting materials to traveling through time or finding ruins of ancient civilizations. Quests range in difficulty and duration, with the greater challenges giving a greater reward. Some, but not many quests may require teamwork (This is not limited to [[???]], other quests with hard combat challenges like [[The Qira Hive (Quest)]] and [[Tower of Ascension (Quest)]] can make a player request for teamwork) to complete the quest, and some require you to think outside the box. |
| − | Some quests also give access to different areas, dungeons, fast travel points, or merchants. Additionally to the monetary and experience reward, you may also get powerful gear. |
+ | Some quests also give access to different areas, dungeons, fast travel points, or merchants. Additionally to the monetary and experience reward, you may also get powerful gear. Some examples of powerful gear are the Grookwarts accessories from [[The Order of the Grook]], the Ornate Shadow items from [[A Hunter's Calling]]. It can also save you time from looting chests, running [[Boss Altars]], or running [[Dungeons]], or killing mobs, since you won't have to try to fill for the specific gear slot. Quests past level 80 generally give over 1 LE, and quests below level 80 can also give good money and XP relative to their level. |
| − | '''NOTE: It is recommended to complete most (if not all) quests you come across on your first playthrough to fully |
+ | '''NOTE: It is recommended to complete most (if not all) quests you come across on your first playthrough to fully understand the lore, and get good money, and if you know how to do quests fast, levelling can be sometimes faster then grinding, especially between levels 80-100. It is also more enjoyable then grinding.''' |
==Items== |
==Items== |
||
| Line 87: | Line 162: | ||
* Item spawning areas (Like the [[Seavale Reef]]) |
* Item spawning areas (Like the [[Seavale Reef]]) |
||
* [[Trading]] with other players |
* [[Trading]] with other players |
||
| − | * [[Crafting]] at a crafting station |
+ | * [[Crafting]] at a crafting station <br />Keep in mind rarity (Unique, Rare, Legendary) doesn't matter, focus on the identifications of gear. |
| − | |||
| ⚫ | |||
| − | {{main|Identifying}} |
||
| − | Most of the weapons, armor, accessories, and crafted items have identifications (stats, IDs) that give buffs and/or debuffs. Here are some of the many possible IDs: |
||
| − | * XP Bonus = increases the amount of XP you gain from monsters or dungeons ('''NOT quests!''') |
||
| − | * Health Regen (raw/%) = increases the amount of health you regenerate every four seconds |
||
| − | * Mana Regen = regenerates additional mana every four seconds. |
||
| − | * Main Attack Damage / Spell Damage = increases raw neutral main attack/spell damage |
||
| − | * (Str./Dex./Int./Def./Agi.) = gives extra skill points to the respective element |
||
| − | * (Element) damage/defense = increases your elemental damage/defense by % |
||
| − | Stats on items are mostly beneficial but can also come at the cost of one or several other stats. For instance, the Mythic [[Warp]] gives a lot of walk speed allowing for fast movement, but it has the tradeoff of massively negative health regen. |
||
==Money & Economy== |
==Money & Economy== |
||
| Line 109: | Line 173: | ||
* [[Dungeons]] also reward emeralds. They fall from the sky upon completion. |
* [[Dungeons]] also reward emeralds. They fall from the sky upon completion. |
||
* A [[Blacksmith]] will give you emeralds depending on the item you sell to them. The amount depends on the identification price (meaning the rarer item the more emeralds). Mostly one '''does not get back the money''' they have spent on identifying the item, but you can increase the chance of turning a profit by selling lower rarity items such as Uniques. |
* A [[Blacksmith]] will give you emeralds depending on the item you sell to them. The amount depends on the identification price (meaning the rarer item the more emeralds). Mostly one '''does not get back the money''' they have spent on identifying the item, but you can increase the chance of turning a profit by selling lower rarity items such as Uniques. |
||
| − | *Emeralds can be condensed into different forms using an emerald NPC, which are found in most cities in their respective banks. 64 Emeralds can be condensed into 1 Emerald Block (EB |
+ | *Emeralds can be condensed into different forms using an emerald NPC, which are found in most cities in their respective banks. 64 Emeralds can be condensed into 1 Emerald Block (EB for short). 64 Emerald blocks can be condensed into 1 Liquified Emerald (LE for short). |
===Trading=== |
===Trading=== |
||
| Line 129: | Line 193: | ||
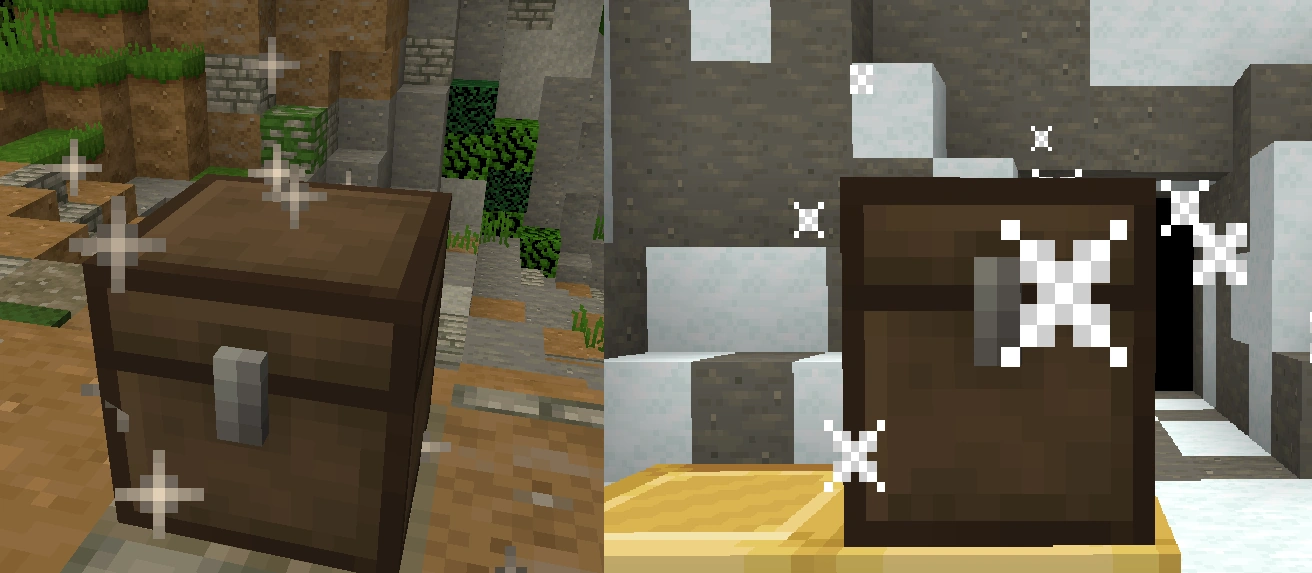
[[File:LootChest.png|200px|thumb|Content of loot chest]][[File:LootChest2.png|200px|thumb|Loot chests are marked by particles. Tier I / II (left) and III / IV (right)]] |
[[File:LootChest.png|200px|thumb|Content of loot chest]][[File:LootChest2.png|200px|thumb|Loot chests are marked by particles. Tier I / II (left) and III / IV (right)]] |
||
You will find many loot chests in the world of Wynncraft, which are distinguished from un-openable decorative chests by their particles. These chests contain gear that may help you along your journey. Take note of where you found them, as they will respawn with new loot inside after a certain amount of time. |
You will find many loot chests in the world of Wynncraft, which are distinguished from un-openable decorative chests by their particles. These chests contain gear that may help you along your journey. Take note of where you found them, as they will respawn with new loot inside after a certain amount of time. |
||
| + | Tier 3-4 chests are usually found inside caves and surrounded by mobs. They often spawn on decorative and/or different blocks, such as Gold Blocks in an Alpine area, or a raised wood platform in a Stone area. |
||
| − | If a loot chest goes unopened for a long time, the loot in it will increase in value and amount. A recently opened loot chest will only have a pitiful amount of emeralds inside. |
||
| + | |||
| + | If a loot chest goes unopened for a long time, the loot in it will increase in quality and amount. A recently opened loot chest will only have a pitiful amount of emeralds inside. However, average loot chests will contain health/stat potions, Tier 1-4 Powders, crafting ingredients and Items. Tier 1-2 chests are optimal for opening after 30min-1 hour, and tier 3-4 chests is maxed in terms of loot quality after 2-3 hours of it being unopened. The average of getting a Mythic is about 2000 tier 1-4 (Level 80+) chests opened in random lobbies with optimal Loot Quality. |
||
| + | |||
| + | The loot of these chests is affected by the mobs surrounding it or your level when you open the chest. For example, if the mobs around the chest are level 40, the items and ingredients found in the chest will range from level 36-44. The chest loot can also be altered by gear with Loot Bonus (more quantity of loot) and Loot Quality (less Unique/Rare items, more 3 star materials, etc). Mythics are only found above level 69 and are most plentiful at level 90-100. |
||
| + | |||
| + | Loot Quality is currently only obtainable from crafted Armour and Rings/Bracelets/Necklaces that have a level requirement of 100+ to craft and use (each piece of loot quality armour is about 10-20 Liquid Emeralds to craft and to purchase from Trade Market), which is why lootrunning for Mythics isn't recommended until you have the emeralds and the level to obtain such gear. |
||
| + | |||
| + | If you insist on lootrunning below level 100, some good lootruns for Powders/Rarity, etc. include Ragni and Troms/Dernel Jungle. In a good lootrunning lobby, it is possible to get about 1-2 LE per run. This figure is laughably low for lootrunning, so it is not recommended at all. |
||
==Dungeons== |
==Dungeons== |
||
| Line 171: | Line 243: | ||
* The [[Wynn Province]] is a land of humans, and the starting point of the player. It suffers from the [[Corruption]], an evil force killing the land and raising the dead. Some of the main regions are: the [[Ragni]] area, the [[Detlas]] plains, the [[Nemract]] area, the [[Desert of Almuj]], the [[Nesaak Forest]], the [[Troms]] jungle and the [[Silent Expanse]]. |
* The [[Wynn Province]] is a land of humans, and the starting point of the player. It suffers from the [[Corruption]], an evil force killing the land and raising the dead. Some of the main regions are: the [[Ragni]] area, the [[Detlas]] plains, the [[Nemract]] area, the [[Desert of Almuj]], the [[Nesaak Forest]], the [[Troms]] jungle and the [[Silent Expanse]]. |
||
* The [[Gavel Province]] is the home of villagers. It suffers from greed and the [[Decay]], which is slowly spreading and killing Gavel's nature. Some of the main regions are the [[Llevigar Plains]], the [[Light Forest]], [[Gylia Plains]], the [[Canyon of the Lost]], the [[Molten Heights]] and the [[Sky Islands]]. |
* The [[Gavel Province]] is the home of villagers. It suffers from greed and the [[Decay]], which is slowly spreading and killing Gavel's nature. Some of the main regions are the [[Llevigar Plains]], the [[Light Forest]], [[Gylia Plains]], the [[Canyon of the Lost]], the [[Molten Heights]] and the [[Sky Islands]]. |
||
| − | * The [[Corkus Province]] is inhabited by the Avos Tribe and refugees from Fruma. The Avos are bird-like people living in secluded villages and in harmony with nature. Corkians know little to no conventional magic and use their invented electromagic and advanced machines instead. The main problem plaguing the island is the mechs, rebelling against the humans that created their factory. Some of the main areas are [[Corkus City]], [[Fallen Factory]] and the [[Avos Territory]]. |
+ | * The [[Corkus Province]] is inhabited by the [[Avos]] Tribe and refugees from Fruma. The Avos are bird-like people living in secluded villages and in harmony with nature. Corkians know little to no conventional magic and use their invented electromagic and advanced machines instead. The main problem plaguing the island is the mechs, rebelling against the humans that created their factory. Some of the main areas are [[Corkus City]], [[Fallen Factory]] and the [[Avos Territory]]. |
* The [[Ocean]] is the separator between Wynn and Gavel. Some of the main islands are [[Selchar]], the [[Ice Islands]], and the [[Pirate Cove]]. |
* The [[Ocean]] is the separator between Wynn and Gavel. Some of the main islands are [[Selchar]], the [[Ice Islands]], and the [[Pirate Cove]]. |
||
* There are also regions that are currently not accessible by the Player, such as the [[Fruma Province]], the original home of the humans. |
* There are also regions that are currently not accessible by the Player, such as the [[Fruma Province]], the original home of the humans. |
||
| Line 178: | Line 250: | ||
==Frequently asked questions== |
==Frequently asked questions== |
||
| − | You can find the official F.A.Q [ |
+ | You can find the official F.A.Q [[wcforum:threads/wynncraft-frequently-asked-questions.295549/|here]]. |
* '''I am stuck and can't get out! Somebody help!''' - If you have 6 or more soul points, use /kill to respawn at a nearby town. If you reach an out-of-bounds region or go outside the map due to a bug, immediately use /kill and report the bug. Otherwise, you may be punished for bug abuse. |
* '''I am stuck and can't get out! Somebody help!''' - If you have 6 or more soul points, use /kill to respawn at a nearby town. If you reach an out-of-bounds region or go outside the map due to a bug, immediately use /kill and report the bug. Otherwise, you may be punished for bug abuse. |
||
* '''I have lost my item, can I get it back?''' - Sadly, you can't. Wynncraft has a strict no refund policy. If you believe it was due to a bug, please create a [https://forums.wynncraft.com/forums/bug-reports.134/ bug report]. |
* '''I have lost my item, can I get it back?''' - Sadly, you can't. Wynncraft has a strict no refund policy. If you believe it was due to a bug, please create a [https://forums.wynncraft.com/forums/bug-reports.134/ bug report]. |
||
| Line 190: | Line 262: | ||
==Horses== |
==Horses== |
||
{{main|Horses}} |
{{main|Horses}} |
||
| − | Horses are a quick and versatile mode of transportation. You can get one for free at level |
+ | Horses are a quick and versatile mode of transportation. You can get one for free at level 13 after completing the quest [[Stable Story]], but subsequent horses must be bought for 24EB per brown horse. Their skills are capped at a certain amount, but the higher your horse's level, the stronger and faster it is. There are 4 tiers of horses: Brown, Black, Chestnut, and White. Horses can be bred by combining two horses in your crafting window, which will result in either a better tier, the same tier, or a worse tier. White is the highest tier and capable of the highest speeds and jump heights. |
==Guilds== |
==Guilds== |
||
| Line 201: | Line 273: | ||
==Builds== |
==Builds== |
||
| + | A (class) '''build''' is the collective of active gear ([[Weapon]], [[Armour]] and [[Accessories]]) on a player's character. |
||
| − | {{Main|Builds}} |
||
| − | Builds involve choices of armor, accessories, and a weapon that usually fit a certain theme. While any combination of equipment is technically a build, most endgame builds focus on either 3 to 5 [[elements]] and some strategy. |
||
| − | There are several common playstyles and builds: |
||
| − | * Spell Spam - Focuses on low spell costs and good spell damage, with high mana regen. Common elemental tris for this playstyle are TWA, EWF, and WFA, and very rarely but sometimes ETW and TWF. |
||
| − | * Spell Steal - Focuses on high intelligence or spell cost reduction, alongside mana steal, spell damage, and often lifesteal for health sustain. Common elemental tris for this playstyle are ETW, TWF, TWA, EWA, and TFA, and barely but sometimes WFA. |
||
| − | * Heavy Melee - Focuses on stacking high damage, negative attack speed tier gear. Spells are usually only for utility. A common elemental tri for this is ETF. |
||
| − | * Tierstack - Relies on a super slow weapon while using armors and accessories with attack speed tier bonuses. Common elemental tris for this are ETF and TFA. |
||
| − | * Cancelstack - Getting high main attack damage, negative attack speed tier items and cancelling them with positive attack speed tier items. |
||
| − | * Hybrid - Aims for both high spell damage and melee damage. One elemental tri with this is EWA. |
||
| − | * Rawstack - Uses a super fast weapon and stacking as much main attack damage bonus as possible. A common elemental tri for this is EFA. |
||
| − | * Heavy Poison - Stacks as much poison as possible. It can achieve very high damage (Over 33.3k DPS, 100k/3s+ Poison, and more with items like [[Toxoplasmosis]]) with [[Powders#Specials|Courage, Curse]] and [[Skill Points|Strength]]. A common elemental tri for this is ETF. |
||
| − | * Mixed mana - Utilizes both mana regen and mana steal. |
||
| − | === Tri-Elemental Combinations === |
||
| − | * ETW: Spell steal/Spell Spam (Barely). Has the highest damage out of every other tri element, but not the greatest out of all builds, since it is ''extremely'' glassy because it lacks sustain and has no def/agi. |
||
| − | * ETF: Tends to be heavy, reaching 17,000-20,000 melee damage a hit. The main damage comes from the powder special, Quake, which is responsible for quite a bit of its damage. ETF can also be used in cancelstack, which is getting -attack speed tier, high main attack damage items and cancelling them with +attack speed tier items, or tierstack, though TFA tierstack overrides it in most cases. It is also sometimes used in heavy poison. |
||
| − | * ETA: The glass cannon version for melee, you can tierstack it but it will turn out glassy with low health and low health sustain (Life Steal and Health Regen). Generally ETF/TFA is better in tierstack, or in some cases you can go ETFA tierstack. |
||
| − | * EWF: It is a spell spam tri element with decent damage, good health, and good regen and mana sustain. |
||
| − | * EWA: Hybrid - good melee damage and spell damage along with life steal. |
||
| − | * EFA: Rawstack. This is stacking main attack damage with a super fast weapon. It is a very tanky tri element, but usually doesn't excede 17k DPS. |
||
| − | * TWF: This can be spell steal, spell spam or mixed mana. It gets a pretty good amount of damage with items like Medeis, Anima-Infused Cuirass, and Cinderchain. |
||
| − | *TWA: It is usually focused on mana regen and has a good amount of damage, but is often a bit glassy. |
||
| − | * TFA: It is a tri-element that's normally spell-steal and has a good amount of tankiness and life steal. It relies on reducing its spell costs. Usually items like Hepheasthus-Forged Sabatons, Flashing Boots, Cinderchain, and Discharge work well in it. |
||
| − | * WFA: It is a tanky type of spell spam (sometimes spell steal) with a lot of HP sustain and mana sustain, but usually doesn't achieve good damage. |
||
| − | * Rainbow (all elements): This usually uses a rainbow weapon and rainbow dmg boosters like Rainbow Sanctuary or Cumulonimbus. Skill point boosters like Libra and Blue Mask are also used, while accessories can be used for mana sustain. |
||
| − | |||
| − | Powder specials play a large role in builds, generally. Quake is very good in heavy melee, as it can deal very high damage. When it's charged, it does 415% of the damage you do in one melee hit. Chain Lightning is very good in spell steal. It is best with a super slow attack speed weapon as it is then most likely to trigger life steal and mana steal. Curse gives 210% main attack damage and 210% spell damage, but it only works on some mobs as you have to cast it on the mobs you want to use Curse on. Courage is like Curse, but it gives 150% main attack and spell damage. Unlike Curse, it buffs all damage you and your allies do and can utilize it on any mob you want to. Wind Prison provides a way to stop enemies, make them vulnerable and knock them back, but generally doesn't play as a big as a role as the other powder specials. If you want to use a powder special in a spell build, you should get a super slow speed because you can use more spells between melee hits, which you can do with the existence of items like Tenuto, Aphotic, Eyes On All, Atlas, Agave, Ataraxy, and more. If you want to charge powder specials, you have to use melee hits, and then shift and do a melee hit to trigger the powder special. Keep in mind you have to be able to attack (as in no melee cooldown there) to trigger it. |
||
==Acronyms== |
==Acronyms== |
||
| Line 236: | Line 283: | ||
* DS - [[Decrepit Sewers]] |
* DS - [[Decrepit Sewers]] |
||
*IP - [[Infested Pit]] |
*IP - [[Infested Pit]] |
||
| − | *LS - [[Lost Sanctuary]] |
||
*UC - [[Underworld Crypt]] |
*UC - [[Underworld Crypt]] |
||
| + | * TLS - [[Timelost Sanctum]] |
||
*SST - [[Sand-Swept Tomb]] |
*SST - [[Sand-Swept Tomb]] |
||
*IB - [[Ice Barrows]] |
*IB - [[Ice Barrows]] |
||
| Line 249: | Line 296: | ||
*CIB - [[Corrupted Ice Barrows]] |
*CIB - [[Corrupted Ice Barrows]] |
||
* CUR - [[Corrupted Undergrowth Ruins]] |
* CUR - [[Corrupted Undergrowth Ruins]] |
||
| + | *CGG - [[Corrupted Galleon's Graveyard]] |
||
* EO - [[Eldritch Outlook]] |
* EO - [[Eldritch Outlook]] |
||
If there is a "C" before the abbreviation, it means that it's the corrupted variant. |
If there is a "C" before the abbreviation, it means that it's the corrupted variant. |
||
| + | |||
===Builds=== |
===Builds=== |
||
* E or Str - {{Element|Earth}} |
* E or Str - {{Element|Earth}} |
||
| Line 269: | Line 318: | ||
===Other=== |
===Other=== |
||
| − | * E, EB, LE - Emerald, Emerald Block, Liquid Emerald |
+ | * E, EB, LE, Stx - Emerald, Emerald Block, Liquid Emerald, Stack of Liquid Emerald |
* FFA - Guild territories that anyone can freely attack (Not under control of a guild alliance) |
* FFA - Guild territories that anyone can freely attack (Not under control of a guild alliance) |
||
* ToL - [[Temple of the Legends]] |
* ToL - [[Temple of the Legends]] |
||
Latest revision as of 19:59, 3 April 2024
|
Outdated Content
The following page contains information about content that is outdated and has not been updated yet. You can help Wynncraft Wiki by updating it. |
Outdated Content
The following page contains information about content that is outdated and has not been updated yet. You can help Wynncraft Wiki by updating it.
This is a page for a general introduction to Wynncraft and its mechanics. You can find out more about individual mechanics on their respective pages.
Introduction to Wynncraft
Wynncraft is a magical fantasy land created by CraftedMovie. It is filled with many wonders and things to discover. As you journey you will find everything from harmless animals to dangerous and very powerful foes. Please read the Rules before playing on the server and follow them. The game world is operated and moderated by the Wynncraft Staff.
You, as the player, are a soldier sent to Wynn to help fight the corruption. You start the game near the border of the Wynn province. In the first quest, King's Recruit, you have to reach the Ragni Castle. After finishing the tutorial you are free to explore the world however you desire.
This guide entails many of the basic mechanics of Wynncraft. For more info on each one, see their individual pages.
First thing you want to do is stop using this wiki and go on over to https://wynncraft.wiki.gg/wiki/Wynncraft_Wiki which is the official and better wiki to use
Joining the Server
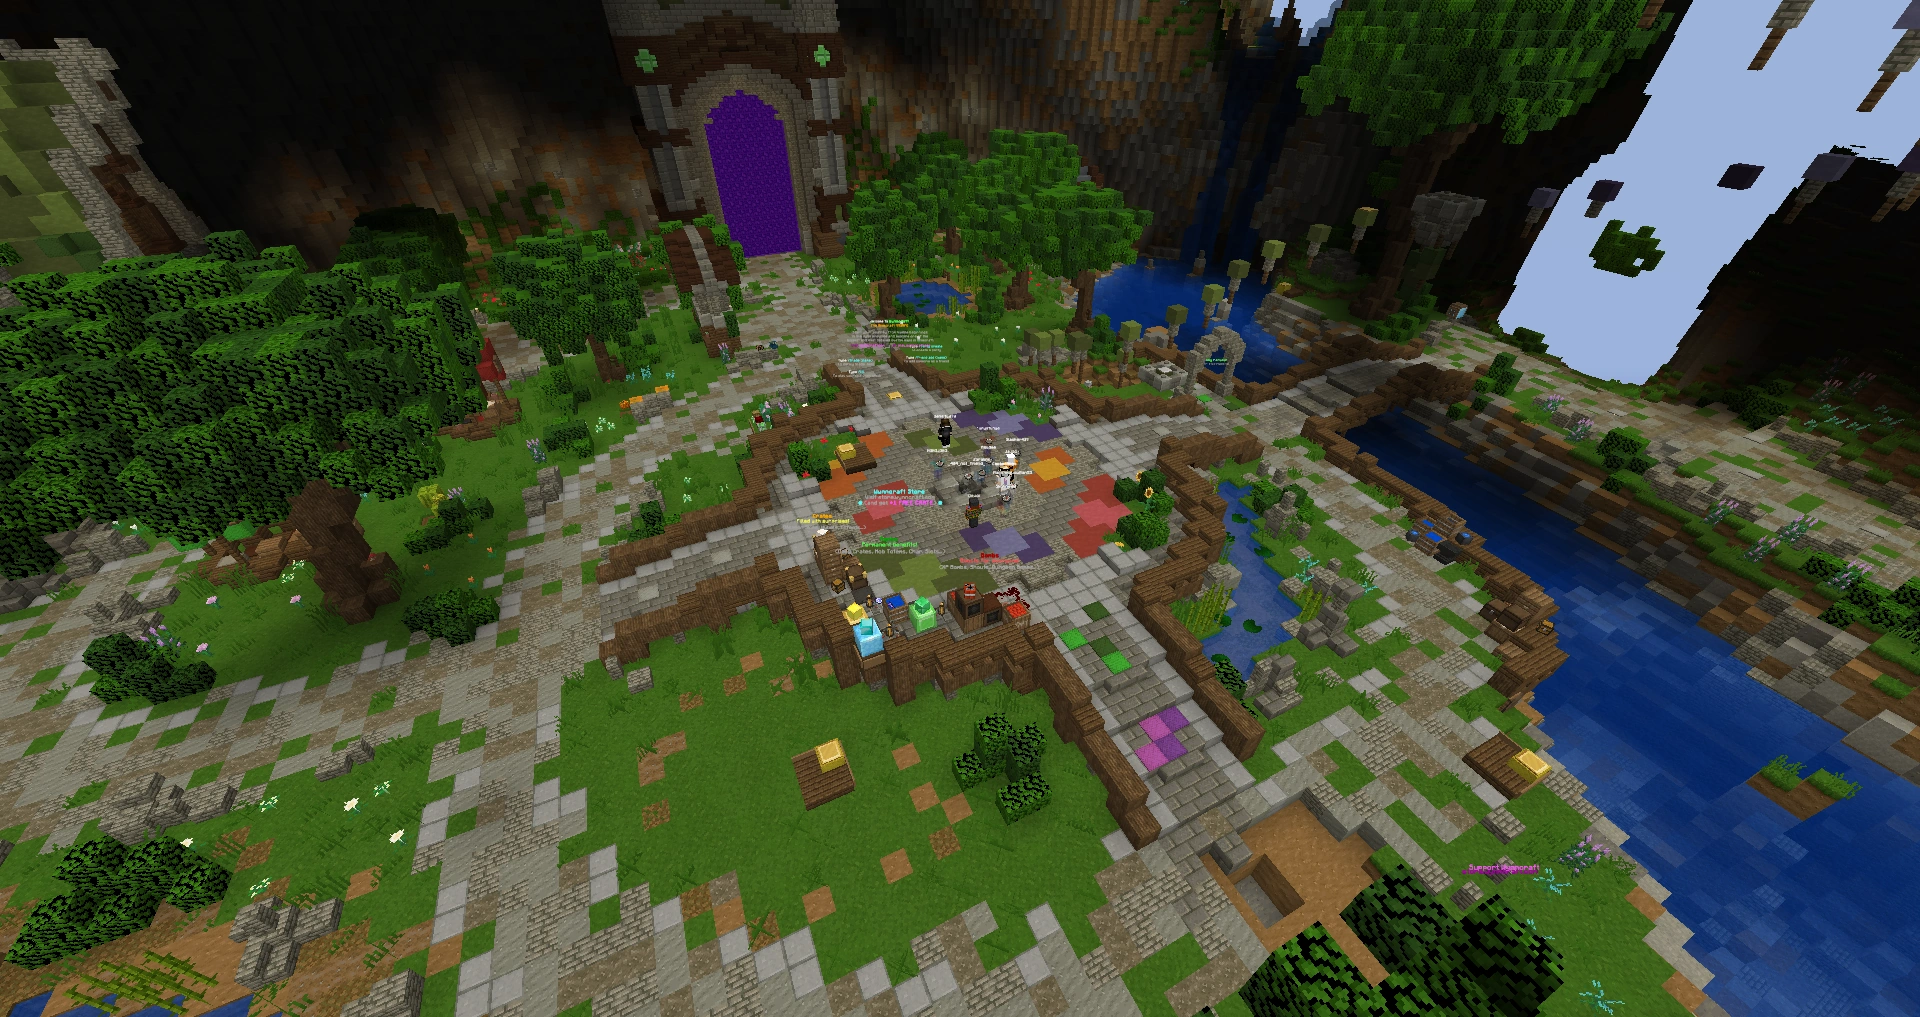

Wynncraft's lobby
You can join the server from multiple IPs:
play.wynncraft.com- sends you to US servers (WC).lobby.wynncraft.com- sends you to the lobby.
When you join a world, the official resource pack will automatically start downloading. It is possible to play without it, but it is not recommended. If you have trouble downloading the resource pack, follow the steps on this thread.
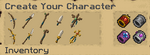
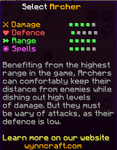
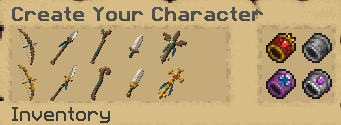
After this, you will see the class selection screen. Click the green plus button. The icons in the upper row are the regular, non-donor classes. From left to right, these are Archer, Warrior, Mage, Assassin, and Shaman. Choose one and you will be sent right into the game. If you already have started a class, click on its icon and play. You can skip this step using the command /toggle autojoin so the game will automatically choose the class you last selected. To undo this, enter the command again.

Class selection menu. Players without a rank have 6 slots, those with VIP have 9, VIP+ has 11, and HERO 14.
Character creation menu.
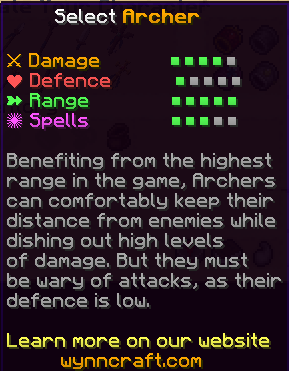
Class information of Archer.
Classes
Each class has different weapons, spells, and base stats. Wynncraft offers five main classes: Mage, Warrior, Archer, Assassin, and Shaman. Donors unlock reskinned classes, which have different visual effects: the Dark Wizard, Knight, Hunter, Ninja and Skyseer.
- Mage: Uses Wands to cast powerful spells. It can use Meteors which deal a decent amount of damage each, but has a slow spell attack speed (Around 1 Meteor a second past level 36, 3 seconds before). Mage is considered a lacking class before unlocking the Meteor spell. However, due to its Heal spell, Mage's survivability is far and beyond almost all other classes apart from Shaman. Due to its power and how easy it is to play, it is considered the "noob" or "beginner" class.
- Warrior: A tank class with the highest defense modifier. However keep in mind it has no healing spell, unlike Mages and Shamans. Their Spell DPS is decent, though nothing special, and is focused around dispersing crowds with large knockback, AoE attacks, basically the opposite of Shaman. Their playstyle is similar to Assassin. Their weapons are Spears. However, a popular way of playing Warrior is Tierstack, where you stack 6+ Bonus Attack Speed Tiers on a Super Slow weapon. Thanks to how tanky Warrior is, players can stay close to the enemy, dealing massive DPS while taking minimal damage.
- Archer: A ranged class that uses Bows. The Archer excels at long range and has amazing damage, which compensates for its low base defense. Its Spell DPS is one of the highest alongside Assassin, and once unlocking the Escape upgrade, it has the fastest average movement speed out of all classes. Furthermore, its Mythic weapons and Major IDs are among the most powerful in the game. Almost all of its spells deal large knockback.
- Assassin: Uses Daggers and is a class focused on dealing burst damage. Although it has to get very close to enemies, it can deal incredible damage alongside Archer. It is a good class for immobilizing and blinding enemies, unless there's Crowd Control Immunity (CCI) which is explained below. It is also an excellent class to learn how to spell cycle as all of its spells are viable for combat. Due to its strengths, Assassin often easily breezes through bosses but is hard to level up without running many Dungeons.
- Shaman: A Relik-wielding class. It lacks defense similarly to the Archer, but makes up for it with healing from its totem. Its Aura spell can completely incapacitate mobs if it's spammed enough. Due to its specialization in AoE attacks, Shaman is the best class for speed-levelling and crowd control. However, its lack of defense makes it difficult to solo bosses or dungeons. Shaman also does not have spells that can be casted in a cycle, instead relying on Aura and many basic attacks to kill most tanky enemies.
Multiple classes
Players may have different classes, each with different progress. They may switch between them using /class command. Each class is completely separate from the rest except Bank, Trade Market and guild, rank and friends.
Compass (Not the 7th slot)
Between your health and mana, and between the coordinates between those, there is a letter. This letter indicates which way you are facing. N = North, E = East, and so on. This can be very useful for questing, since NPCs will sometimes say directions relative to the compass.
Experience Points
Experience points are gained by a number of things, including Dungeon completions, killing mobs, doing quests/mini-quests, doing Discoveries/Secret Discoveries, Raids, and opening the Forgery chest after running a selective amount of Corrupted Dungeons Progression from one level to the next is indicated by the green bar above the hotbar. After a certain amount of experience is acquired, your character will level up, and you will receive a chat message about what you have unlocked (e.g. a quest or spell upgrade).
When you kill a mob, the number of experience points awarded is indicated above the slain mob. Killing mobs closer to your level will award more experience points as opposed to mobs with different levels than what level you are.
the EXP you get from quests/mini-quests is unaffected by XP bonus found on certain items and XP potions/crafted consumables.
Gear with the XP Bonus identification can increase the amount of XP you receive. It can prove to be useful when you run out of quests and need to level up, which makes it wise to keep gear with XP bonus if you find them. An example of XP bonus gear is Adventurer's Set, which has a 50% XP bonus in its set bonus, making it a very good set to level up classes with.
Identifications
Skill Points
On certain gear, you'll sometimes see certain Skill Point bonuses. How they change your build is listed below.
- Strength: Changes your amount of Strength.
- Dexterity: Changes your amount of Dexterity.
- Intelligence: Changes your amount of Intelligence.
- Defense: Changes your amount of Defense.
- Agility: Changes your amount of Agility.
Other Identifications.
Keep in mind the Identifications here do not include the identifications from Crafted Items.
- Health: It sometimes shows on pieces of gear on the Identifications side (below where you would see the requirements for using gear), it is basically just additional Health and is there since the rolls can vary when you identify it.
- Health Regen %: It multiplies Raw Health Regen/Natural Health Regen by the Health Regen % you have. Having below -100% Health Regen does not flip negative raw health regen, and having 100% or above Health Regen % nullifies all -Health Regen.
- Health Regen Raw: It changes your health regeneration by a raw amount and is affected by Health Regen %.
- Walk Speed: Multiplies your speed by the percentage of Walk Speed you have.
- Mana Regen: Gives a certain amount of mana every 4 seconds based on the Mana Regen you have.
- Mana Steal: It is an ID that has a chance to trigger on melee hits. The chance of getting mana per hit depends on your attack speed.
- XP Bonus: Changes the XP you get from mobs/dungeons. It gives a percentage of the original XP you'd get from mobs added onto the XP you already get from mobs.
- Loot Bonus: Increases the amount of loot you can get from chests and mobs.
- Stealing: Gives a chance to get emeralds from mobs, and is affected by attack speeds.
- Poison: It triggers upon hitting a mob, and spreads for 3 seconds and stops giving poison unless you hit again.
- Attack Speed Bonus: It changes the attack speed of your weapon.
- Reflection: Gives a chance for giving back damage when a player is hit by a spell. The chance of reflection triggering is equivalent to the amount of reflection you have.
- Thorns: The same thing as Reflection but it applies for Melee hits.
- Exploding: Gives mobs a chance to explode on death. Other mobs hit by the explosion take what would be the damage of one melee hit.
- -Spell Cost Raw: It reduces your spell costs by a raw amount. For example, if you have a 4 mana cost spell, and used an item with -1 cost in that spell, the spell would then cost 3 mana.
- -Spell Cost %: It reduces your spell costs but with a percentage. You can use this to calculate how much less your spells cost with -spell cost %.
- Sprint: It changes the duration of your sprint bar.
- Sprint Regen: It changes how fast you can regenerate your Sprint Bar.
- Jump Height: Increases the amount you can jump. It is like the Jump Boost effect in Minecraft Singleplayer.
- Elemental Defense: The same thing as Health Regen % except it applies to Elemental Defenses.
Skill Points and Elements

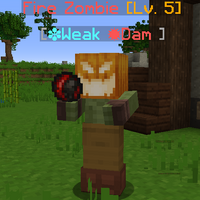
This mob has a weakness to water and deals fire damage, meaning water damage will be more effective on it. Your fire defense can affect its damage.
Skill Points are earned when you level up. Your player will acquire 2 points per level.
NOTE: Most armour, weapons, and accessories require skill points assigned to one or more elements in order to be used.
Skill Points can be spent on these perks:
- Strength increases the amount of damage the player deals and increases your ✤ Earth damage.
- Dexterity increases the player's chance to do +100% base damage (not actually double) on a hit and increases your ✦ Thunder damage.
- Intelligence reduces the cost of spells and increases your ✽ Water damage.
- Defense reduces the damage the player takes and increases your ✹ Fire damage.
- Agility increases the player's chance to dodge an attack and increases your ❋ Air damage.
Mobs can also have elemental stats:
- Damage - mobs with this stat will deal damage of the respective element.
- Defense - mobs with this stat will receive less damage from attacks of the respective element.
- Weakness - mobs with this stat will receive more damage from attacks with the respective element.
Strength and Dexterity give damage based on the base damage of your weapon. To calculate the base damage on weapon, you have to multiply the damage on it multiplied by how many times you can use a melee hit. You can use this to find out how many times you can use a melee hit with the attack speed of your weapon. Strength in the compass will say it gives % more damage, but it scales from the base, so the additional damage is a percent (listed in compass) of the base damage of your weapon. To calculate additional damage in one melee hit, you should do the base damage divided by the amount of melee hits posssible and with the result multiplied with the percentage of the additional damage shown in compass. For example, with a Super Slow 300 Base damage weapon and 68 Strength, the additional damage since Strength has 50% more damage (additive, like what'd you see on armor) would be (300 / 0.51) * 50%, which would be 300 more damage per hit with those stats. If you were to use the weapon and use a 250% spell multiplier (check the Wikis' of each Class if you don't know what it is), the base damage of that spell would be 750, and with 68 Strength you would have an addition 750 * 50% damage in that spell, or 325 more damage in that 250% spell multiplier spell.
Dexterity adds 100% Spell Damage, or 100% Melee damage if you are going Melee. The extra Spell and Melee damage are like what'd you would see on armor. and Dexterity is also scaled from the base. If Dexterity were to trigger in 1 melee hit, the damage it would bring is the base damage of your weapon divided by the amount of melee hits a second. For example, having a Super Slow weapon with 300 base and having Dexterity trigger on a melee hit would give 300 / 0.51 more damage to the melee hit, giving approximately 600 more damage on that melee hit. In Spell, the base damage of your weapon is multiplied by the Spell Multiplier, and than scaled by Dexterity. If you used a Spell with a 250% Spell Damage Multiplier with 300 base, you would have a 750 base in that Spell. Dexterity triggering in that spell will give an extra 750 damage.
Intelligence reduces your spell costs. If you had a 6 mana arrow storm and have 29 intelligence, you have 5 arrow mana storms, and 1 reduced mana cost on bomb. If you want to see how much spell costs are reducted by a certain amount of int, you can see this Mana table. For example, having 68 Intelligence halvens all spell costs costing an even number with no Intelligence or Spell Cost items.
Defense/Agility increase your effective HP, and depending how much you spend into them, you can be a lot tankier.
If you want to see how much tankier you are, you can use Wynnbuilder and it'll show your EHP (EHP stands for Effective HP, which is your health factoring in Defense (and sometimes Agility) skill points or you can follow the formula below.
Health / 1 - (Percentage of damage absorbed by Defense) / Percentage of extra Damage taken from mobs relative to a 100% Base Defense (Or multiplied by the percentage of damage absorbed from mobs). If you want to factor in Agility, you can do Health / 1 - (Percentage of damage absorbed by defense) / 1 - (Percentage of damage absorbed by Agility) / Percentage of extra Damage taken from mobs relative to a 100% Base Defense. For an example, if you are a Shaman, with 4500 HP and 68 Defense, as 68 Defense has a 50% damage reduction, and Shaman takes 1.5 times the damage from mobs, so the formula would be 4500 / 0.5 / 1.5, would would be 6,000 EHP.
Base defenses for each class. It is going by relative to Assassin since Assassin has a 100% Base Defense. This doesn't include Assassin since this is relative to Assassin.
- Shaman - 50% more damage from mobs compared to Assassin
- Archer - 40% more damage from mobs compared to Assassin
- Mage - 20% more damage from mobs compared to Assassin
- Warrior - 20% less damage from mobs compared to Assassin
The base defenses are like additional damage for how far it is from 100% base defense. It is like since 60% Base Defense is 40% short from 100% base defense, so a class with 60% Base Defense (Archer) takes 40% more damage.
When you are levelling a character, it is recommended you first fill out your gear skill point requirements, and put remaining skill point into intelligence and defense after level 29 (Before 29, remaining skill points into Defense). You should put 50% of your remaining skill points into intelligence and defense. If you see you have a useful intelligence threshold 10 skill points away after seeing how much intelligence you have after adding up your current intelligence points with 50% of your remaining sp, then you should get to that threshold and put skill points into defense. You can look at this table for the intelligence thresholds. It is also recommended to stay away from items with a Strength or/and Dexterity requirement when levelling up. You can use Strength or Dexterity requiring items if they're really good and worth using for a Strength/Dexterity/Strength and Dexterity requirement.
It is also not recommended to put tier 4 or higher powders on a weapon before around level 60 since you can change gear fairly quickly. Putting powders like Tier 3 or lower can work however if you want to use some spare powders. You shouldn't powder armor too for the same reason. The change in elemental defense too is barely noticeable by most people for armors.
Quests
Quests are tasks that you can do in order to get XP and Emeralds. The contents of a quest may vary from simply collecting materials to traveling through time or finding ruins of ancient civilizations. Quests range in difficulty and duration, with the greater challenges giving a greater reward. Some, but not many quests may require teamwork (This is not limited to ???, other quests with hard combat challenges like The Qira Hive (Quest) and Tower of Ascension (Quest) can make a player request for teamwork) to complete the quest, and some require you to think outside the box. Some quests also give access to different areas, dungeons, fast travel points, or merchants. Additionally to the monetary and experience reward, you may also get powerful gear. Some examples of powerful gear are the Grookwarts accessories from The Order of the Grook, the Ornate Shadow items from A Hunter's Calling. It can also save you time from looting chests, running Boss Altars, or running Dungeons, or killing mobs, since you won't have to try to fill for the specific gear slot. Quests past level 80 generally give over 1 LE, and quests below level 80 can also give good money and XP relative to their level.
NOTE: It is recommended to complete most (if not all) quests you come across on your first playthrough to fully understand the lore, and get good money, and if you know how to do quests fast, levelling can be sometimes faster then grinding, especially between levels 80-100. It is also more enjoyable then grinding.
Items
Wynncraft has an official resource pack, which is required to be able to view the different weapon models. The game has over 4500 different items, allowing for a broad spectrum of playstyles.
Item types
Wynncraft has many different types of items:
- Weapons, Armor, Accessories. There are six rarities of these (from least rare to rarest): normal, unique, rare, legendary, fabled and mythic. Additionally, there are also Set Items, which increase their stats depending on how many pieces of the set you're wearing.
- Crafting materials and ingredients used in crafting.
- Usable items - horses, potions, scrolls and dungeon keys.
- Other items, such as powders, quest items, runes, etc.
Obtaining Items
In the world of Wynncraft, blocks are unable to be broken. An exception is flowerpots, which have a chance to drop emeralds (and a low chance to drop items). The majority of the blocks you see will be decorative. Items can be obtained in the following ways:
- Killing mobs
- Trading with Merchants
- Loot Chests
- Completing Quests
- Item spawning areas (Like the Seavale Reef)
- Trading with other players
- Crafting at a crafting station
Keep in mind rarity (Unique, Rare, Legendary) doesn't matter, focus on the identifications of gear.
Money & Economy
Wynncraft's primary currency is Emeralds, a green gem that you will encounter many a time as you adventure through the world.
Emeralds
- Most of the Quests reward emeralds. The reward depends on the level and length of the quest. Sometimes, instead of emeralds, you get valuable items that you might be able to trade.
- Most mobs drop emeralds.
- You can find emeralds in Loot Chests. Those spawn on fixed locations, usually few minutes after being claimed (with nearly no loot).
- Dungeons also reward emeralds. They fall from the sky upon completion.
- A Blacksmith will give you emeralds depending on the item you sell to them. The amount depends on the identification price (meaning the rarer item the more emeralds). Mostly one does not get back the money they have spent on identifying the item, but you can increase the chance of turning a profit by selling lower rarity items such as Uniques.
- Emeralds can be condensed into different forms using an emerald NPC, which are found in most cities in their respective banks. 64 Emeralds can be condensed into 1 Emerald Block (EB for short). 64 Emerald blocks can be condensed into 1 Liquified Emerald (LE for short).
Trading
You can trade your items with other players. To ask for a trade, either use the command /trade [playername] or shift+right-click on the player one wishes to trade with. Be careful not to get scammed.
To accept a trade, both of the players need to click the checkmark twice.
Merchants
Merchants are NPCs marked with a magenta name that after right-click opens a GUI for trading. Most merchants trade for emeralds, although some use a different currency. In Rymek, for instance, merchants will only accept Gold Bars as currency. They can be found in almost every city or town. You can buy almost anything from basic gear and Accessories to scrolls, potions or even potatoes.
Trade Market
You can use the in-game trade market, located in most major cities, in order to easily get items without having to search for them or look on the Forums or Discord server. Note: It is recommended to check the regular price of an item (especially higher-level and rarer items) before deciding to buy it.
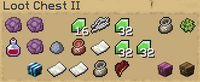
Loot Chests

Content of loot chest

Loot chests are marked by particles. Tier I / II (left) and III / IV (right)
You will find many loot chests in the world of Wynncraft, which are distinguished from un-openable decorative chests by their particles. These chests contain gear that may help you along your journey. Take note of where you found them, as they will respawn with new loot inside after a certain amount of time. Tier 3-4 chests are usually found inside caves and surrounded by mobs. They often spawn on decorative and/or different blocks, such as Gold Blocks in an Alpine area, or a raised wood platform in a Stone area.
If a loot chest goes unopened for a long time, the loot in it will increase in quality and amount. A recently opened loot chest will only have a pitiful amount of emeralds inside. However, average loot chests will contain health/stat potions, Tier 1-4 Powders, crafting ingredients and Items. Tier 1-2 chests are optimal for opening after 30min-1 hour, and tier 3-4 chests is maxed in terms of loot quality after 2-3 hours of it being unopened. The average of getting a Mythic is about 2000 tier 1-4 (Level 80+) chests opened in random lobbies with optimal Loot Quality.
The loot of these chests is affected by the mobs surrounding it or your level when you open the chest. For example, if the mobs around the chest are level 40, the items and ingredients found in the chest will range from level 36-44. The chest loot can also be altered by gear with Loot Bonus (more quantity of loot) and Loot Quality (less Unique/Rare items, more 3 star materials, etc). Mythics are only found above level 69 and are most plentiful at level 90-100.
Loot Quality is currently only obtainable from crafted Armour and Rings/Bracelets/Necklaces that have a level requirement of 100+ to craft and use (each piece of loot quality armour is about 10-20 Liquid Emeralds to craft and to purchase from Trade Market), which is why lootrunning for Mythics isn't recommended until you have the emeralds and the level to obtain such gear.
If you insist on lootrunning below level 100, some good lootruns for Powders/Rarity, etc. include Ragni and Troms/Dernel Jungle. In a good lootrunning lobby, it is possible to get about 1-2 LE per run. This figure is laughably low for lootrunning, so it is not recommended at all.
Dungeons
Individual Dungeons are unlocked by completing their dungeon quests. To enter a dungeon, you will need a Dungeon Key dropped by their respective Key Guardian.
Dungeons often contain a mixture of combat and parkour. The player must make their way through several stages before being able to defeat the dungeon boss. Dungeons are often more challenging than the usual cave or quest, so the player should come well-prepared. Dungeon rewards include one boss drop and three dungeon fragments. Both are used to buy items from Dungeon Merchants. They also give the player a significant amount of EXP and some Emeralds upon completion.
Most dungeons also have higher-level corrupted variants, which can be found in The Forgery.
Soul Points (Death)
Upon death, you will lose two Soul Points and a few items. The lower the number of Soul Points you have, the higher the chance to drop more valuable items.
If you are under 6 Soul Points, it is highly recommended to wait for more Soul Points or you may lose items on death. Unless your gear is fully untradeable or made of Mythic Items, there is a chance your gear will be lost on death. Also, make sure your emeralds are in your bank, as those can be dropped too. Avoid combat when under 6 Soul Points.
You also lose one Soul Point after using a teleport scroll and two soul points by resetting your skill points. Skill points can also be reset for no soul point cost using Skill Reset Scrolls. One Soul Point is gained at every in-game sunrise, which occur every 20 minutes. You can also wait offline to regenerate soul points at the rate of one Soul Point per hour.
The soul point regen ID gives you a chance to get two soul points instead of one each day.
Commands
Three especially useful and most used commands are:
/kill- kills you at the cost of two Soul Points. It is recommended to use it when stuck. If you have less than 6 soul points, wait before killing yourself to avoid loss of items./hubor/lobby- returns you to the main lobby server. Can be useful to avoid the timeout period when you stay on a server as it reboots, or to find a server with less lag. You can find how much lag is on the world by looking under the number of players. If the world is red it can mean that it is either full or very laggy./class- brings you to the class selection screen./toggle- allows you to toggle a variety of in-game settings, such as blood, swearing, autojoin, the scoreboard, and hitsounds.
Other
This information isn't strictly necessary to play the game, but it's good to know nonetheless.
Lore / Story
The game contains a lot of lore found in Quests, Discoveries, and other sources. By playing through the game, you can find out more about Wynncraft.
Click here to read the current timeline of Wynncraft. The full storyline was written by Grian (admin and head builder for Wynncraft) and is expanded upon each update. The Lore category contains a list of articles pertaining to the lore of the game.
World
The world of Wynncraft is separated into four main provinces:
- The Wynn Province is a land of humans, and the starting point of the player. It suffers from the Corruption, an evil force killing the land and raising the dead. Some of the main regions are: the Ragni area, the Detlas plains, the Nemract area, the Desert of Almuj, the Nesaak Forest, the Troms jungle and the Silent Expanse.
- The Gavel Province is the home of villagers. It suffers from greed and the Decay, which is slowly spreading and killing Gavel's nature. Some of the main regions are the Llevigar Plains, the Light Forest, Gylia Plains, the Canyon of the Lost, the Molten Heights and the Sky Islands.
- The Corkus Province is inhabited by the Avos Tribe and refugees from Fruma. The Avos are bird-like people living in secluded villages and in harmony with nature. Corkians know little to no conventional magic and use their invented electromagic and advanced machines instead. The main problem plaguing the island is the mechs, rebelling against the humans that created their factory. Some of the main areas are Corkus City, Fallen Factory and the Avos Territory.
- The Ocean is the separator between Wynn and Gavel. Some of the main islands are Selchar, the Ice Islands, and the Pirate Cove.
- There are also regions that are currently not accessible by the Player, such as the Fruma Province, the original home of the humans.
There is also the Realm of Light and the Dark realm Dern.
Frequently asked questions
You can find the official F.A.Q here.
- I am stuck and can't get out! Somebody help! - If you have 6 or more soul points, use /kill to respawn at a nearby town. If you reach an out-of-bounds region or go outside the map due to a bug, immediately use /kill and report the bug. Otherwise, you may be punished for bug abuse.
- I have lost my item, can I get it back? - Sadly, you can't. Wynncraft has a strict no refund policy. If you believe it was due to a bug, please create a bug report.
- What is the best Minecraft version to play on? - 1.12.2 is currently the most stable version.
- Am I allowed to play with mods? You can use map mods as long as you turn off entity and cave radar. Performance mods are also permitted if they don't change vanilla behavior. There is also the Wynntils mod that provides a lot of QoL features. This mod is a legal one, and you will not get banned for the reason of using it.
- Where can I find a list of all items? - You can use Wynndata. It also provides things like an item crafter, a build maker, and a 2D map of the game world.
Map
The Wynncraft webpage has a semi-3D map of the overworld. Make sure to use it as some quests may be difficult without this. At the top right, you can choose which markers to show. There is a wide variety of markers, including merchants, the Portal, dungeons, etc. The map itself is accessible by going to the main website and scrolling down to the "Help" section, and then press the "Map" button. Or you can simply follow this link. There is also an unofficial 2D map on Wynndata.
Horses
Horses are a quick and versatile mode of transportation. You can get one for free at level 13 after completing the quest Stable Story, but subsequent horses must be bought for 24EB per brown horse. Their skills are capped at a certain amount, but the higher your horse's level, the stronger and faster it is. There are 4 tiers of horses: Brown, Black, Chestnut, and White. Horses can be bred by combining two horses in your crafting window, which will result in either a better tier, the same tier, or a worse tier. White is the highest tier and capable of the highest speeds and jump heights.
Guilds
Guilds are player-made groups that can be registered at the Guild Hall, each with their own name, banner, and hierarchy. A guild's goal might be to take over as many Territories as possible, or to simply help any newcomers with the game, it's up to them! Guilds can claim territories to gain resources and guild XP. Claimed territories can be attacked and defended by guilds in Guild Wars.
Crafting
Crafting is a way of creating your own items. It is not necessary in Wynncraft, since there are plenty of other sources of items that require less work. To craft, you will need several resources. There are four gathering professions: Woodcutting, Mining, Fishing and Farming, each with their own unique Crafting Materials. Combining the materials in different ways at different Crafting Stations gives you different items. The eight crafting professions are Weaponsmithing, Woodworking, Armouring, Tailoring, Jeweling, Alchemism, Scribing and Cooking.
Builds
A (class) build is the collective of active gear (Weapon, Armour and Accessories) on a player's character.
Acronyms
These abbreviations are commonly used ones:
Dungeons
- DS - Decrepit Sewers
- IP - Infested Pit
- UC - Underworld Crypt
- TLS - Timelost Sanctum
- SST - Sand-Swept Tomb
- IB - Ice Barrows
- UR - Undergrowth Ruins
- GG - Galleon's Graveyard
- CDS - Corrupted Decrepit Sewers
- CIP - Corrupted Infested Pit
- CLS - Corrupted Lost Sanctuary
- CUC - Corrupted Underworld Crypt
- CSST - Corrupted Sand-Swept Tomb
- CIB - Corrupted Ice Barrows
- CUR - Corrupted Undergrowth Ruins
- CGG - Corrupted Galleon's Graveyard
- EO - Eldritch Outlook
If there is a "C" before the abbreviation, it means that it's the corrupted variant.
Builds
- E or Str - ✤ Earth
- T or Dex - ✦ Thunder
- W or Int - ✽ Water
- F or Def - ✹ Fire
- A or Agi - ❋ Air
Combinations like TWA, ETW, ETA represent builds focused on these elements. For example, TWA means a build focused on ✦ Thunder, ✽ Water, ❋ Air.
Raids
NotG/NoG - Nest of the Grootslangs
NoL/ONoL/ONL - Orphion's Nexus of Light
TCC - The Canyon Colossus
Other
- E, EB, LE, Stx - Emerald, Emerald Block, Liquid Emerald, Stack of Liquid Emerald
- FFA - Guild territories that anyone can freely attack (Not under control of a guild alliance)
- ToL - Temple of the Legends
- ToA - Tower of Ascension
- CoW - Corrupter of Worlds
- RoL - The Realm Of Light