| This page contains spoilers. Readers are discouraged from continuing if they want to discover features by themselves. |
This page contains spoilers. Readers are discouraged from continuing if they want to discover features by themselves.
This article is about the quest called ???. For the NPC, see ??? (A Hunter's Calling).
| ??? | |
| Quest Info | |
|---|---|
| Length | Long |
| Difficulty | Hard |
| Location | Gavel |
| Province | Gavel |
| Combat Level | 80 |
| Starter NPC | ??? |
| Reward | As follows:
|
??? is a long level 80 quest revolving around the Meteors. However unlike other quests, this one does not have instructions for each stage - instead, you are supposed to look around and try to figure out what to do based on clues around the world.
Segment 1 - Starting the Quest - "The Meteors"[]
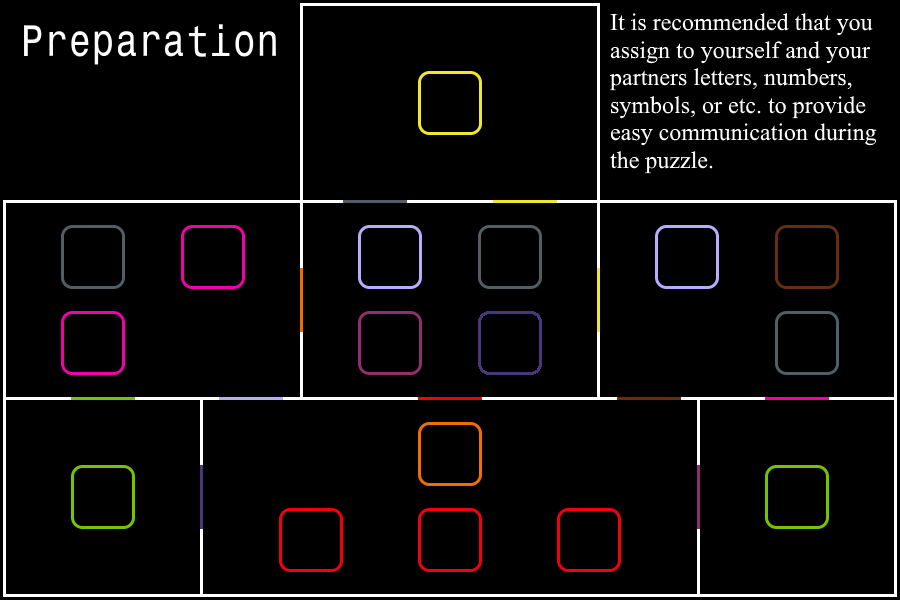
This section requires three players in total.
To begin the ??? quest, three players must travel to the Red, Blue, and Yellow meteors and stand on the pressure plates within at the same time. This will teleport all players currently standing on the pressure plates to the "Computer Room", which contains the NPC that begins the quest. (Additional players can ride the teleport by standing on the pressure plate as well).
Blue Meteor[]
| Location |
| Aldorei Valley Outskirts -754, 102, -4416 |
| Wynncraft Map |
Spoiler alert: The hidden text contains spoilers relating to Hay Bales Puzzle.
|
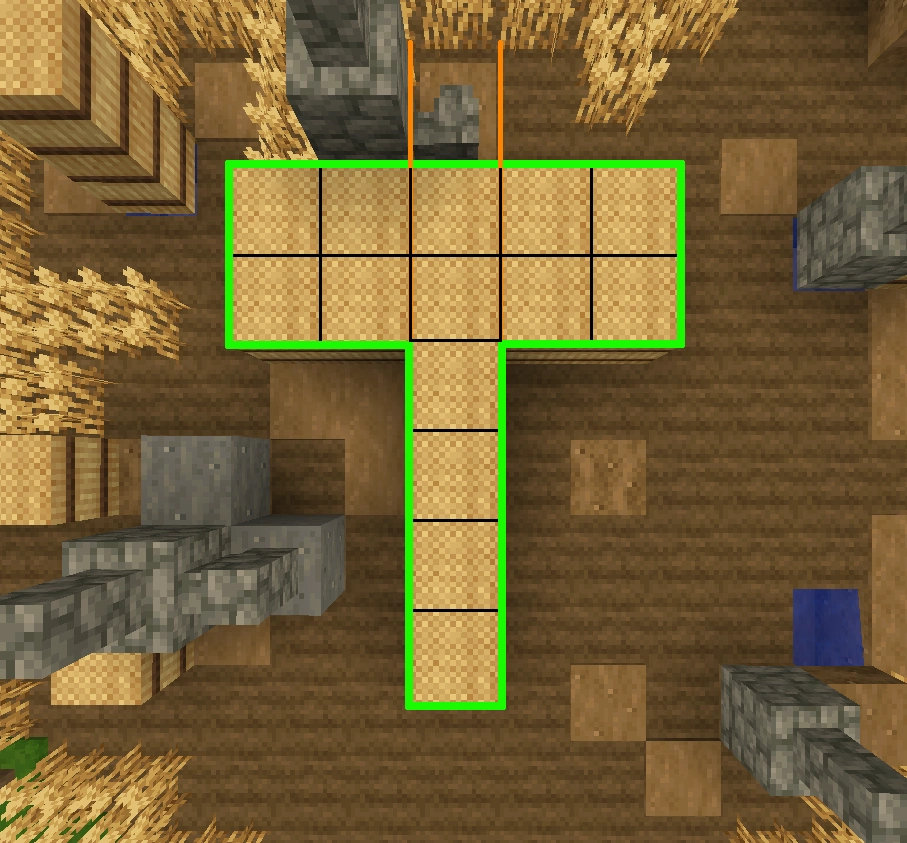
The objective of this puzzle is to orient the hay bales in the field into the correct shape. Begin by killing the "Crazy Elf Farmer" that spawns in the vicinity to obtain the item "Hay Sickle". When the Hay Sickle is held in the main hand, the player will be able to push the hay bales in the field.
Push the hay bales into a T-shape outlined by the podzol blocks on the ground. The upper line of the "T" should be two blocks thick.
After the final hay bale is pushed into place, the puzzle will reset with a puff of smoke. Beginning at the tree, a series of floating platforms will appear (visible by the clouds of red dust on each one). Stepping on the base of the tree will give the player a jump boost effect- use this to reach each platform. Note that the platforms are timed and all of them will disappear at the same time after a while. The platforms will lead up and into the waterfall. When the player reaches the final platform, a 3x3 wall behind the waterfall will break and reveal the next area.
|

Spoiler alert: The hidden text contains spoilers relating to Memory Puzzle.
|
The objective of this puzzle is the correctly recreate each layout of the panel on the ground for a total of five rounds. Begin the puzzle by pressing the button on top of the emerald block in the ground. This will create a 5x5 panel on the floor. The puzzle will consist of five rounds. Each round will overlay the panel with colored blocks depending on the current round (which goes in the order of green, yellow, orange, red, and pink). After the display is shown for a few seconds, the panel will be covered in buttons. Pressing a button will change the block below to a colored block, or change the block back to its original state. After editing the panel to match what was shown previously, press the wooden button off to the side labelled "Submit". If the panel is incorrect, it will reset to the beginning with a metal clang. If the panel is correct, it will play a level-up jingle and either move on to the next round or (after five rounds have been completed) display green particles and spawn two bridges above the puzzle, which can be reached by climbing the leaves on the wall.
|
Spoiler alert: The hidden text contains spoilers relating to Activating the Teleporter.
|
The objective of this puzzle is to locate the Blue Wire Piece that spawns within the room, throw the item into the frayed wire near the center of the room, and activate the teleporter. There is an opening in the wall lies at the upper left of the room. Simply follow the path from the opening of the wall until a metal cell is reached- blue wool named "Blue Wire Piece" will spawn within. Collect at least one, then return to the main room by pressing the button on the wall across the cell. Throw one Blue Wire Piece into the bottom of a frayed wire segment to the right of the teleportation chamber and it will repair itself. After a few moments, the teleporter will activate and teleport all players inside on top of the Blue Meteor.
Notes:
|
Spoiler alert: The hidden text contains spoilers relating to Entering the Meteor.
|
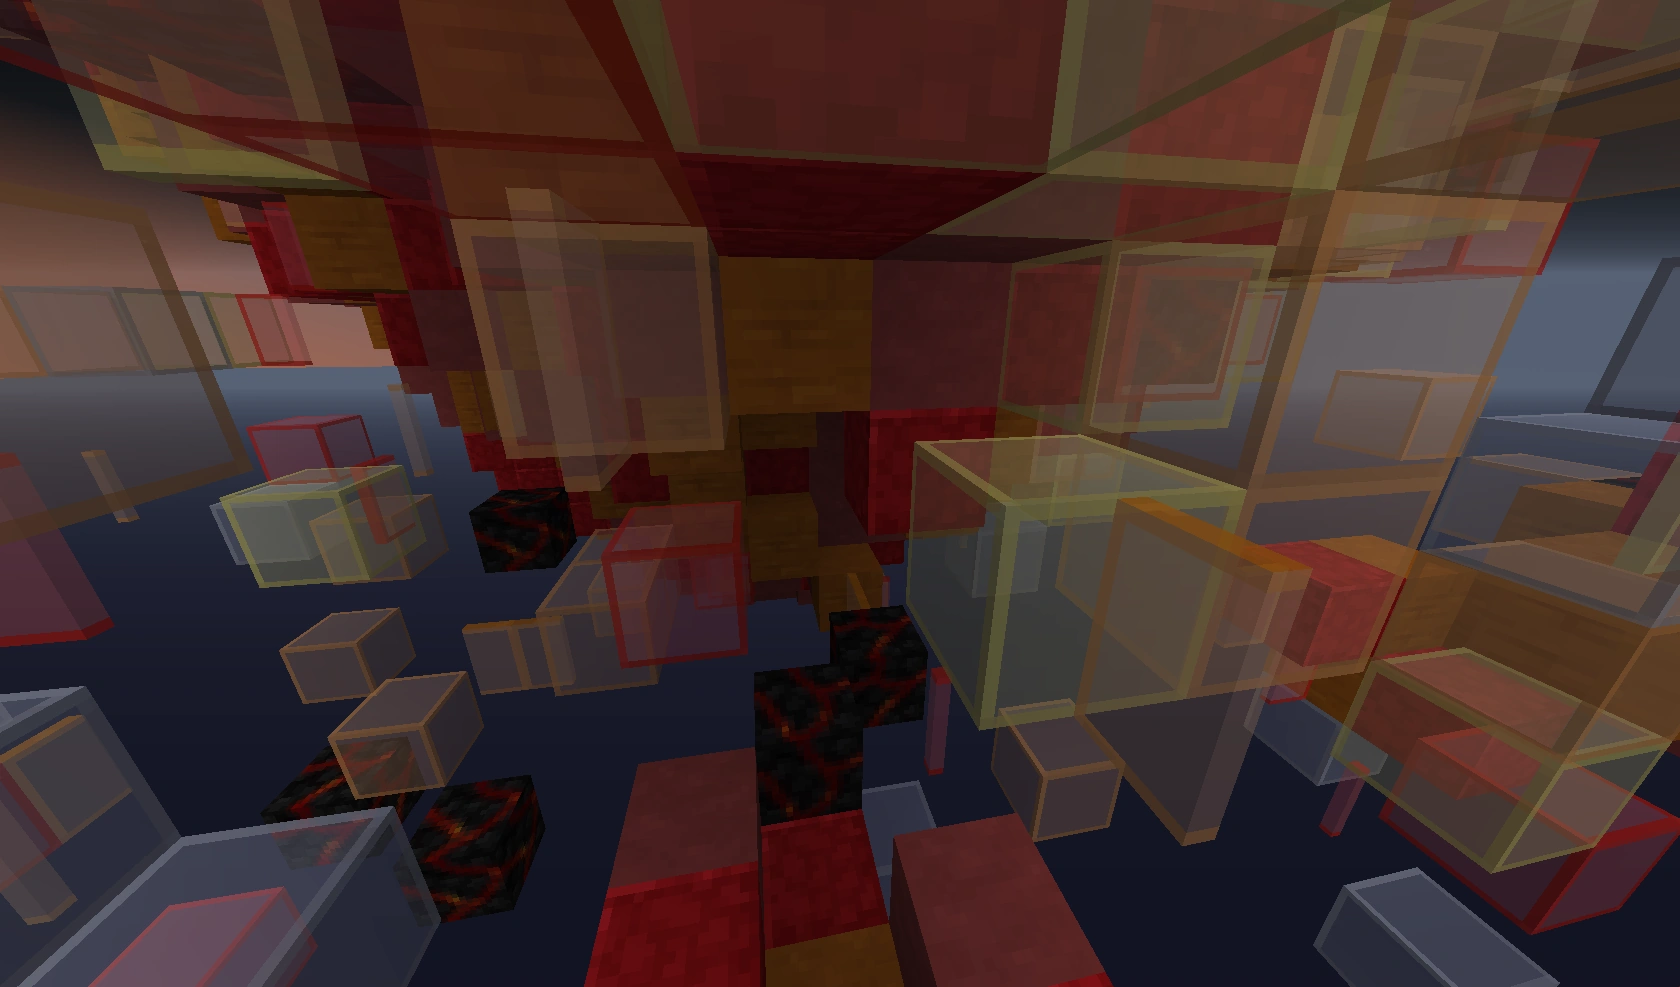
The objective of this puzzle is to enter the inside of the meteor. Note that the meteor contains two parts: the meteor itself, and a glass "flame" trail. From the teleporter, the player will spawn on top of the meteor. Collect the Blue Meteor Shard, which will spawn on top of the meteor (It will be used in the final segment of the quest). Move towards the flame trail and drop down onto the blocks below. Turning around back towards the direction you came from will allow you to face the rear side of the meteor. In the water flowing within a portion of the wall there is a stone button within it. Pressing the button will reveal an short-lived entrance into the meteor. Quickly pass through to get inside the meteor.
|
Red Meteor[]
| Location |
| Llevigar -2125, 80, -4423 |
| Wynncraft Map |
Spoiler alert: The hidden text contains spoilers relating to Obtaining the Mechanical Chip.
|
The objective of this puzzle is to get a minecart into the deepest part of Karoc Quarry to obtain the "Mechanical Chip". Facing the entrance of Llevigar Bank, the cave to your right, on the west side of the city, contains wooden scaffolding that can be climbed via ladders to obtain a "Quartz Key" that spawns at the top. A hint is given through its item lore to find out where to go next, which is: "This clean white key is used to operate minecart dispensing units." Take a Quartz Key to the entrance of the cave on the south east side of the city, where there is a small room containing a pressure plate and a hopper on the wall towards the left. Throw the Quartz Key into the hopper, which will cause an item frame with an "X" to appear on the front of it. Stand on top of the stone pressure plate until it breaks, then head further into the cave. Close to the entrance is a raised wooden area accessible via ladder. A minecart will spawn and wait on the tracks. Enter the minecart and roll it down the tracks. While in the minecart, there are three buttons that must be pressed to change the direction that the cart travels:
Failure to push the button in time will cause the minecart to travel a little further, then roll backwards to the start point of the latest button, allowing the player to try again. The minecart will stop near a tent with tnt. Get off the minecart and you should see a hologram with plus sign saying "Right-Click to Load Tnt". Clicking on it will spawn a new minecart with tnt. Push it on its tracks. It will stop near a rock and blow it up, revealing a hole in the mountain. Enter it to proceed. In the room inside, a Mechanical Chip (player head) will spawn. Collect this chip and proceed to the next stage. The chip's item lore has a hint for where to go next: "Behind the one who watches the blue, Near the red and brown, and under the yellow." Notes:
|
Spoiler alert: The hidden text contains spoilers relating to Reaching the Yellow Flower.
| ||||||||
The objective of this puzzle is to bring the Mechanical Chip across Gavel to a yellow flower located in a mountain behind a Gert camp. The yellow flower is located at:
Note that you do not need a Gert mask for this section. Simply proceed to:
There are a variety of ways to shorten the time taken travelling across Gavel, including using a Cinfras Scroll, a Forgery Scroll, or even a Detlas Scroll + Calo's Airship. Upon reaching the yellow flower, simply throw the Mechanical Chip on top of it. The wall behind the flower will retract and reveal an entrance to the next stage. Notes:
|
Spoiler alert: The hidden text contains spoilers relating to The Blindness Maze.
|
The objective of this puzzle is to reach the end of the path. In this stage, the player will be afflicted by blindness as they proceed through a maze. Although it is titled a "maze", it is in reality just a straightforward path with no dead ends. Simply continue following the path, walking in between the fences if necessary and ignoring the ominous item frames with Xs. Absolutely nothing happens during this stage. There are no monsters to fight nor puzzles to solve. At the end of the path, the blindness will be removed and the player can continue to the next stage. Notes:
|
Spoiler alert: The hidden text contains spoilers relating to The Green Puzzle.
| ||
The objective of this puzzle is to move the block over every space on the board and color it green. In the center of the room, a panel with four buttons can be found in between a button labelled "Reset" and another labelled "Undo". Pressing a button on the panel will move the block on the board across the panel in the specified direction. In doing so, the space under the block will be colored green, and the block will no longer be able to move over that space. The exception to this rule are the sea lanterns, which the block may return to. The following image contains a solution to the puzzle:
|
Spoiler alert: The hidden text contains spoilers relating to Activating the Teleporter.
|
The objective of this puzzle is to locate the Red Wire Piece that spawns within the room, throw the item into the frayed wire near the center of the room, and activate the teleporter. Upon entering the room, a frayed red wire can be found in the front, and a red glass-pane chamber towards the back. Red wool named "Red Wire Piece" spawn in a hole located at the top of the left wall. The hole can be reached by climbing the falling water next to the glass-pane chamber and walking over the red wire. Throwing a Red Wire Piece at the base of the frayed wire will cause the wire to repair itself and open the teleporter after a few seconds. Entering the teleporter will transport the player to the top of the Red Meteor.
Notes:
|
Spoiler alert: The hidden text contains spoilers relating to Entering the Meteor.
|
The objective of this puzzle is to enter the inside of the meteor. Note that the meteor contains two parts: the meteor itself, and a glass "flame" trail. From the teleporter, the player will spawn on top of the meteor. Begin by collecting a Red Meteor Shard, which will spawn on top of the meteor (It will be used in the final segment of the quest). Move towards the flame trail and drop down onto the blocks below. Turning around back towards the direction you came from will allow you to face the rear side of the meteor. A segment of the meteor wall will repeatedly disappear and reappear. If the player is caught while the wall is reappearing, they will be moved back a few blocks where they can try again. Use a class mobility spell or simply time your entry (given that you have enough walk speed) to enter the meteor. Notes:
|
Yellow Meteor[]
| Location |
| Dark Forest Cave -1357, 47, -5575 |
| Wynncraft Map |
Spoiler alert: The hidden text contains spoilers relating to The Cave of Pots.
| ||||
The objective of this puzzle is to break all eight pots within the cave, then throw an item into the map inside the house to open the door to the next stage. The location of the eight pots are as follows:
After breaking all eight pots, quickly throw any item into the map located inside the tent. If all pots are broken, a metal clang will be heard and the door outside will open. Otherwise, the map will change to display an item frame with a pot. Once complete, head to the doorway outside the cave at:
which is indicated by two torches, and proceed to the next stage. |
Spoiler alert: The hidden text contains spoilers relating to Wynntron, the Unbeatable AI.
|
The objective of this puzzle is to move all of the cubes to the left.
Begin by pressing the button labelled "Reset" at the base of the panel. This will spawn a total of four cubes onto the panel, two red and 2 blue in the order of red-blue-red-blue, and a line of buttons to connect the cubes. The player controls the blue cubes while the AI controls the red cubes. The goal is to get all 4 cubes to the left side making it impossible for the AI to move the red cubes. If all 4 cubes are on the right side, the AI wins. The trick to solving this puzzle is to count the number of buttons between each red-blue pair, and lowering the numbers to be equal to each other after your turn. Few example board states:
After the puzzle is completed, the AI will make several ERROR messages in the chat before exploding.
Notes:
|
Spoiler alert: The hidden text contains spoilers relating to Activating the Teleporter.
|
The objective of this puzzle is to locate the Yellow Wire Piece that spawns within the room, throw the item into the frayed wire near the center of the room, and activate the teleporter. Upon entering the room, a yellow glass-pane chamber and a frayed wire can be found at the second floor of the room. Next to the entrance on the left side, there is a large hollow quartz structure- inside, yellow wool named "Yellow Wire Piece" spawn. Players can parkour inside from the top of the structure by jumping on ledges starting from the right side of the entrance. Throwing a Yellow Wire Piece at the base of the frayed wire will cause the wire to repair itself and open the teleporter after a few seconds. Entering the teleporter will warp the player to the Yellow Meteor.
Notes:
|
Spoiler alert: The hidden text contains spoilers relating to Entering the Meteor.
|
The objective of this puzzle is to enter the inside of the meteor. Note that the meteor contains two parts: the meteor itself, and a glass "flame" trail. From the teleporter, the player will spawn on top of the meteor. Begin by collecting a Yellow Meteor Shard, which will spawn on top of the meteor (It will be used in the final segment of the quest). Move towards the flame trail and drop down onto the blocks below. Turning around back towards the direction you came from will allow you to face the rear side of the meteor. Note the lava embedded in the wall of the meteor. By right-clicking through the lava, the player will be moved inside the meteor. Alternatively, the player can simply just walk through the lava (at the cost of some health). Notes:
|
After entering the meteors:[]
Once all three players are inside their meteors, locate a pressure plate on the floor. Once all players are ready step on the pressure plate and stand still until you are teleported. Moving off of the plate will result in a failure to teleport that player.
Notes:
- All players must be on the pressure plates at the same time
- Standing on the pressure place causes a 3x3 wall to open with a "pop" and a cloud of purple particles. Entering the room beyond will throw the player back out on top of the meteor - it is NOT involved in teleporting the player to the next segment of the quest.
A bunch of strange characters will appear in chat when the plates have been triggered.
- T̴̯̈́́h̷̩̼́̚ę̸͇͑ ̵͇͇̃̌f̵͓͕́ơ̴͖͓r̸͎͗ͅg̷̫͠o̸̢͋t̸̡̹̚͝t̸̰͖̎e̵͓̽n̸̮͎͗ ̵͈̲͒s̴͚̐̀c̴̤͆͘i̷͖͒ë̷̗̽n̷̖̤͛ţ̷͙̈́ȋ̵̱̅s̴͓̜̈́t̴̠́̇ͅ ̵͙̱̈́r̸̞͉̔ȅ̶̹͐q̵͚͝u̴̳̟͑͗ē̶̘͚ṡ̷̹̐t̵̡̧̊e̷̱̜͘͝d̷̯̲̂̔ ̵͓͇̀͝ȧ̷̡̔ ̷̝̮̾͝ü̶̞̺̈́t̴͕̞̓e̷͘͜n̷̥̠͂s̸͕̒͝ͅi̵̗̦͗l̷͍̂́.̵͙͇̿̓
- >Commencing warp sequence...
After the transport, talk to the Computer NPC in the room. After some dialogue, the quest book will be updated and the quest will be officially started.
Dialogue:
- >Starting up...
- >All systems online.
- >Permissions update requested. Beginning process...
- >Processes complete. Permissions successfully updated.
- >WARNING: Systems overloading!
- >ERROR.
- >ERROR.
- >ERROR.
- >Ţ̵̅h̵̝͊e̷̲͆ ̷̖̕m̸̯͋ȃ̵̠d̸̮̈́m̴̛͍a̶͛ͅn̷͐͜'̴̬̃ś̷̡ ̴̰̎f̸̳̂ą̵͝v̵̓͜ó̵͇r̸̘̈́i̶̯̐t̷͉͠ẻ̸̝ ̴͚̆f̴̖̍ò̸͓o̶̩͝d̸̤̚ ̸̰͘l̴̨͝i̸̺͛e̷̫͝s̷͎͠ ̴̨̀i̴̘̇n̶̙̿ ̸̯͋a̶̛͜ ̴̜͠p̶͚͝l̵̳͝ã̶͙ć̵̻ę̷͆ ̵͓͌o̵͚̽f̸͎͝ ̶͔̐c̴̤̉h̶͉̓a̴̮͑ñ̴̬ġ̴̼ĭ̵̦ṉ̴̓g̸̛͔ ̵̮̇p̶̝̈́ë̵̠ř̶͇s̴̲̀p̸̪̔e̴̤͌c̷̻͝ť̶̘ỉ̶͇v̵̧̈́e̸͓͘.̸͉̈
- ̶͍̌N̵͍̍ẹ̶̛w̴͘͜ ̸̹̀Q̶̡̔u̴͎̅e̶͈͠s̵̭͆t̷͇͠ ̸̛̰S̶̫̈́t̸̨͒ȃ̷̩r̷͚͂t̷̲̊e̷̩͐d̶̤̎:̵̘̈́ ̸̺̀?̵̛̪?̸̬̿?̷̖̀
Make sure that everyone in your group starts the quest before leaving the room, otherwise they will have to re-do this segment.
If you talk to the Computer again after the segment is done, it will bring up this dialogue:
- >Ţ̵̅h̵̝͊e̷̲͆ ̷̖̕m̸̯͋ȃ̵̠d̸̮̈́m̴̛͍a̶͛ͅn̷͐͜'̴̬̃ś̷̡ ̴̰̎f̸̳̂ą̵͝v̵̓͜ó̵͇r̸̘̈́i̶̯̐t̷͉͠ẻ̸̝ ̴͚̆f̴̖̍ò̸͓o̶̩͝d̸̤̚ ̸̰͘l̴̨͝i̸̺͛e̷̫͝s̷͎͠ ̴̨̀i̴̘̇n̶̙̿ ̸̯͋a̶̛͜ ̴̜͠p̶͚͝l̵̳͝ã̶͙ć̵̻ę̷͆ ̵͓͌o̵͚̽f̸͎͝ ̶͔̐c̴̤̉h̶͉̓a̴̮͑ñ̴̬ġ̴̼ĭ̵̦ṉ̴̓g̸̛͔ ̵̮̇p̶̝̈́ë̵̠ř̶͇s̴̲̀p̸̪̔e̴̤͌c̷̻͝ť̶̘ỉ̶͇v̵̧̈́e̸͓͘.̸͉
Segment 2 - Lab Y - "Yahya's House"[]
This section requires one player in total.
NOTE: If you have already reached Lab N / completed the quest, you do not need to repeat this segment to get back into the Lab. Instead, you can throw a Mysterious Feather onto a yellow carpet in Nohno's basement at Rooster Island to return there, or have a party member already in the Lab open the Rooster Island door from the inside. (Remember that you are only able to use the shortcut if you have already done the quest on that class)
Once the quest has been started, players must retrieve three items and bring them to Yahya's house. The three items are a "Black Spoon", a "Tiny Mushroom", and an "Odd Painting".
Required Items[]
Spoiler alert: The hidden text contains spoilers relating to Location of the Black Spoon.
|
The Black Spoon can be obtained as part of the quest Memory Paranoia. Head to Caritat Mansion and enter the building. After the initial warp, head to the library on the left. After the second warp into the ruined library, climb the back wall above the fireplace to the charred hole- this will trigger a cutscene before transporting the player to the memory-filled ruins of the library. The Black Spoon will spawn in the fireplace. The mansion can be exited quickly via a teleport scroll or /kill. |
Spoiler alert: The hidden text contains spoilers relating to Location of the Tiny Mushroom.
| |||||||||
The Tiny Mushroom can be found within the quest, The Bigger Picture. Head to the Mushroom Village and shrink yourself via the Subtraxerim Utilium at
Then go to
You can quickly exit the area via a teleport scroll or /kill. |
Spoiler alert: The hidden text contains spoilers relating to Location of the Odd Painting.
| ||||
The Odd Painting can be obtained in a hidden room at Skiens Island. Head to the roof of the fortress and inside one of the towers at:
You can quickly exit the area via a teleport scroll, using /kill, or jumping off the tower and going to the Seaskipper. |
Once the items are acquired[]
Head to Yahya's house, which is located at:
| Location |
| Yahya's House -282, 69, -1694 |
| Wynncraft Map |
If you have started the ??? quest with the 3 items on you, then the following dialogue will appear:
- ...?
The Tiny Mushroom will then turn into the Somewhat Tiny Mushroom. Right-click it to make the following dialogue appear. It will be consumed in the process if you haven't interacted with it before.
- You hold up the mushroom... ("You hold up the pezizomycete..." if you have interacted with it)
- ...
- You hear a strange, mechanical sound.
After this, the Odd Painting will turn into an Odd Painting...? with the same image on it. However, you need to right-click it to progress the quest. It will be consumed in the process if you haven't interacted with it before.
- You hold up the painting...
- ...
- You hear a curious, mechanical sound.
After this, use the Black Spoon, which will still be the same item as it was before. Unlike the Tiny Mushroom and Odd Painting, it will not be consumed.
- You hold up the spoon...
- ...
- You hear an odd, mechanical sound.
After using the Black Spoon, a small hole will open up in Yahya's House near the entrance.
Notes:
- The hole closes quickly, so be prepared
- Players that have not started quest yet aren't able to fall through the hole.
After that, two puzzles must be solved in order to complete this segment and reach Lab N:
Spoiler alert: The hidden text contains spoilers relating to Red & Brown Mushroom Lights-Out Puzzle.
| ||
The objective of this puzzle is to turn all of the brown mushroom blocks into red mushroom blocks. A grid of buttons and mushroom blocks is placed on the floor. Pressing a button will turn the block underneath and all adjacent blocks into the opposite type of mushroom (i.e. from brown to red, and vice-versa). A picture of a solution order is below:
|

Spoiler alert: The hidden text contains spoilers relating to QR Code Password Puzzle.
|
The objective of this puzzle is to step on the pressure plates in the correct order. The room contains four pressure plates (stone, wood, gold, and iron), one in each corner of the room. The correct order in which they must be pressed can be found by decoding the QR code that makes up the floor:
When decoded, it yields the following image:
Upon stepping on the last plate, all players in the room will be teleported to Lab N.
|

After solving the puzzles:[]
All players in the QR code room will be teleported to Lab N.
Segment 3 - Lab N - "The Checkpoint"[]
This section requires four players in total.
NOTE: If you have already reached Lab N / completed the quest, you do not need to repeat the previous segment to get back into the Lab. Instead, you can throw a Mysterious Feather onto a yellow carpet in Nohno's basement at Rooster Island to return here, or have a party member already in the Lab open the Rooster Island door from the inside. (Remember that you are only able to go through the door at Rooster Island if you've reached the Lab on the same class you intend on entering with.)
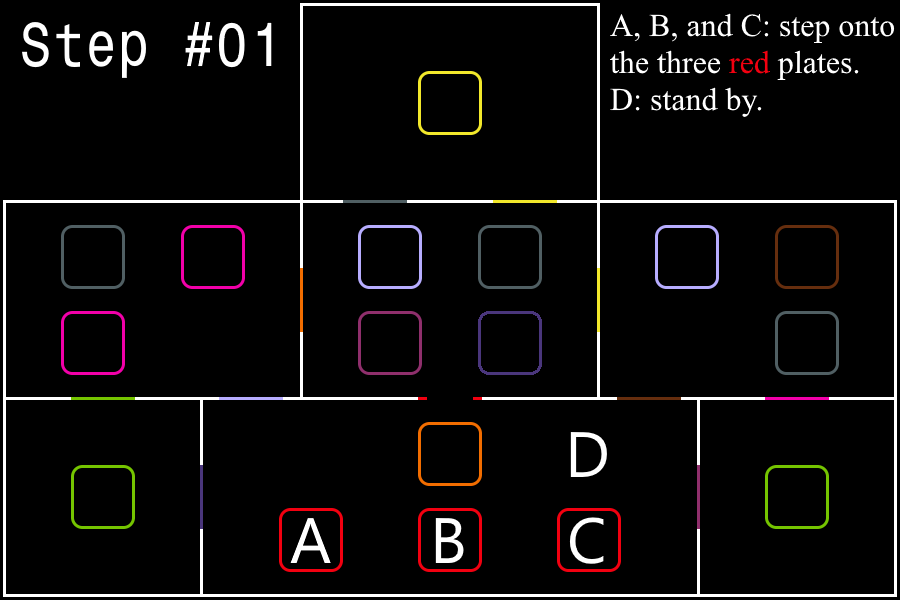
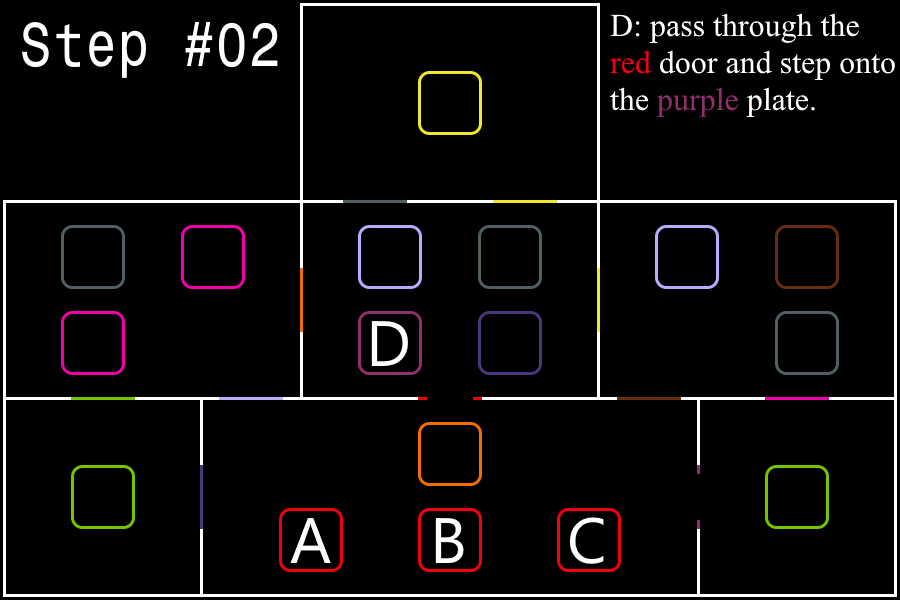
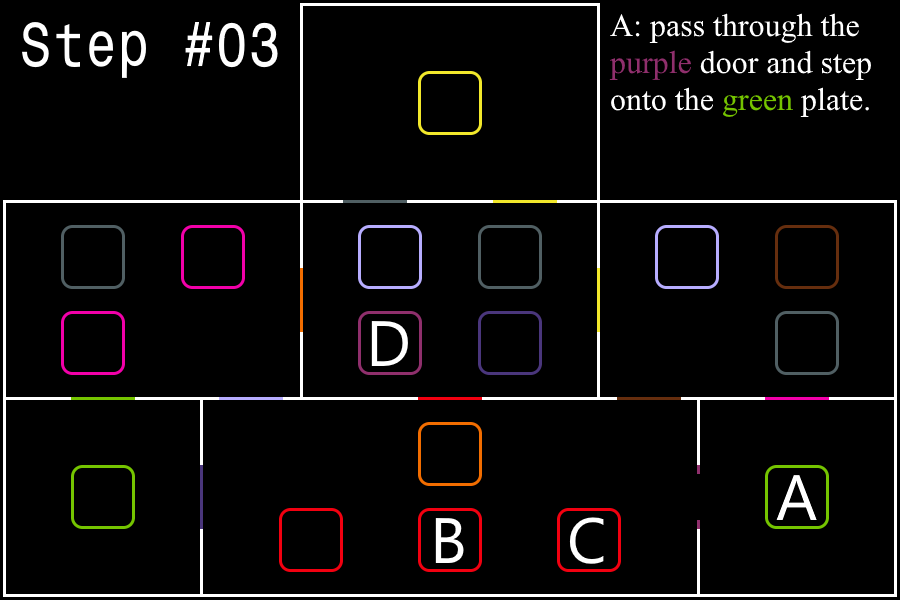
After reaching Lab N, there are two puzzles that need to be solved. Both puzzles require four players to complete.
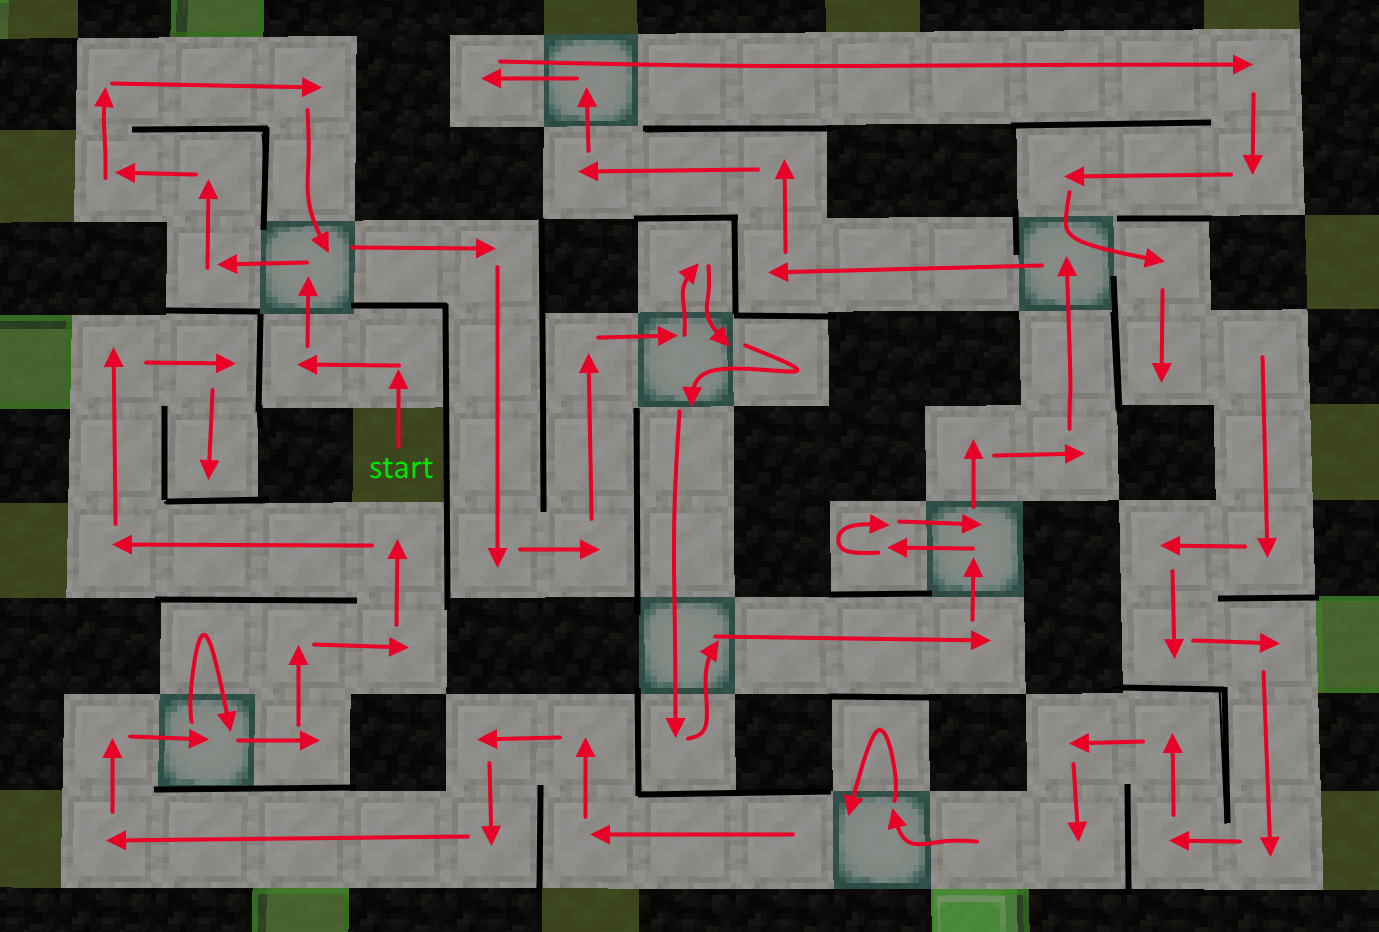
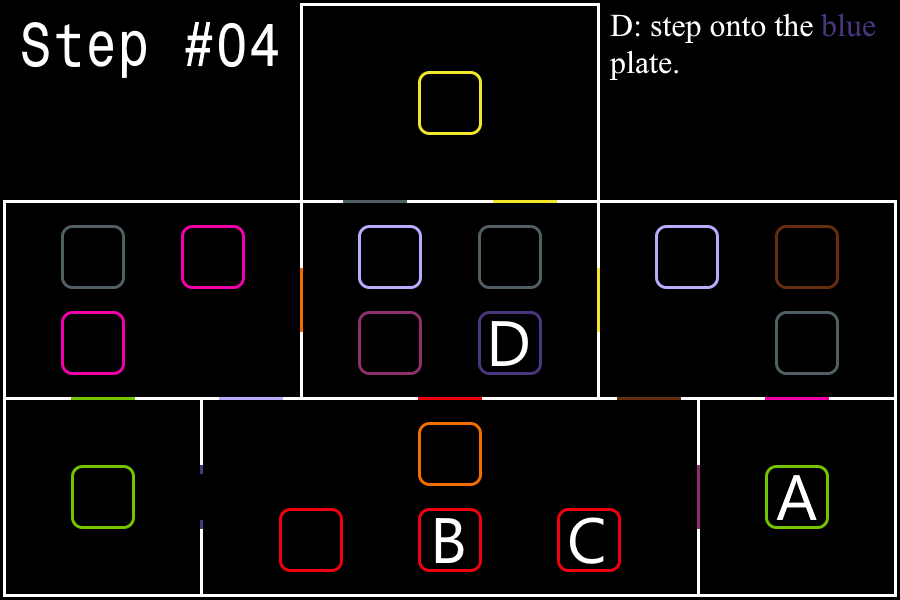
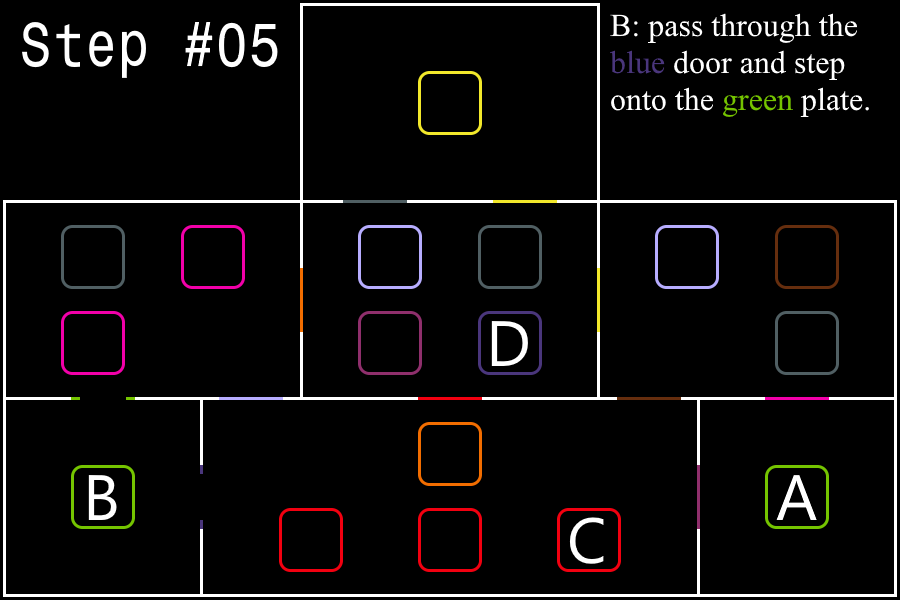
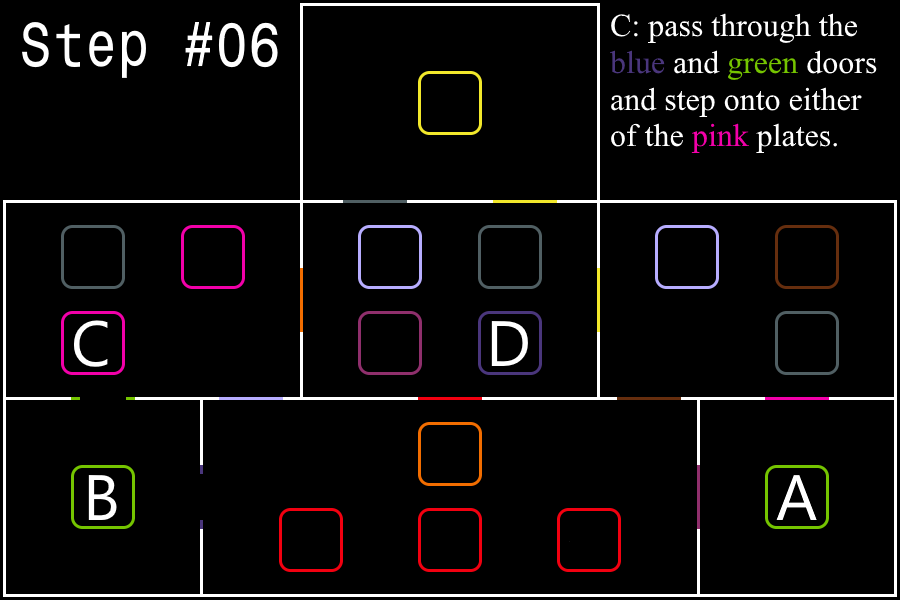
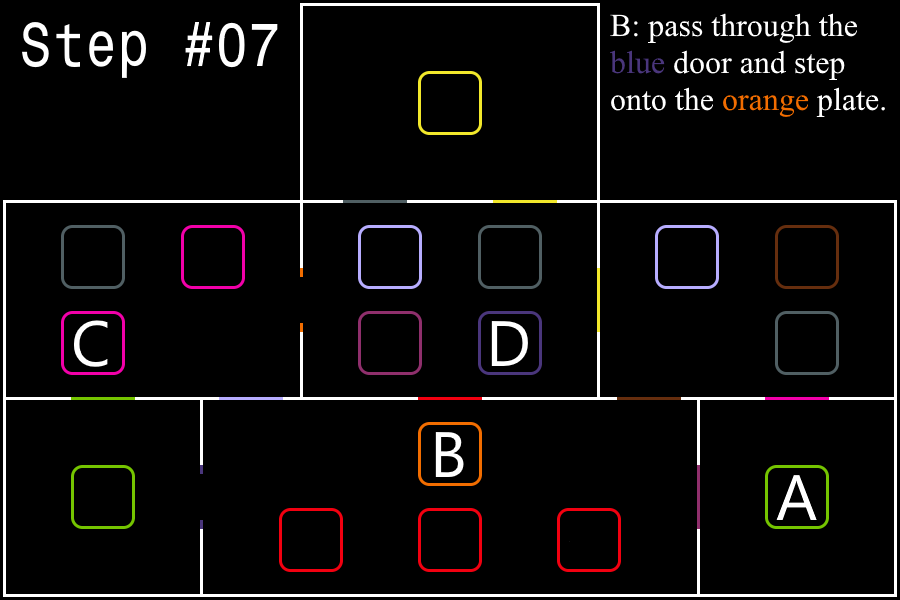
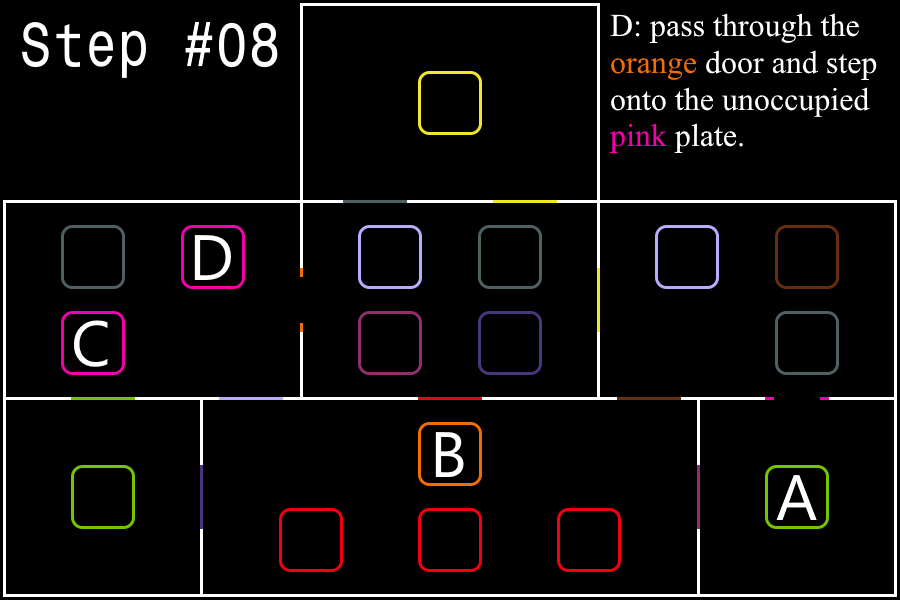
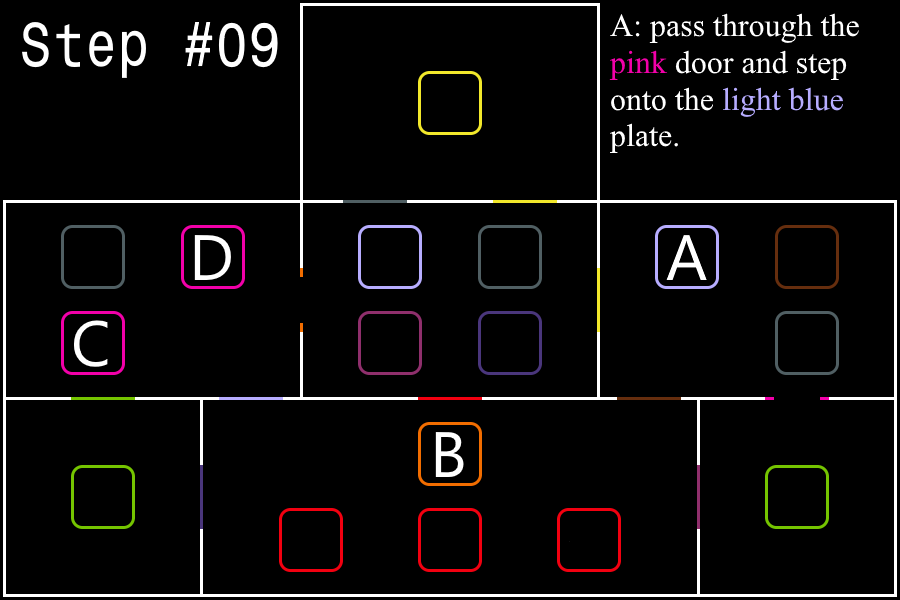
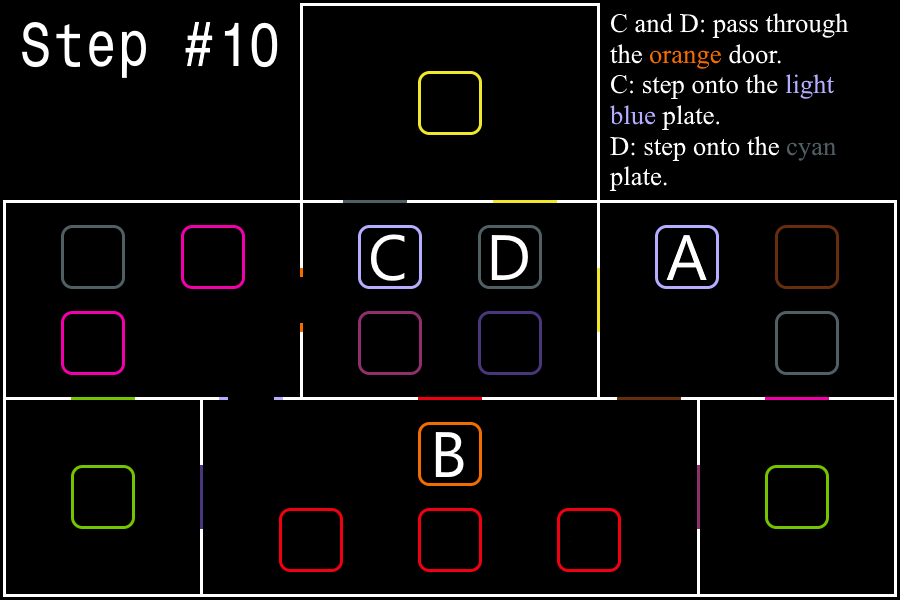
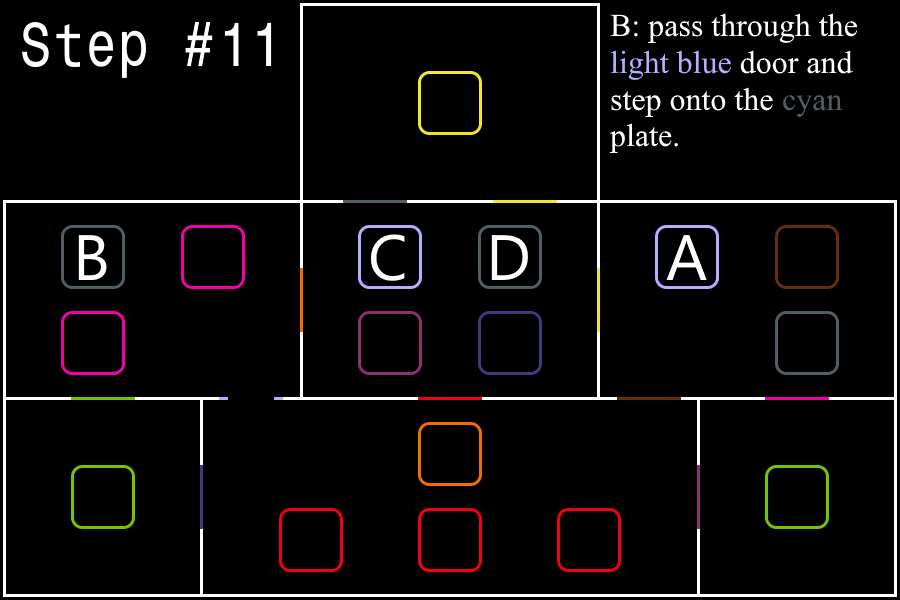
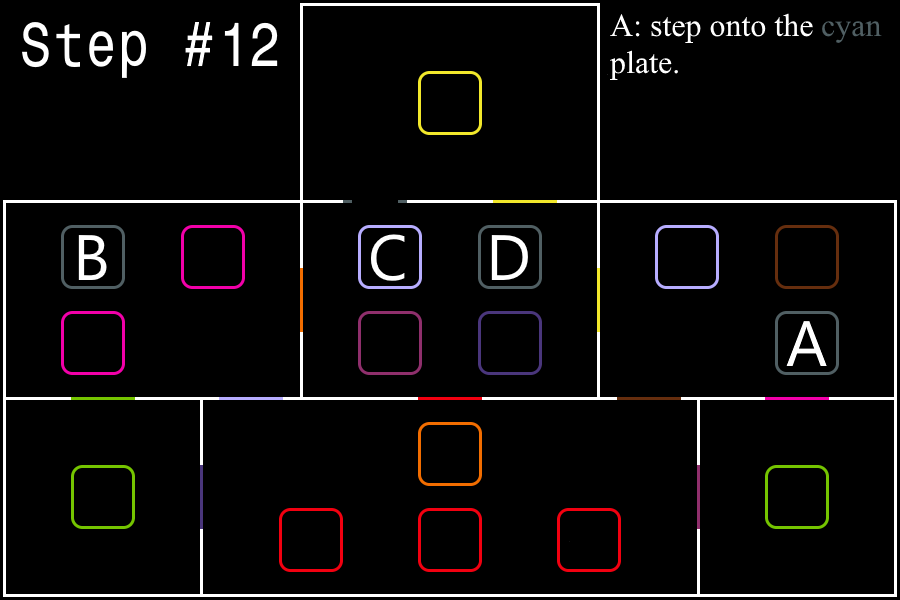
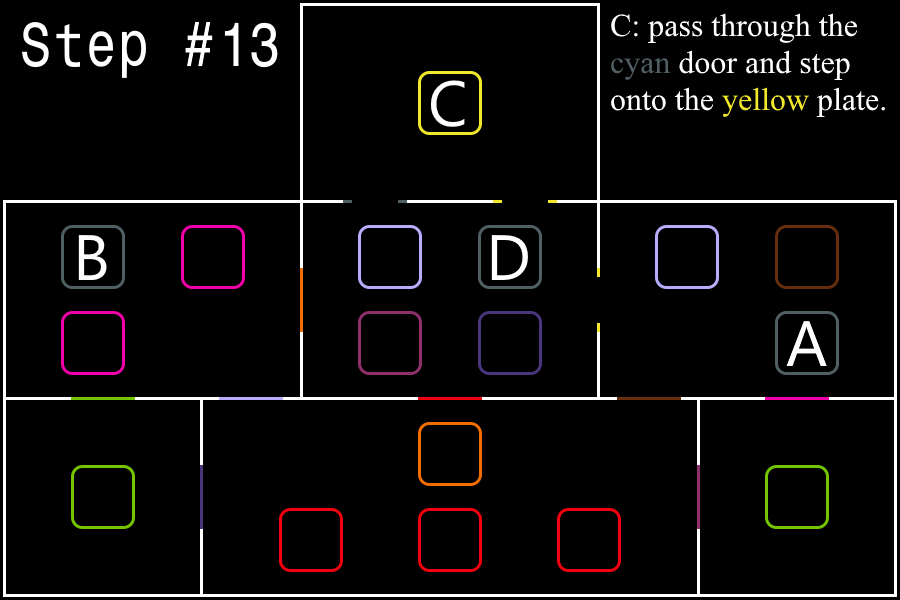
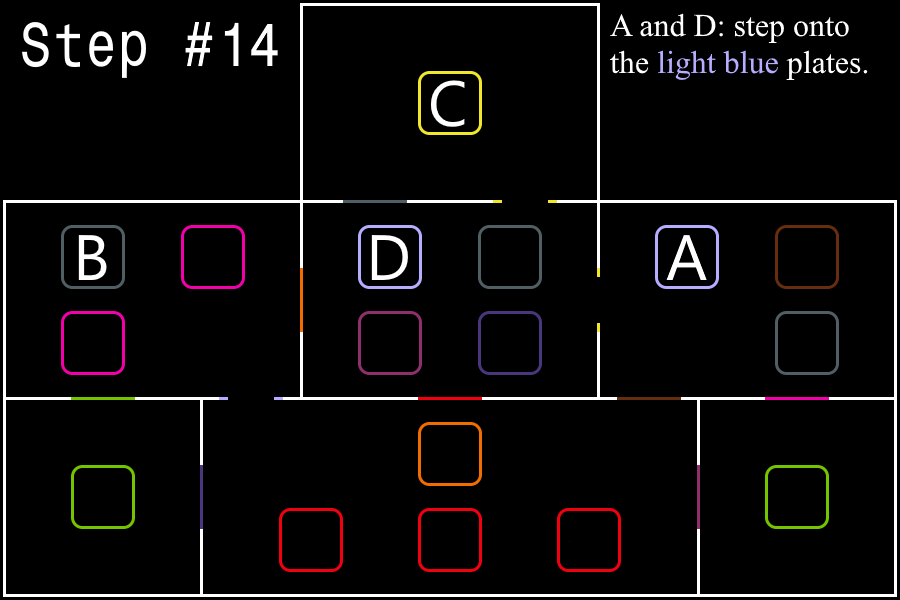
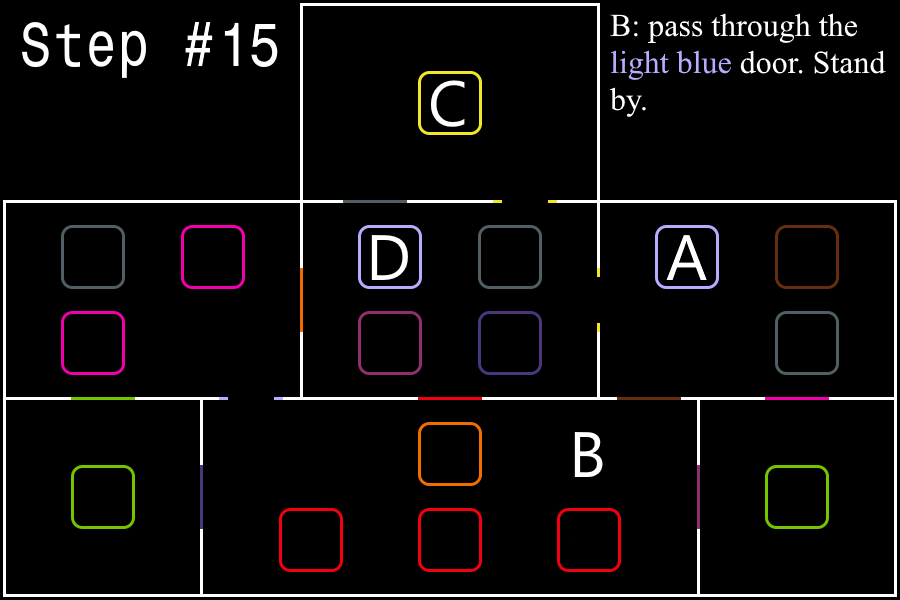
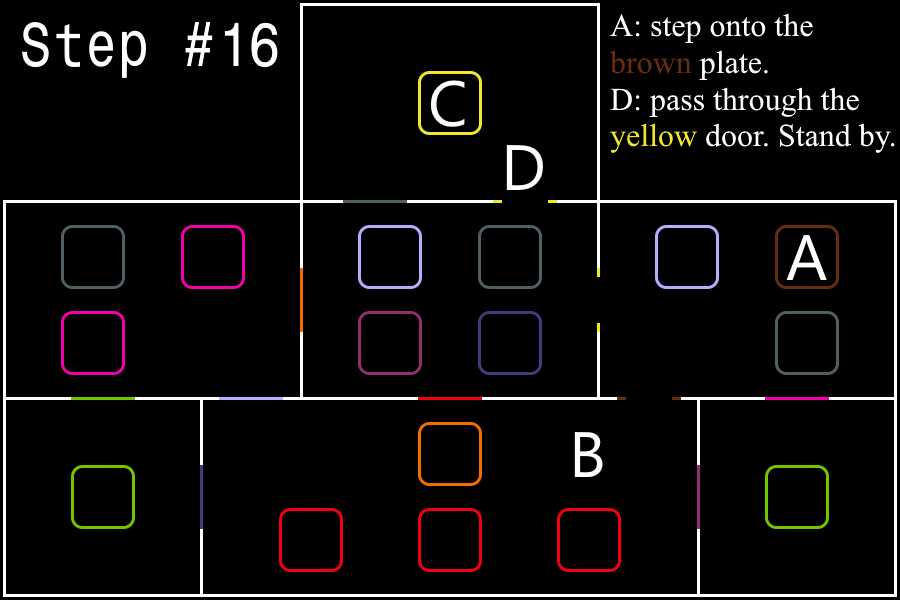
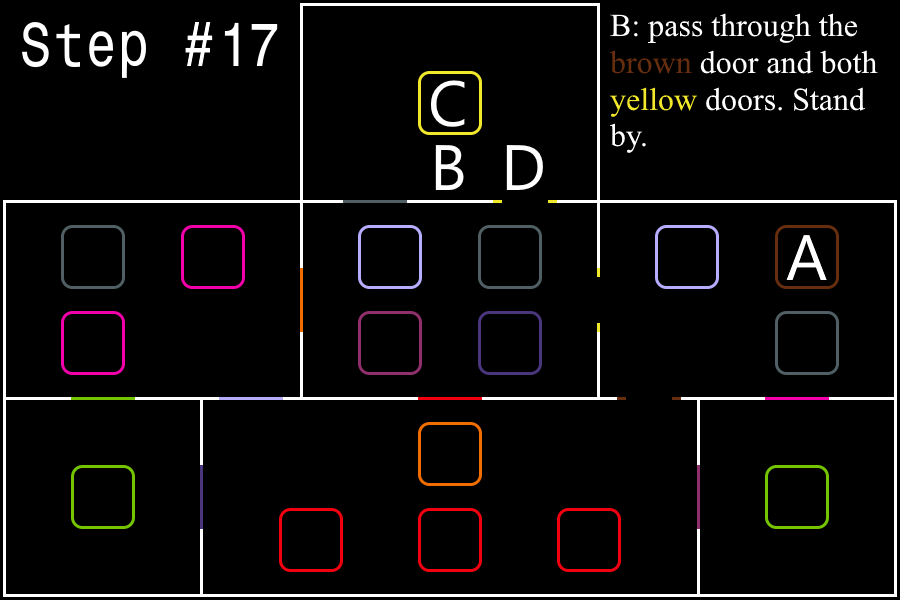
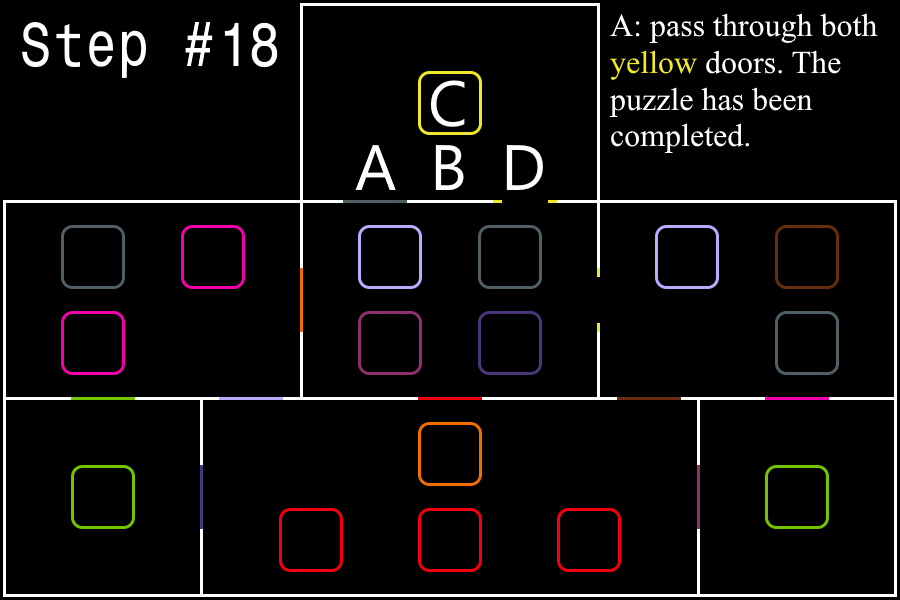
Spoiler alert: The hidden text contains spoilers relating to Color Maze.
| ||||
The objective of this puzzle is to get all four players through the final door at the end. In this puzzle, there are a total of seven rooms, each with at least one pressure plate outlined with a colored block. Stepping on a pressure plate will "lock" that plate by surrounding it with invisible barriers. A plate can be unlocked by jumping- this will play a metallic clinking sound and remove the barriers. For a layout of the rooms, refer to the following GIF:
Specific instructions for the solution are listed below. Some context:
For more specific instructions (useful for guiding a party through the puzzle), expand the following spoiler:
For a gallery version of the instructions, expand the following spoiler:
Notes:
|

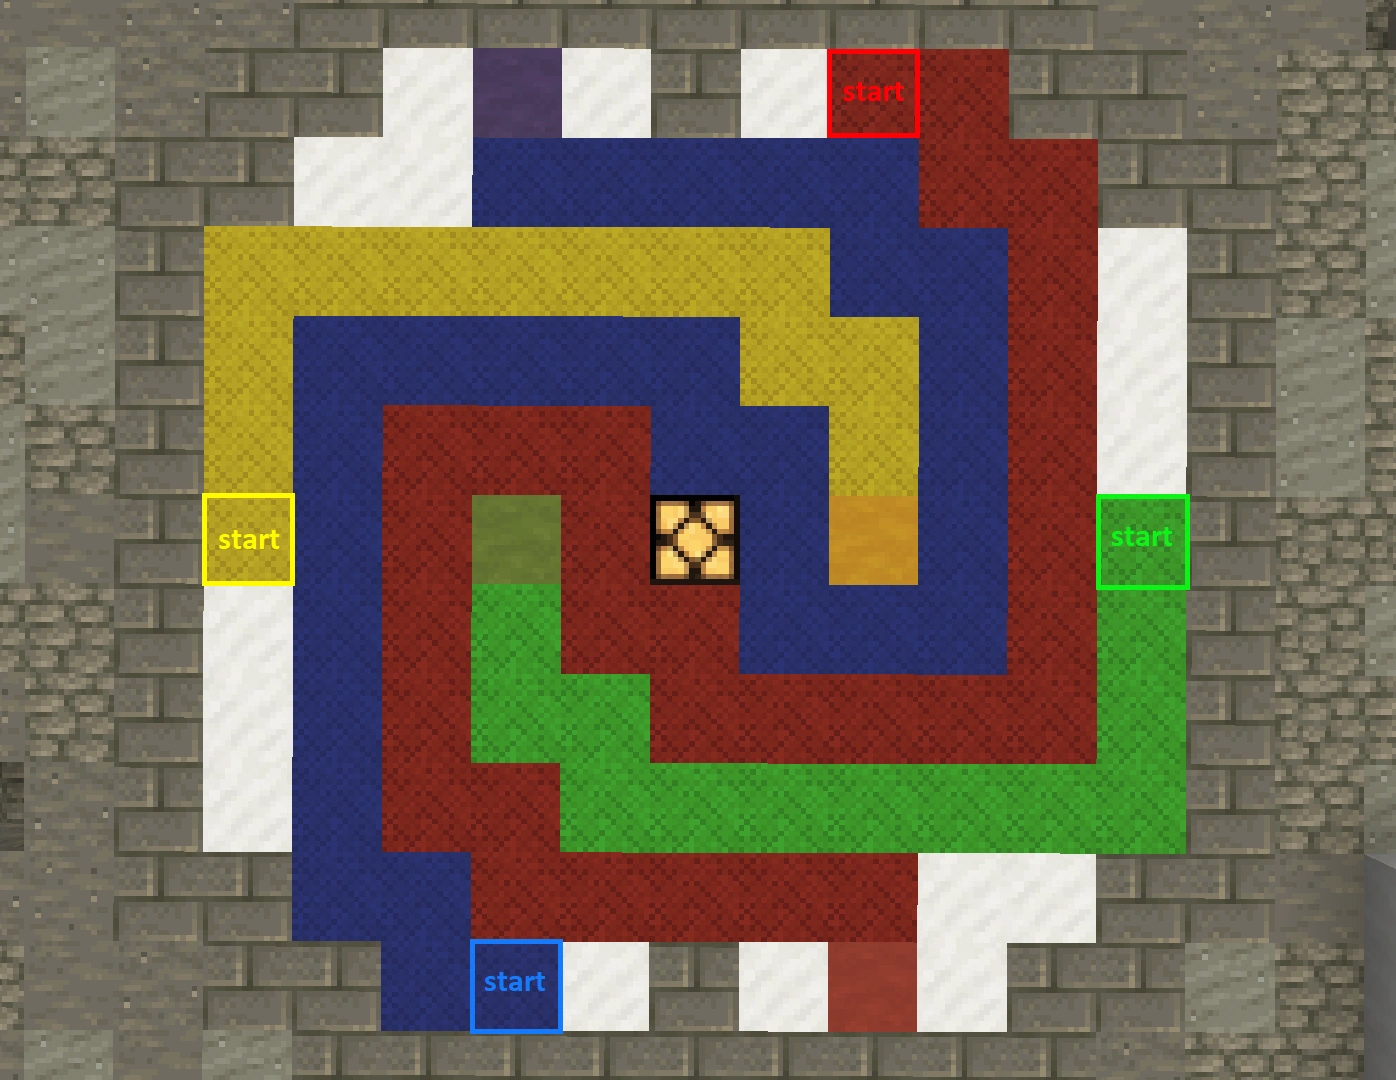
Spoiler alert: The hidden text contains spoilers relating to 4-Color Flow.
|
The objective of this puzzle is to draw the colored wires on the white circle such that each player is able to reach their destination. Begin the puzzle by having each player stand on a pressure plate. Then, move over the quartz blocks in the floor to change the block underneath into a colored block matching the color of the previous block. The puzzle is complete when all four players stand on top of the colored terracotta/clay. Jumping will reset the puzzle back to a blank board, and will require the players to return to the pressure plates on the edges to start again. A solution can be seen in the image below:
Notes:
|
After solving the puzzles[]
The final room contains a Rusted Laboratory Key, and a teleporter with four plates. After getting a Rusted Laboratory Key, have each player stand on a plate to update the quest book for the final segment. The teleporter will transport all players within the chamber to Nohno's basement in Rooster Island (in the cell next to the one that can shortcut back to Lab N).
- >Permissions updated.
- >Sealing capsule...
- >Commencing warp sequence...
Notes:
- It is not strictly necessary for all players have a Rusted Laboratory Key. However, the key will be consumed in the final segment.
- Sometimes, the teleporter will fail to transport a player. It is possible to activate the teleporter using a horse and/or stepping on all of the remaining plates in quick succession.
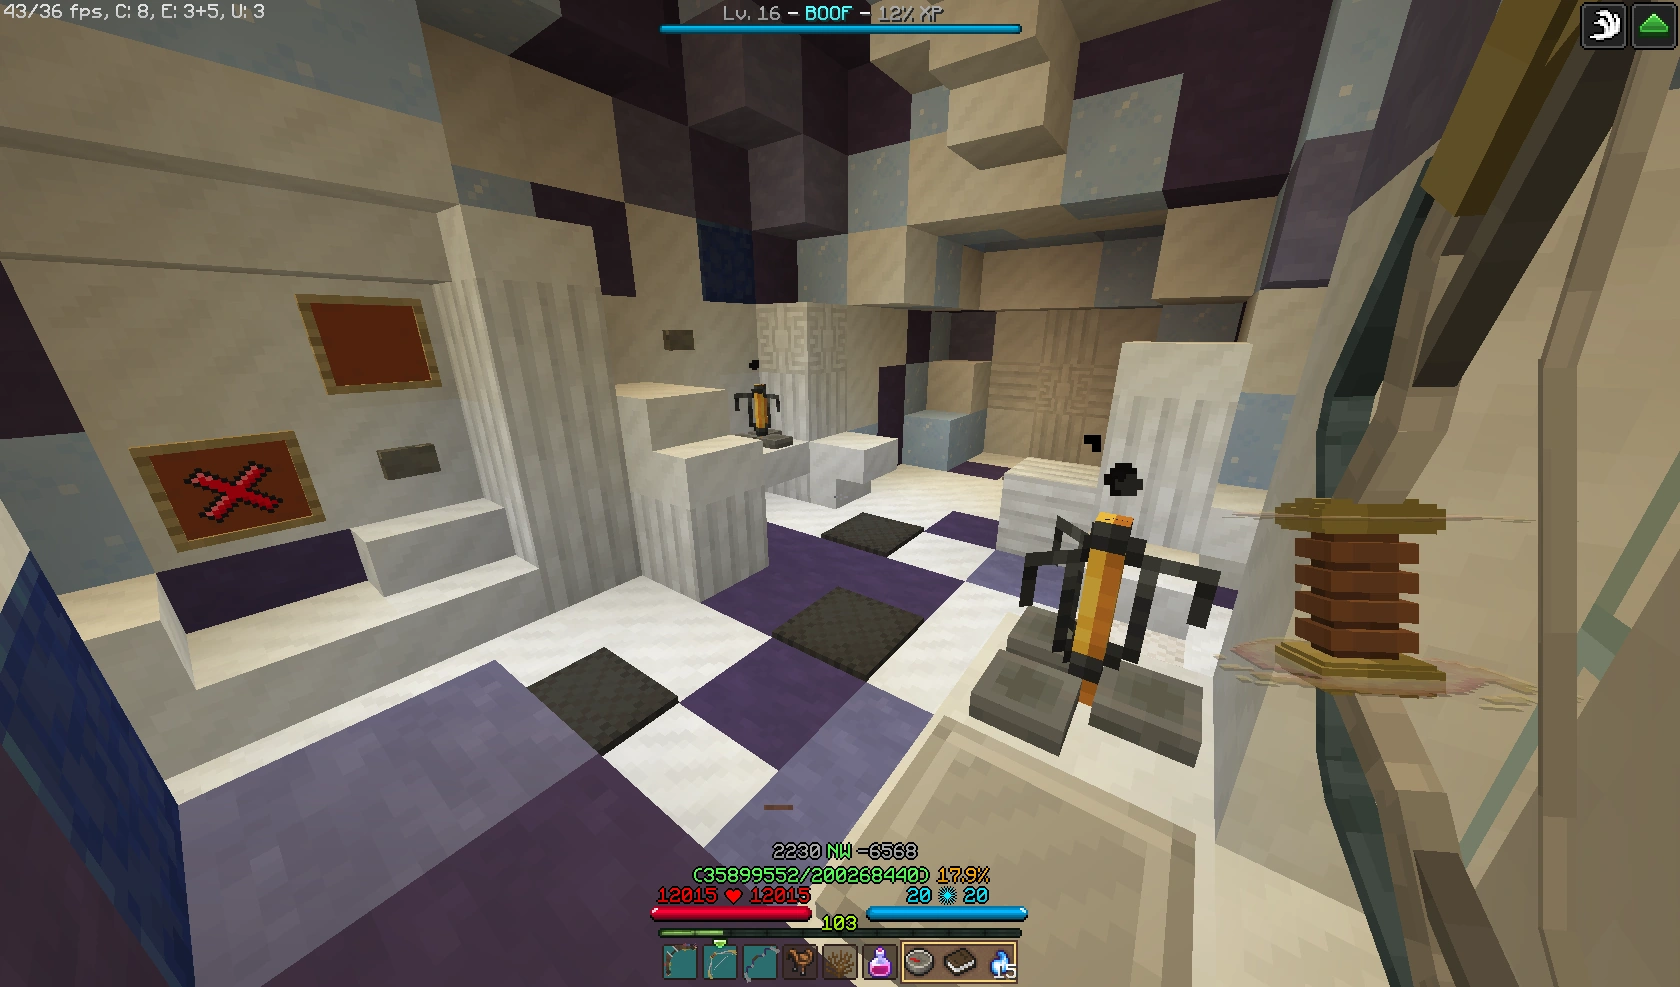
Segment 4 - Lab M - "White Meteor"[]
This section does not require any additional players.
After clearing Lab N, head to the White Meteor that lies east of Cinfras at:
| Location |
| Old ??? Meteor 7, 42, -5018 |
| Wynncraft Map |
NOTE: If you have already finished Lab N/completed the quest, you do not need to repeat any of the previous segments again as long as you or another player have spares of all 3 shards and a Rusted Laboratory Key. Just repeat the following steps to access the meteor like you normally would.
Throw one of each type of meteor shard (Red, Blue, and Yellow) gathered in Segment 1 ("The Meteors") onto the brown carpet. This will open a door into the white meteor (note that it closes fairly quickly).
Once inside the meteor, head to the upper right of the lower room and press the wooden button. This will scan your inventory for a Rusted Laboratory Key- if it is found, a door next to the button will open. NOTE: The key will by consumed in the process
In the following hallway, step into the glass-pane chamber in the center to be teleported to Mehme's room.
- >Systems starting up...
- >Calculating destination...
Talking to Mehme will finish the quest.
Dialogue:
- Mehme: Welcome to my wonderful wooden home!
- Mehme: You are welcome here as long as you don't have any mushrooms or chickens.
- Mehme: I hate those things. Just my home and me.
- Mehme: Me and my home.
- Mehme: Alone.
- Mehme: My home.
- >Permissions updated.
You can exit the meteor by going back to the room you entered from, then heading towards the blue glass-pane chamber in the upper left. It will open if a player comes within proximity, and teleport you outside of the meteor.
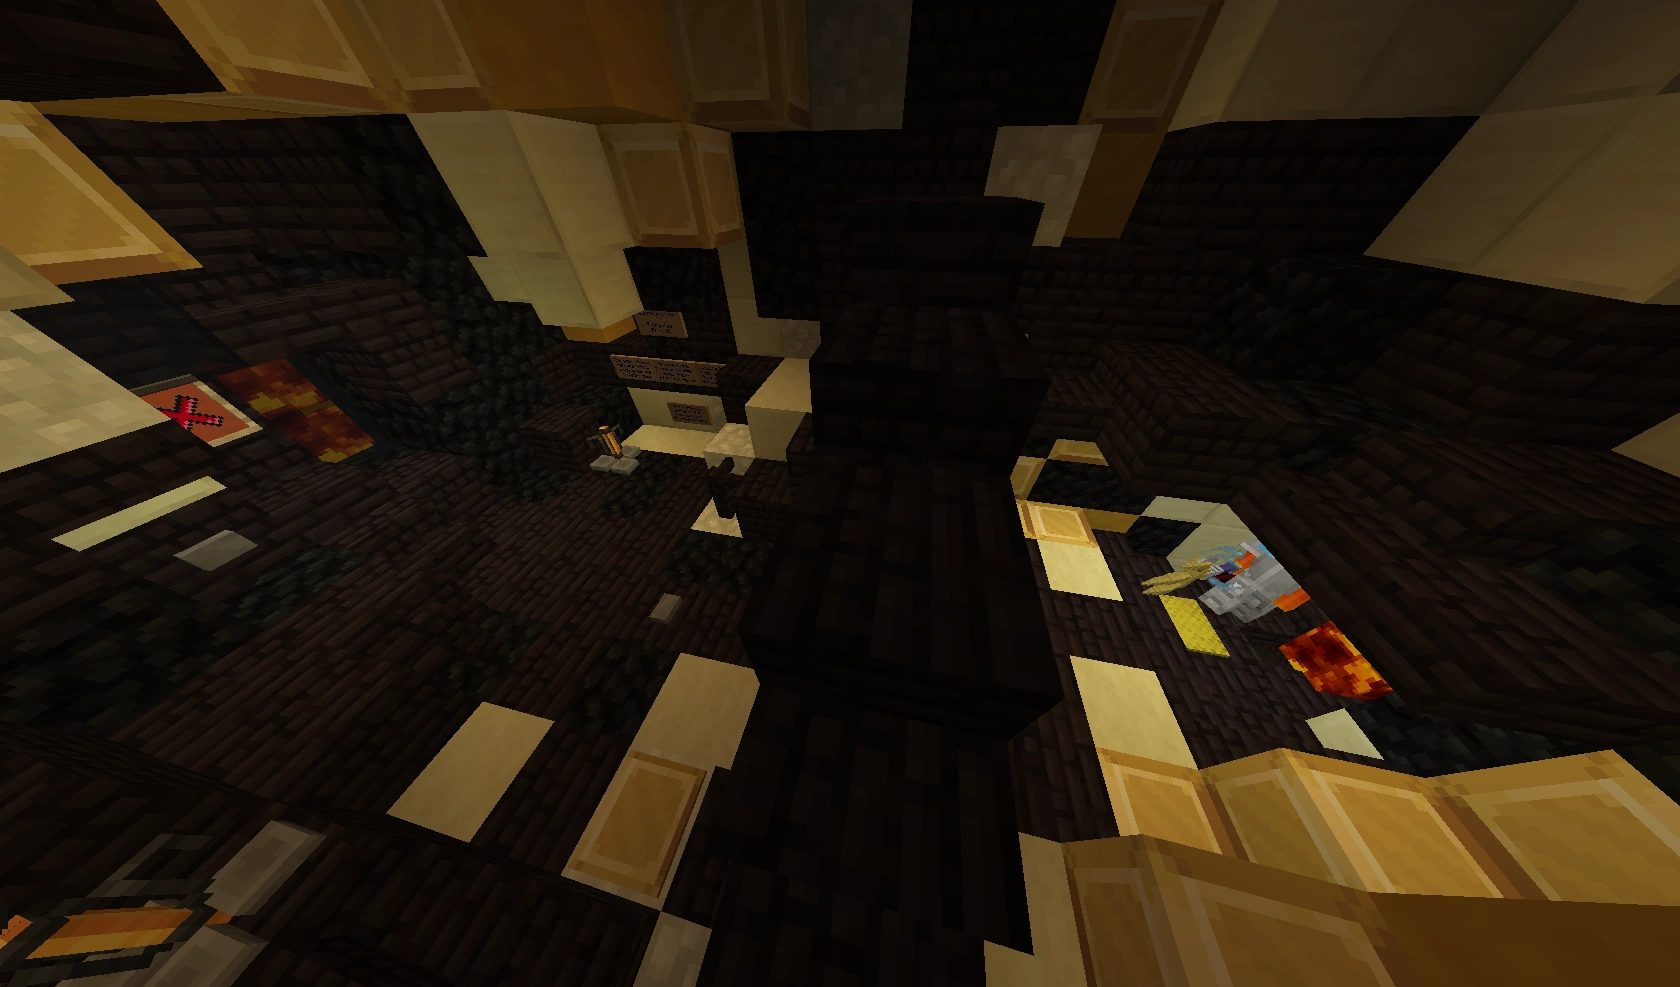
Bonus Segment - Additional Secret Lore[]
Note: This section is not part of the quest. After finishing, you will be forced to exit the meteor. Do not do this if you're doing the quest.
In the hallway with Mehme's teleporter, it is possible to reach a hidden room containing some additional lore.
Solutions[]
Spoiler alert: The hidden text contains spoilers relating to Activating the Door.
|
The objective of this puzzle is to activate the two pressure plates at the ends of both corridors, then press buttons beneath each meteor replica in the order of "Red, Green, Yellow, Blue". Upon entering the hallway, there are two corridors extending to the left and right. At the end of each of these is an iron pressure plate at the far wall. Drop an item onto the plates- this will cause buttons to appear underneath the meteor replicas that can be accessed by the start of the corridors. Then, press the buttons that are underneath the appropriately colored meteor replicas in the following order:
|
Spoiler alert: The hidden text contains spoilers relating to Invisible Parkour.
|
The objective of this puzzle is to reach the door on the top wall of the farthest room. After completing the previous step, invisible barrier blocks will spawn in the farthest room. Their locations are hinted at by the beacon blocks underneath the floor. Parkour around the glass sphere in the center to reach the door at the top wall. Once everyone has made it to the door, step on the pressure plate to open it. Notes:
|
Spoiler alert: The hidden text contains spoilers relating to Clipboard Instructions.
|
The objective of this puzzle is to drop the clipboard (map item) onto the bloody spikes on the floor to open a door to the next area. Going down the stairs, there is a large room on the left and a smaller room on the right. Go down the left room until a door with a button on it is reached. Press the button to spawn a map with an image of a clipboard. Return to the small room on the right and drop the map onto the bloody spikes on the floor. This will cause an explosion that opens a path to the next room. Notes:
|
Spoiler alert: The hidden text contains spoilers relating to Emerald to Diamond.
|
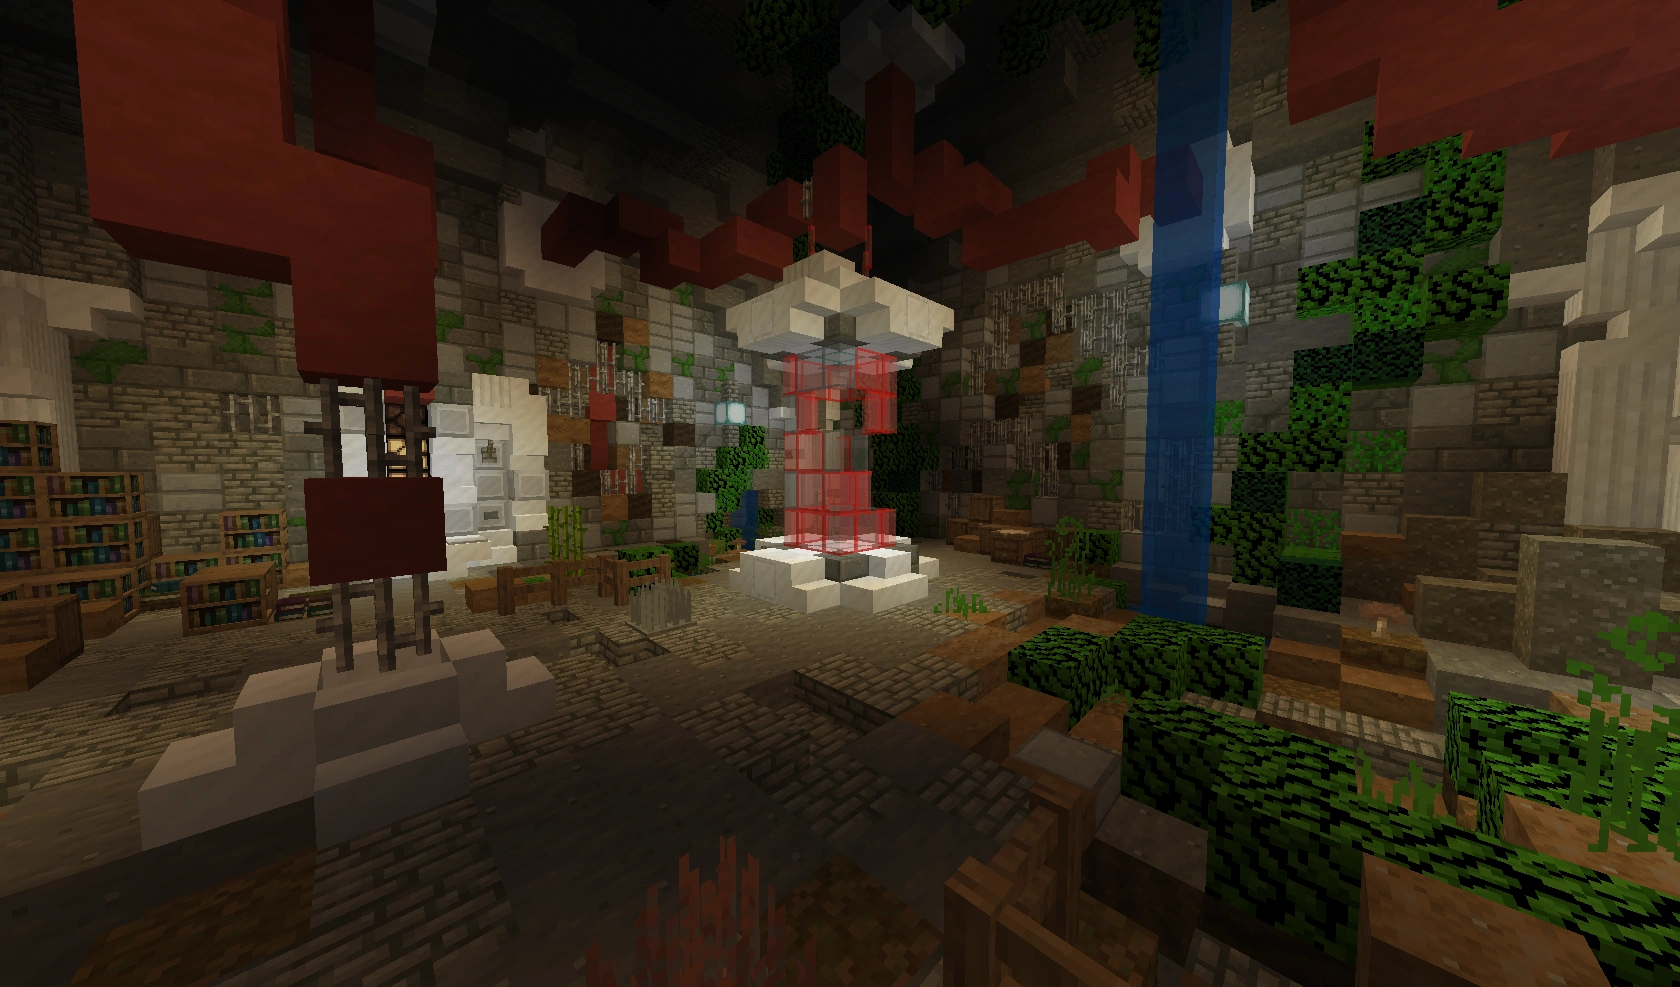
The objective of this puzzle is to move the emerald blocks in each contraption onto the corresponding diamond block in the floor. In this room, there are two contraptions made of quartz blocks and pistons. By pressing buttons, it is possible to use the pistons to push the emerald block in each contraption around. Note that some of the pistons are actually Sticky Pistons, and some may need to be pressed first before pushing the emerald block into the head of the piston (so that when the first piston retracts, it pulls the emerald block with it). When a contraption is completed, a note block sound will play. When both machines are finished, stepping on the iron pressure plate in the center of the room will open a door to the final area. A video solution to the smaller contraption: A video solution to the bigger contraption: |
Spoiler alert: The hidden text contains spoilers relating to Transcript of the signs.
|
Secret Step: My brothers have gone insane. The cosmic magic is too strong. We should have never experimented with the white rock. Now they are obsessed with stupid things! Mushrooms... Chickens! What has happened? I fear there is something hidden behind this magic someone cast on this rock... perhaps we are not ...alone... Even now, my mind is slipping... I just hope... Sohso makes it out alive... I hear he was travelling to Fru... |
Spoiler alert: The hidden text contains spoilers relating to ??? Secret video walkthrough.
|
Gallery[]

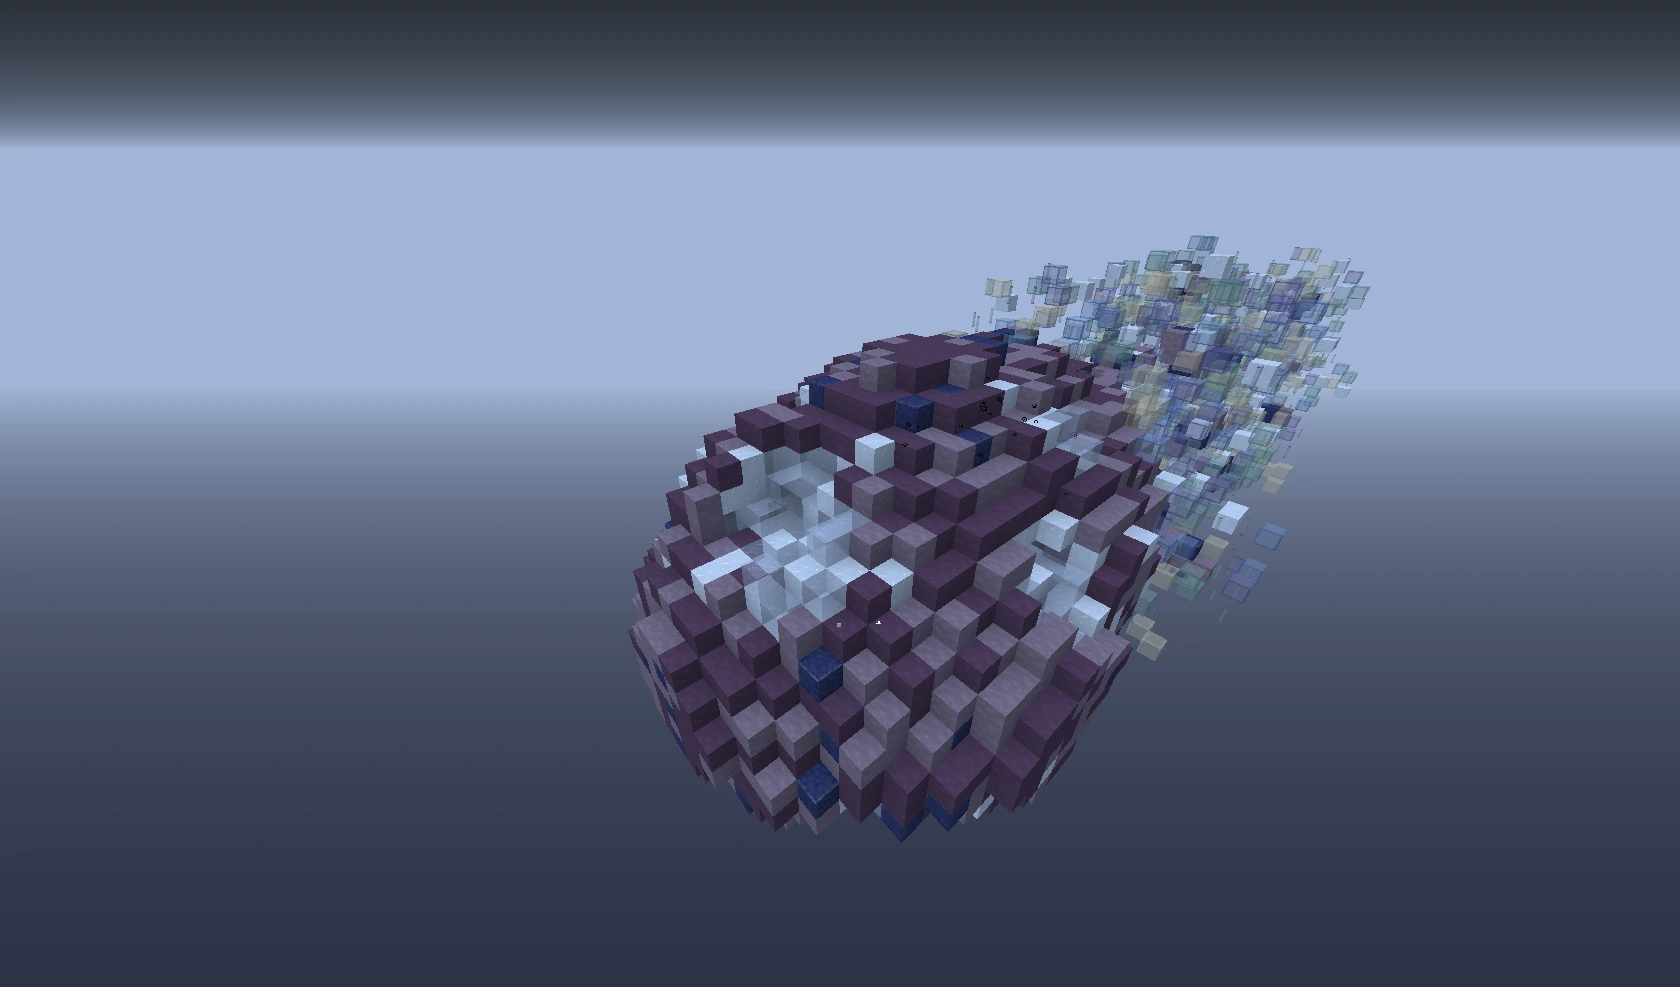
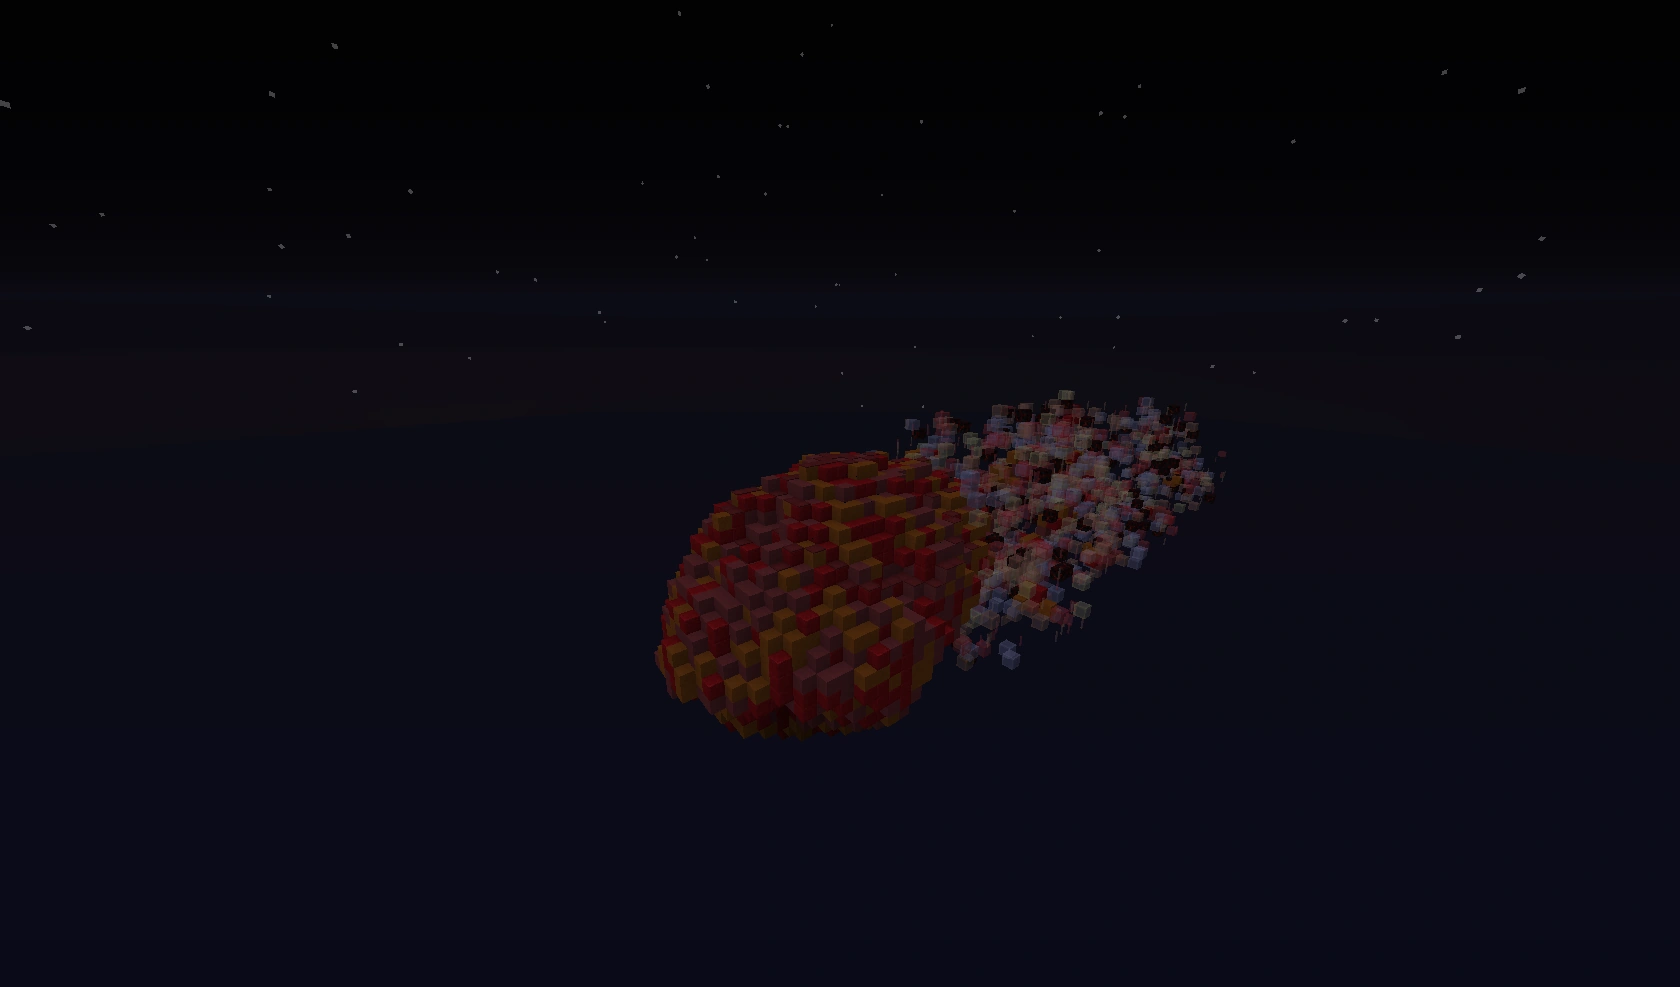
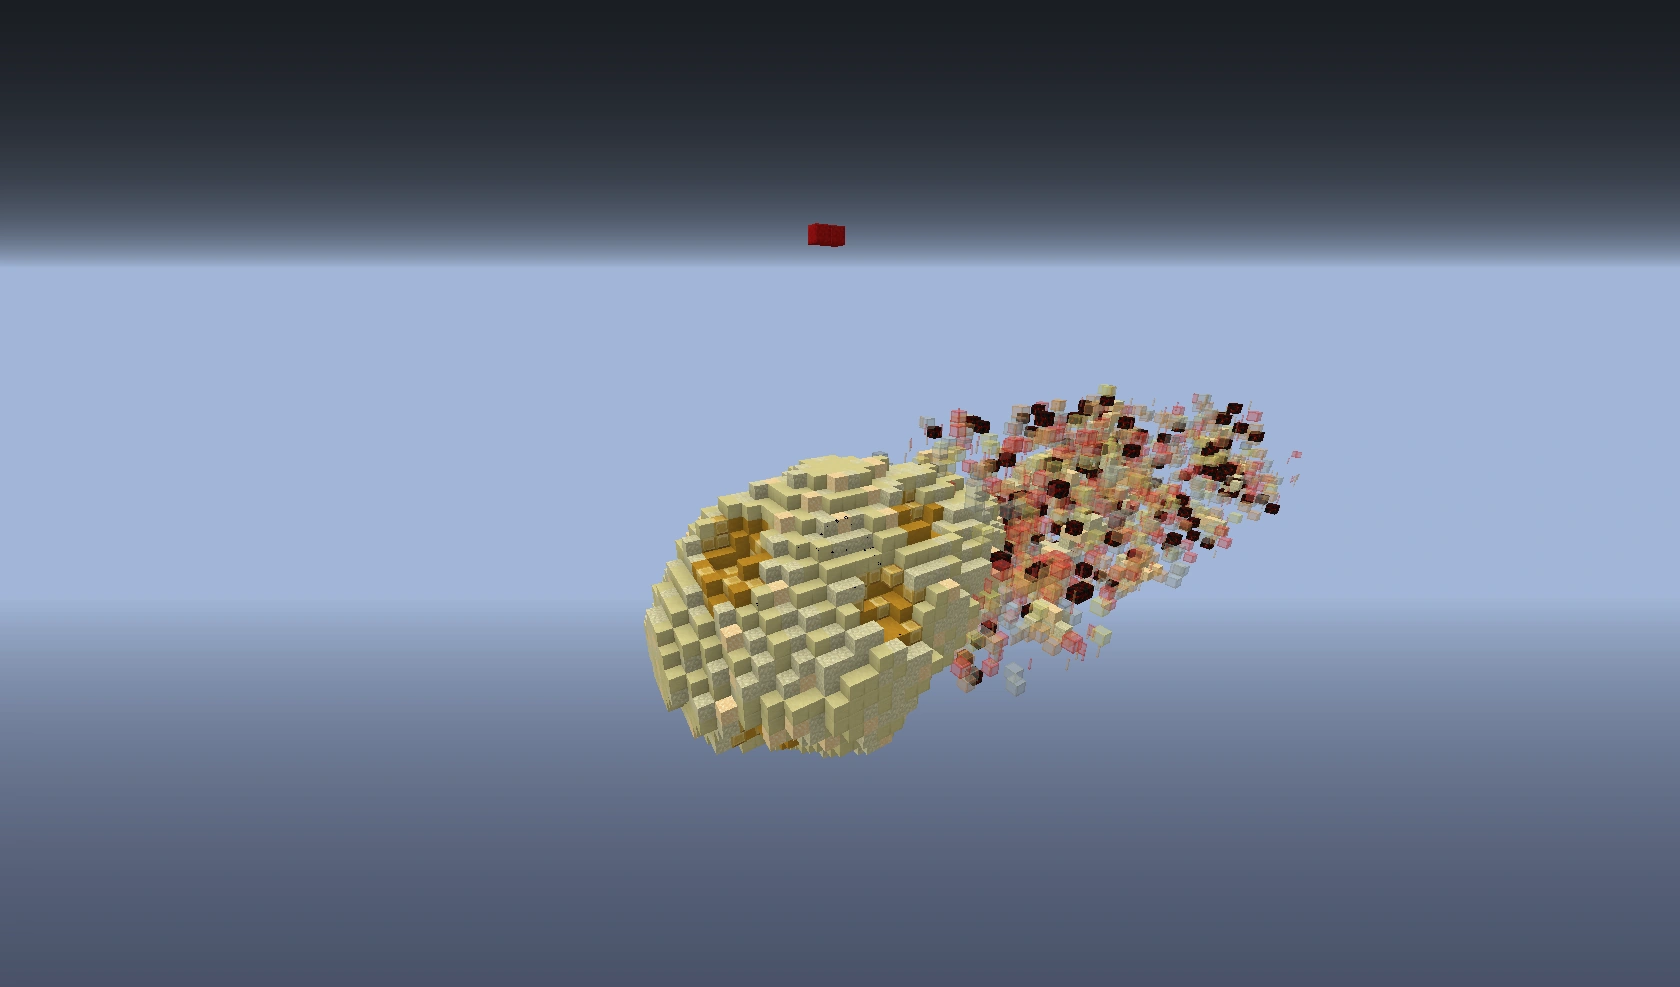
Blue meteor
Red meteor
Yellow meteor
Blue meteor entrance
Red meteor entrance
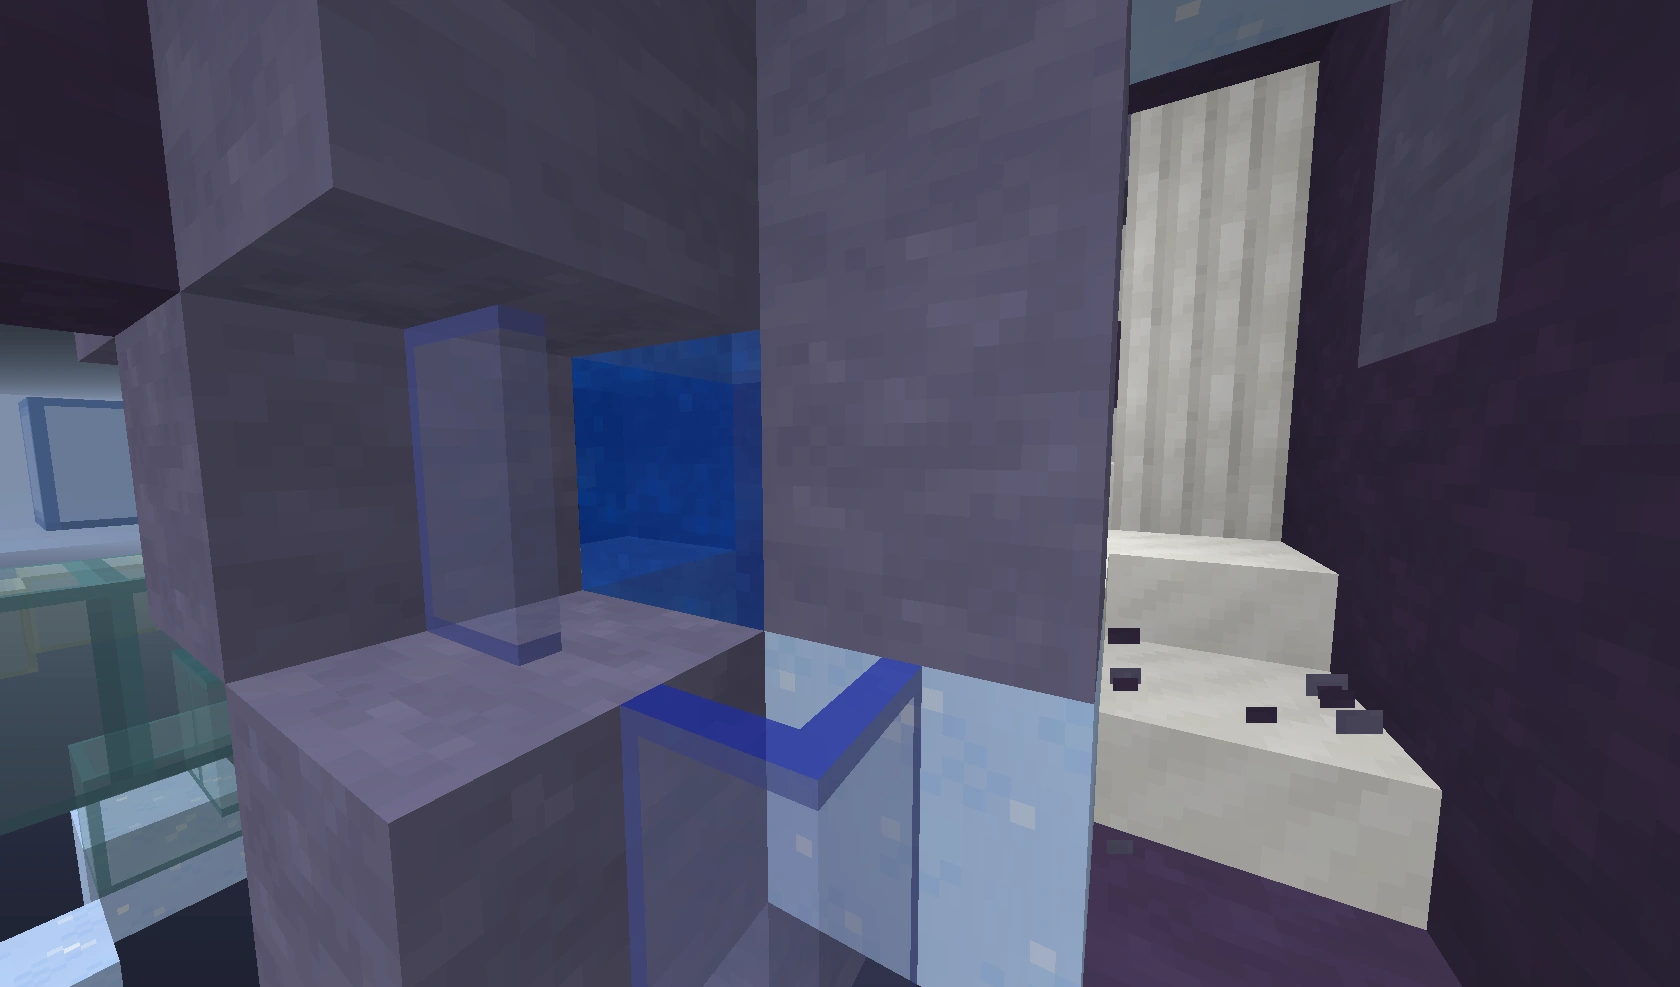
Blue meteor interior
Red meteor interior
Yellow meteor interior
Blue meteor lore
Red meteor lore
Yellow meteor lore
Blue meteor teleport room
Red meteor teleport room
Yellow meteor teleport room
Example of memory puzzle
Pressure plate that summons minecart
The Text on the signs in the Secret of the quest


Tips[]
- While in Lab N, it is recommended to grab some Mysterious Feathers. They are used to return to Lab N without needing to do Lab Y. Simply throw the feather into the yellow carpet in Nohno's basement at Rooster Island to open a door that leads to Lab N.
- It is highly recommended to unlock Calo's airship before going through this quest, as it reduces the travel expenses and time for going between Wynn and Gavel.
- If you are planning to do the quest multiple times (usually to help others), there is a number of shortcuts you can prepare for and take.
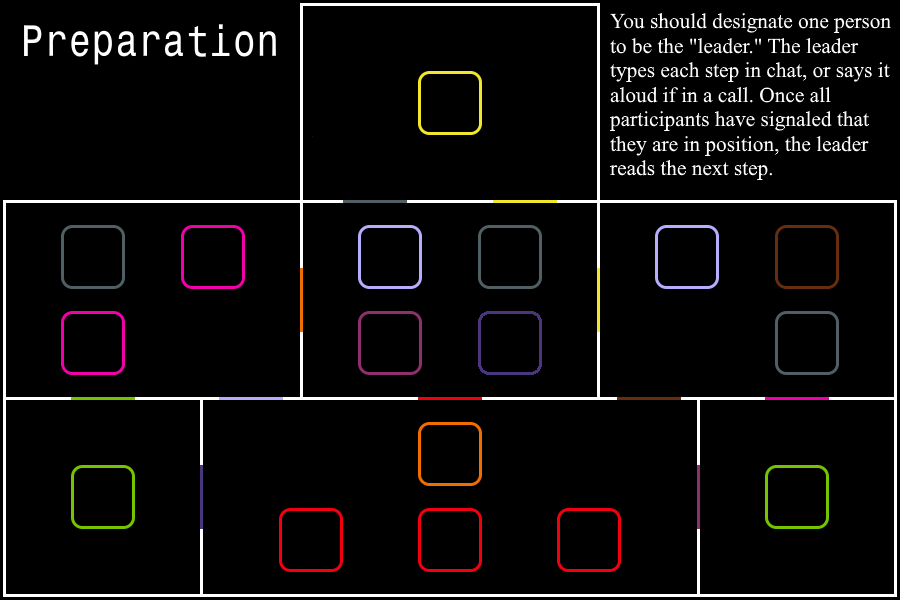
- It is reasonable to choose a leader who can guide everyone in the puzzles.
Spoiler alert: The hidden text contains spoilers relating to Shortcuts.
|
Useful items to keep with you:
|
Trivia[]
- ??? was not meant to be a quest, but it was made as one to allow stage and rewards system.
- The original ??? quest was reworked in the 1.14.1 Gameplay Update.
- In the old version it was prohibited to talk about it and it was punished by ban.
- The quest has its own subforum[1] and official thread[2].
- It took over 100 hours for the puzzles in this quest to be thought of and made.
- Each of the items that is needed to get into Yahya's Lab has its own unique interactions.
- Each Meteor has lore, and so does the hidden step of ??? showing that Yahya, Nohno, and Mehme have a fourth brother called Sohso.
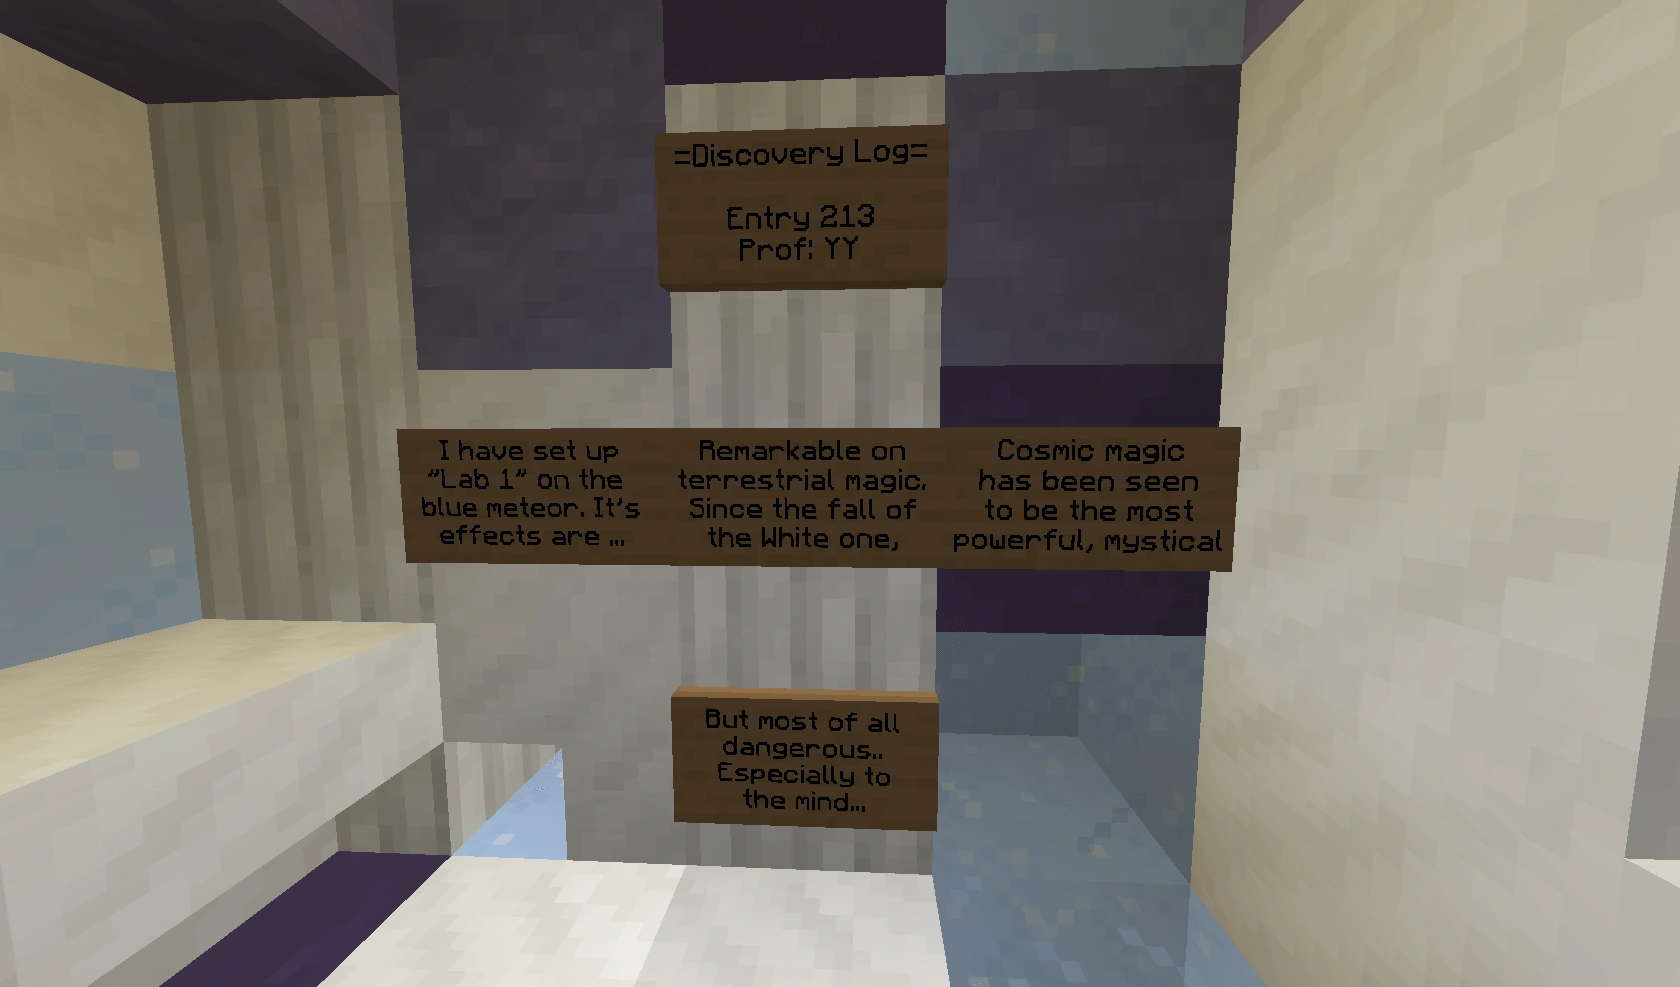
- Blue Meteor: Discovery Log, Entry 213, Prof. YY, I have set up "Lab 1" on the blue meteor. Its effects are... remarkable on terrestrial magic. Since the fall of the White one, Cosmic Magic has been seen to be the most powerful, mystical, but most of all... dangerous. Especially to the mind.
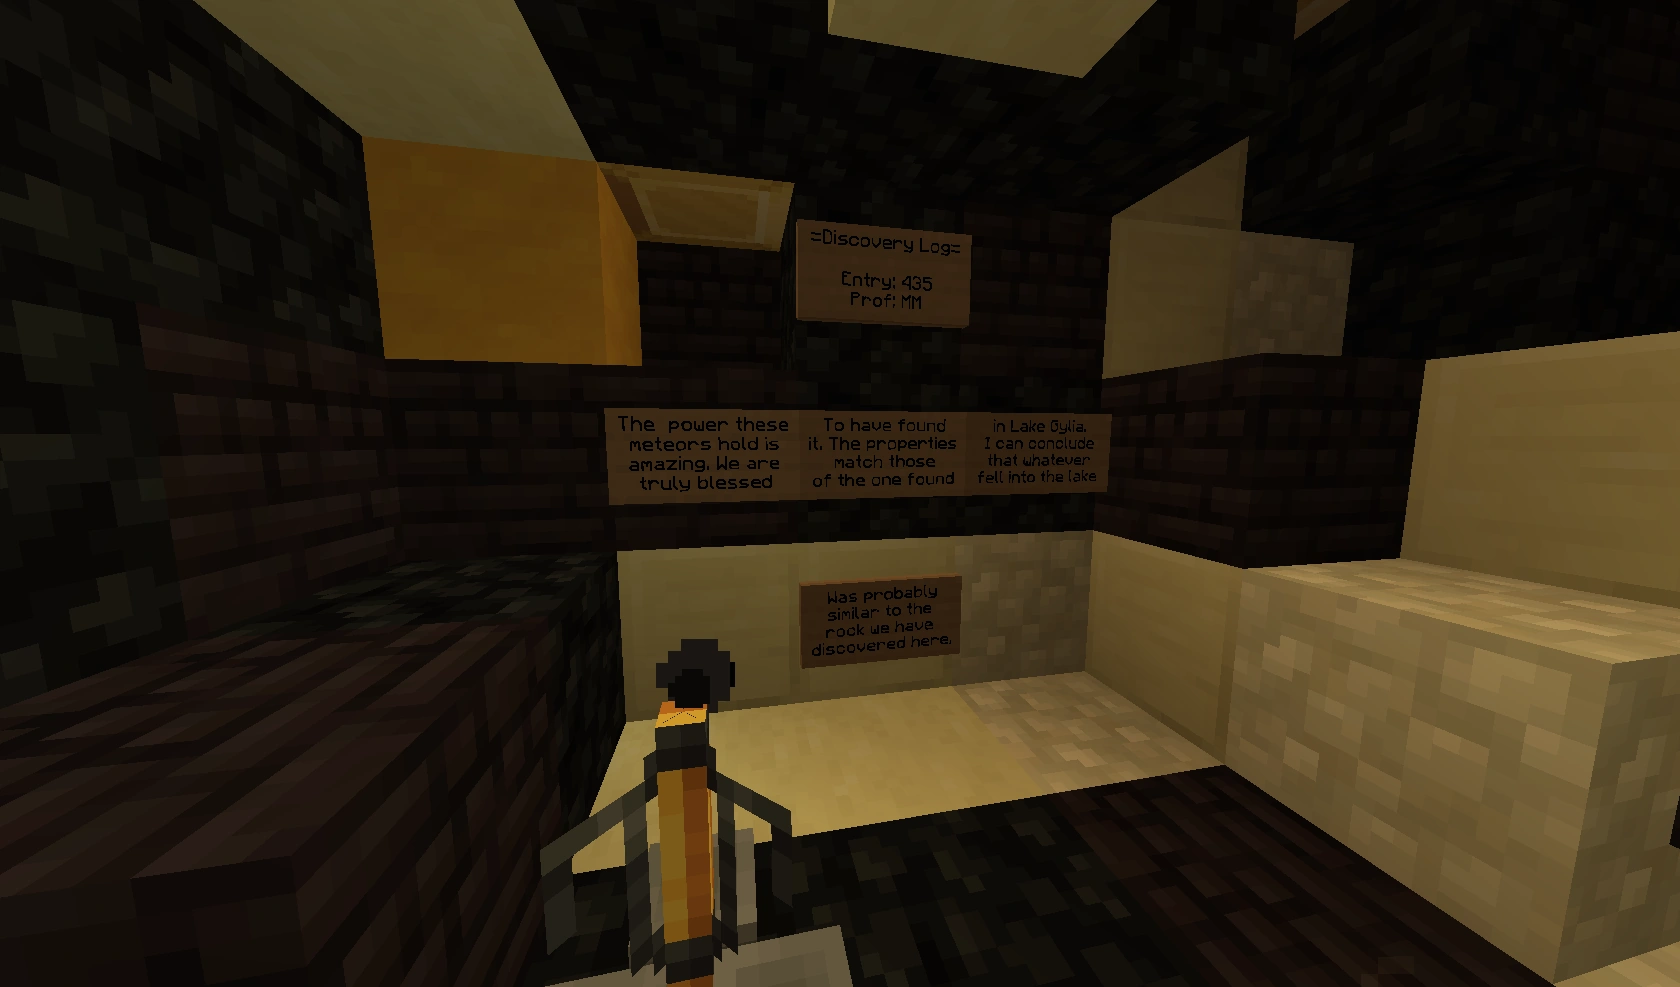
- Yellow Meteor: Discovery Log, Entry 435, Prof. MM, The power these Meteors hold is amazing. We are truly blessed to have found it. The properties match those of the one found in Lake Gylia. I can conclude that whatever fell into the lake was probably similar to the rock we have discovered here.
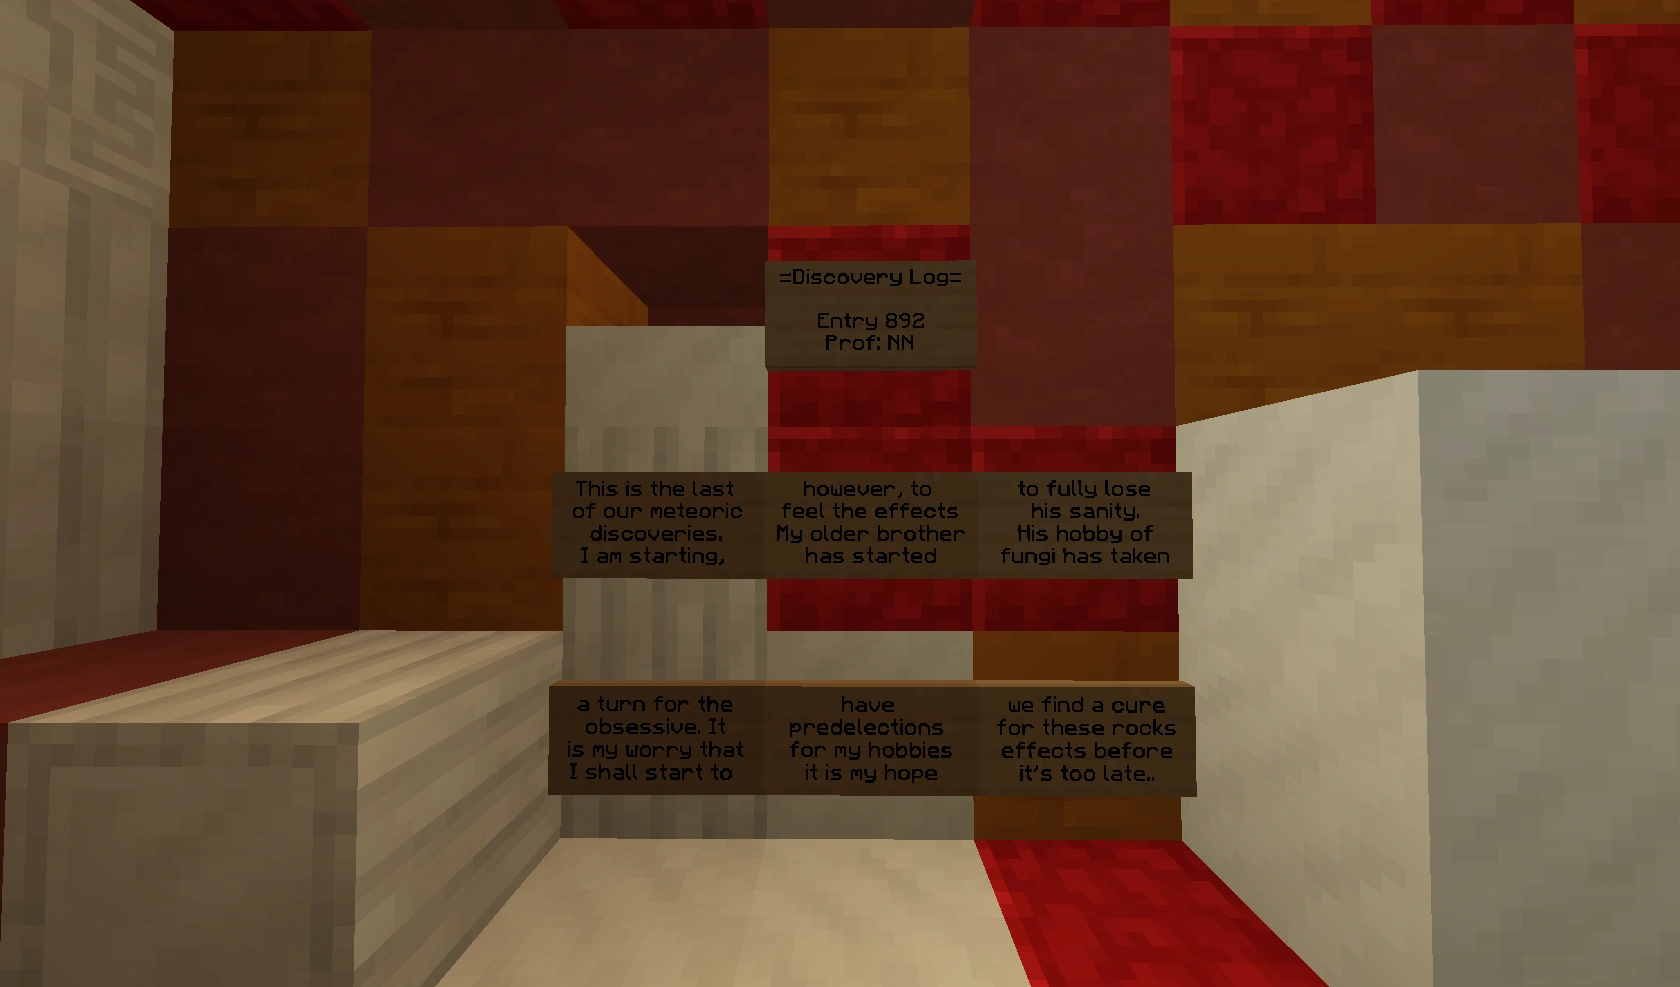
- Red Meteor: Discovery Log, Entry 892, Prof. NN, This is the last of our meteoric discoveries. I am starting, however, to feel the meteor's effects. My older brother has started to fully lose his sanity. His hobby of fungi has taken a turn for the obsessive. It is my worry that I shall start to have predilections for my hobbies. It is my hope we find a cure for these rock's effects before it's too late...
- Lab N: Discovery Log, Entry 1025, Prof. NN, I have my most valuable experiments within this lab. To prevent any valuable research from being stolen, I have made the entrance in YY's lab highly encrypted. Now the only way to enter this lab is to use a key I made that is shaped like a feather. It merely needs to be tossed into one of the cells on my island, and the door will open.
- According to Nohno, the cosmic energy from these meteors made Yahya even more obsessed about his mushrooms, while he was starting to feel the effects of the energy too. It could be why they are so obsessed over mushrooms and chickens, respectively.
- In the Red Meteor Lab with the path puzzle, Squiggles makes a cameo in the water tank.
| Image | Name | Level | Health | AI Type | Abilities | Elemental Stats | Drops | Location |
|---|---|---|---|---|---|---|---|---|
|
Squiggles | 5 | 100 | - | - | - | - | Red Meteor Laboratory |