| Eldritch Outlook | |
  Eldritch Outlook Icon | |
| Access | |
|---|---|
| Coordinates | X: 1306, Z: -776 |
| Suggested Level | 101 |
| Reward | As follows:
|
| Battle | |
| Monsters | Eldritch Outlook Mobs |
| Boss | The Eye |
| Dungeon | |
| Battle | 80% |
| Puzzle | 0% |
| Parkour | 20% |
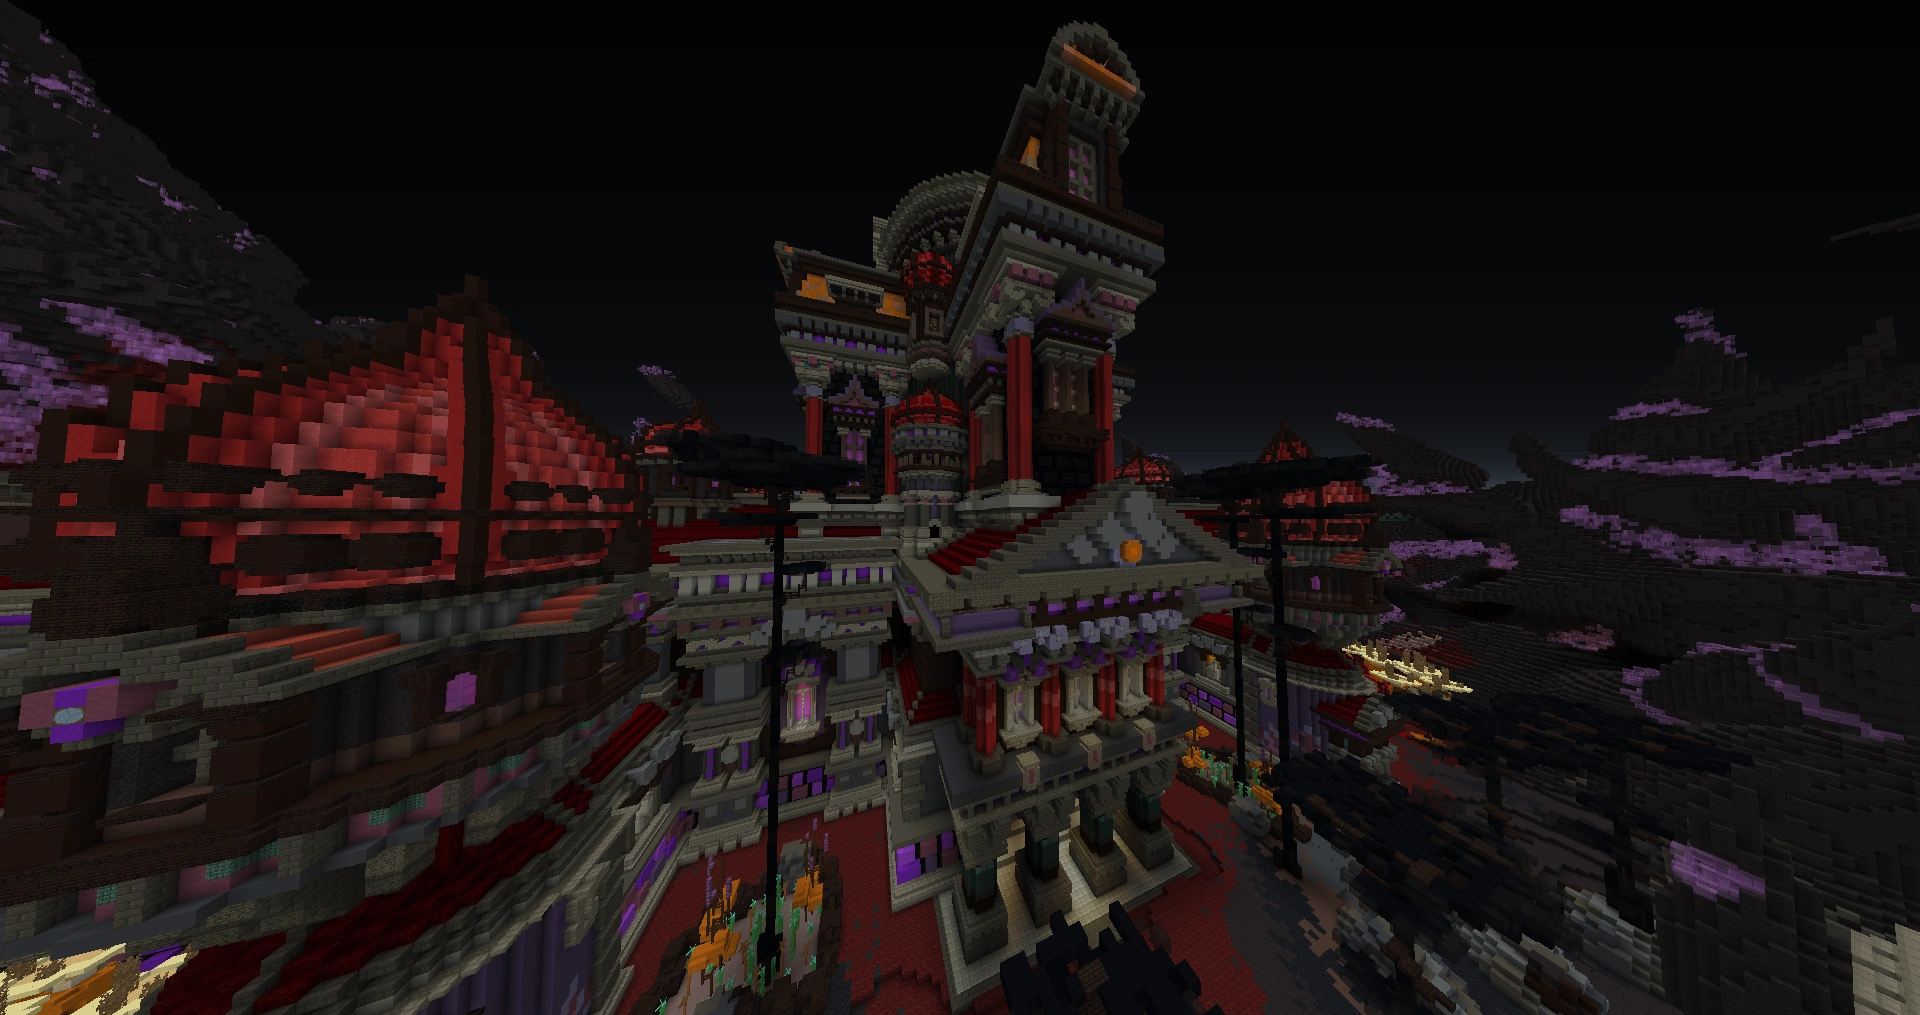
"A gigantic and peculiar-looking monument blocks the exit towards Dern itself. What kind of madness lies in it?"
The Eldritch Outlook is a dungeon that was released during the 1.19 Silent Expanse Update, and stands near the end of the Silent Expanse blocking the way to the Portal to Dern.
Room 1
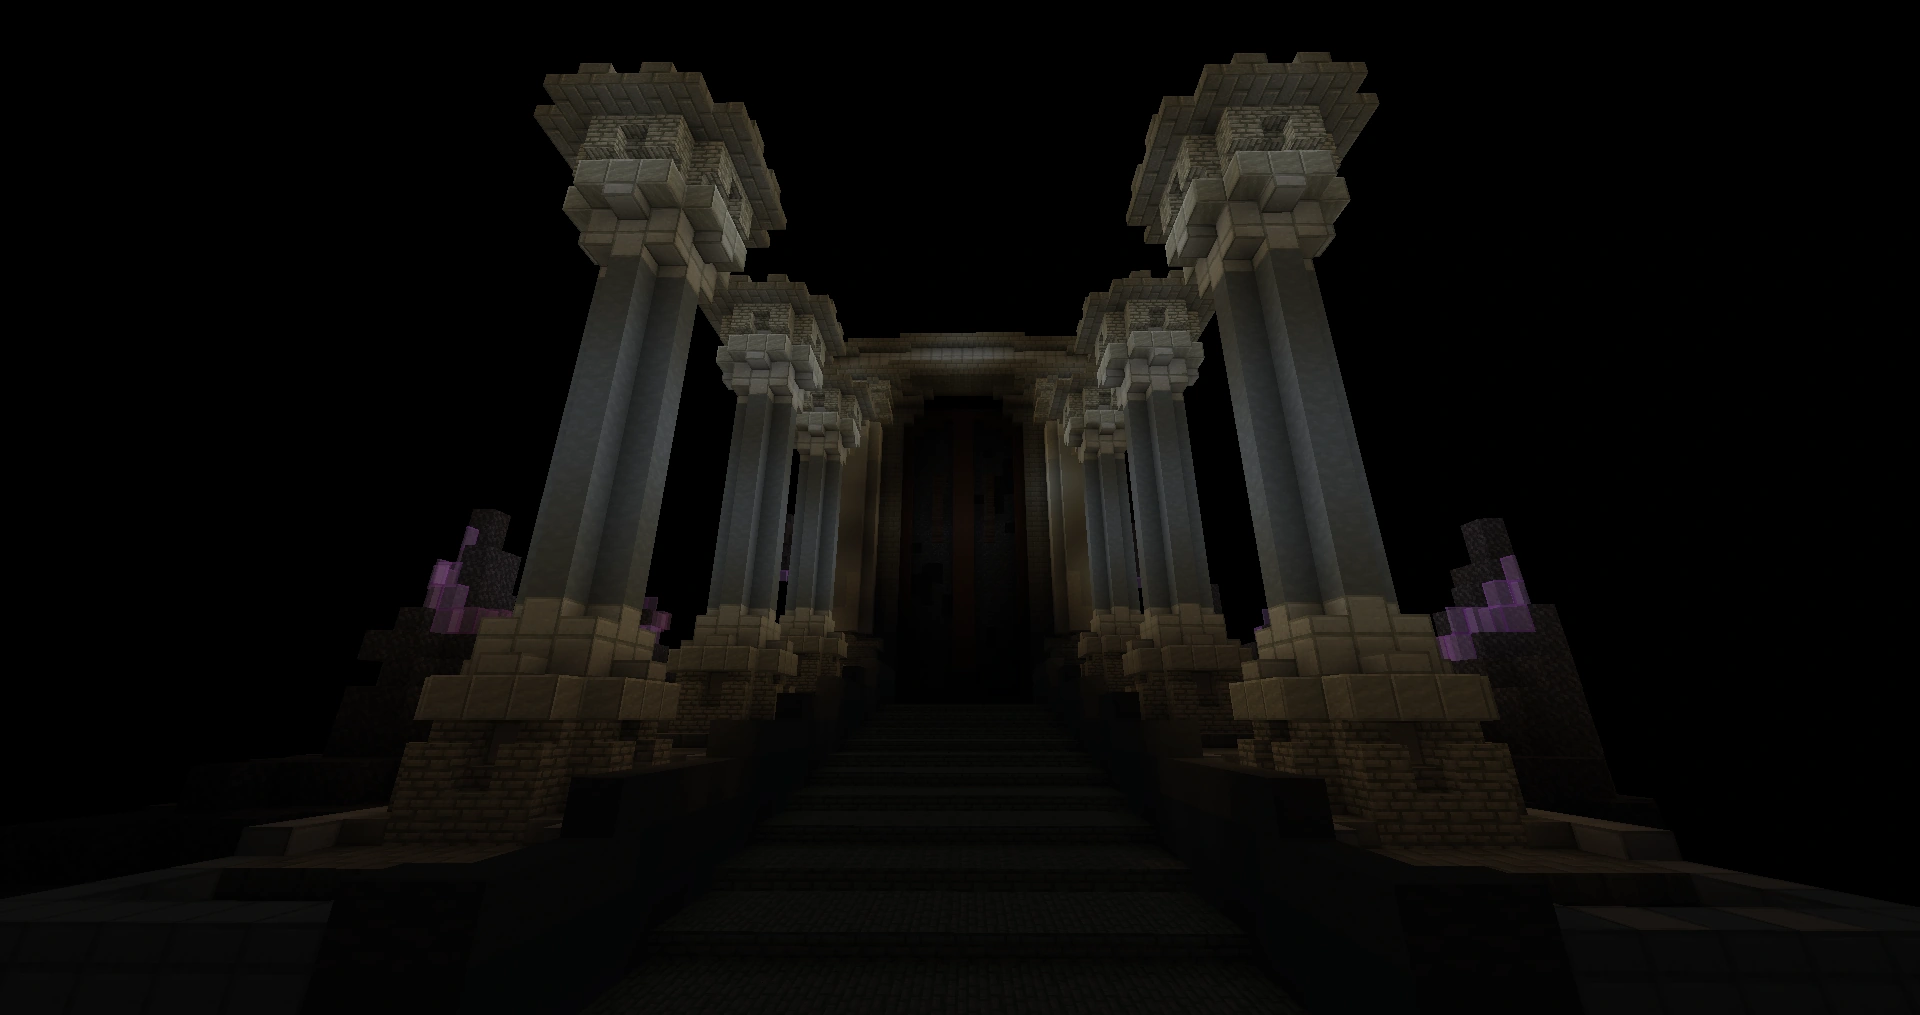
By entering the dungeon, the player will find themselves in a room with a large staircase leading to a gigantic door. Upon going closer the door will open, revealing a snowy landscape with a mirror on one side, reflecting the entire room.
Room 2
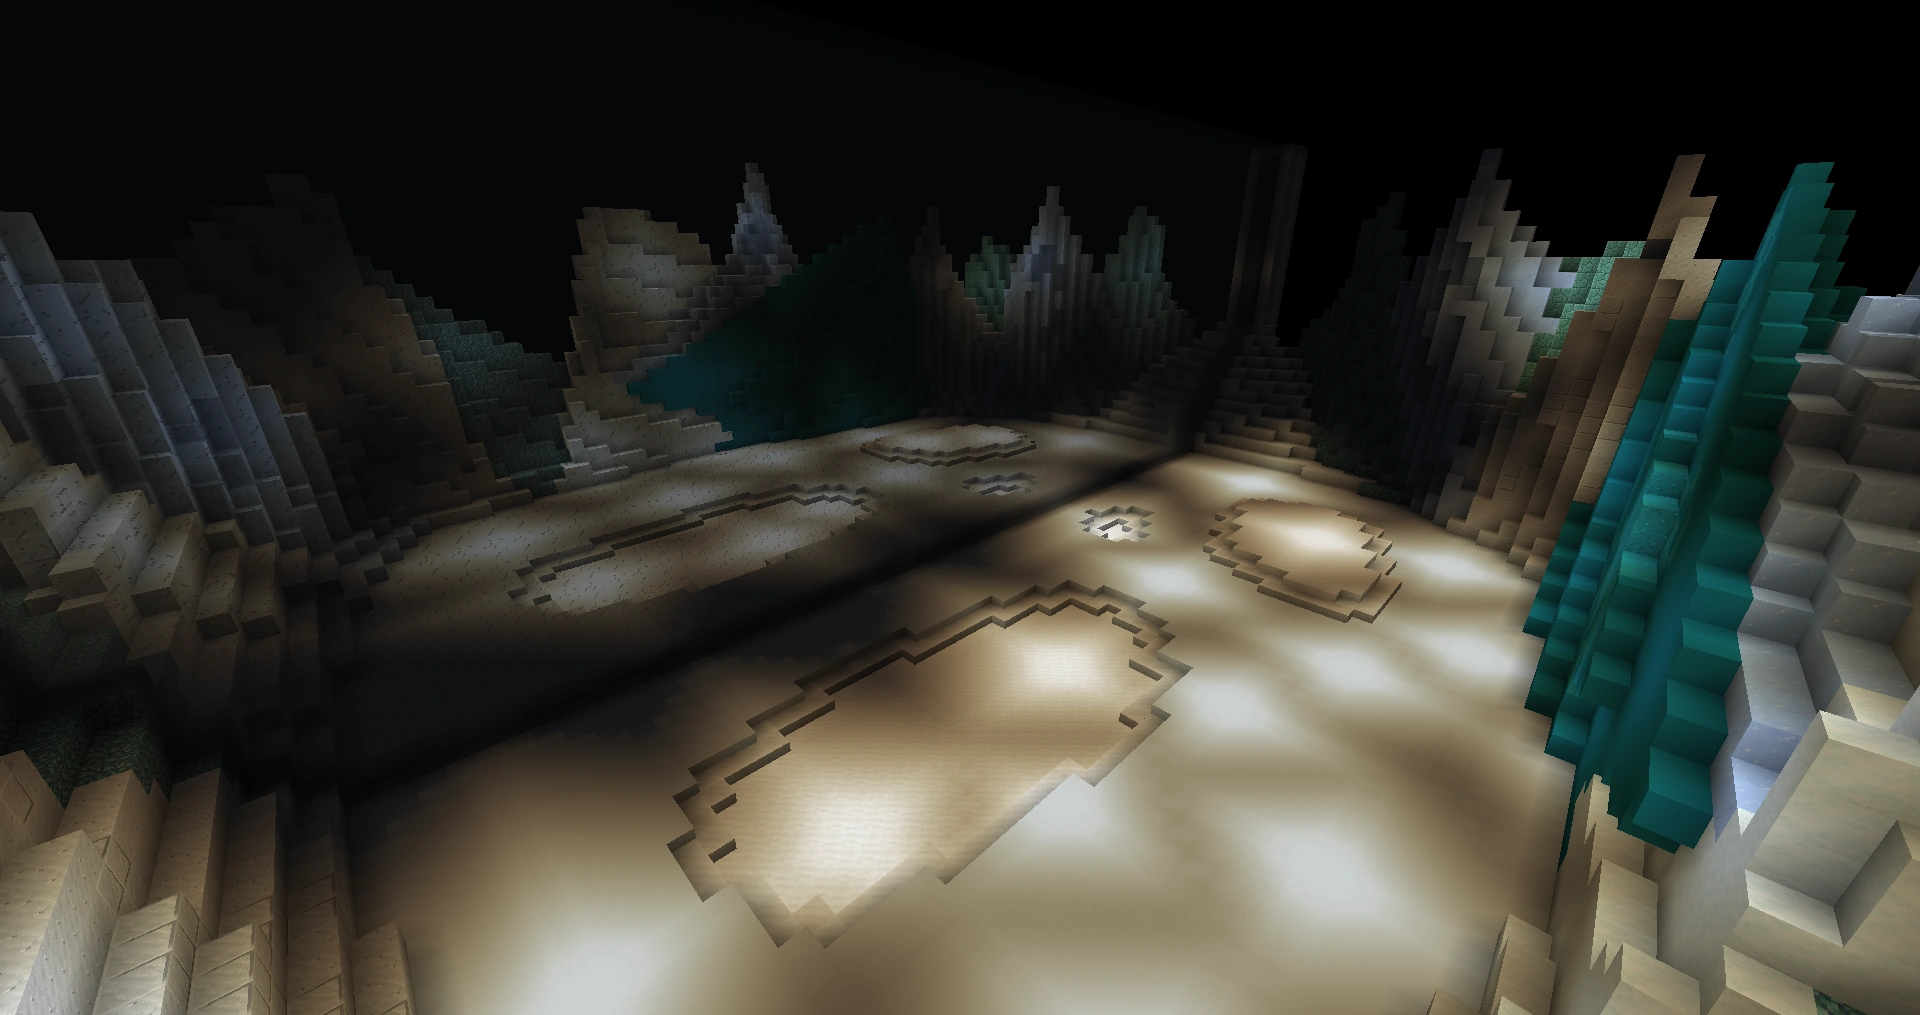
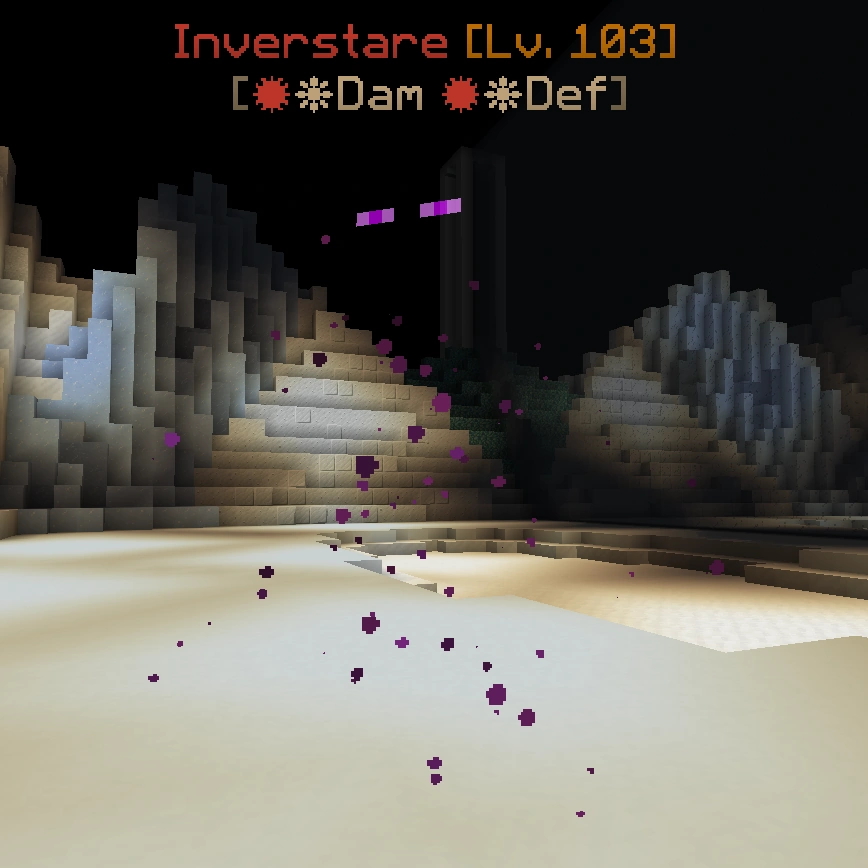
The player is able to travel back and forth the two sides of the mirror by running through it, and mirror-related mobs will spawn on either end. The goal of this room is to kill the mobs, which will drop tokens, and bring 16 tokens to the back of the reflected side of the snowy landscape to open a door to the next room. Inverspirits will only spawn on the reflected side in groups of 4, and the player must kill all enemies on one side of the mirror before swapping back.
| Image | Name | Level | Health | AI Type | Abilities | Elemental Stats | Drops | Location |
|---|---|---|---|---|---|---|---|---|
|
Inverstare | 103 | 9925 | Ranged | Vanish | ✹ Fire: Damage, Defense ❋ Air: Damage, Defense |
- | Eldritch Outlook |

|
Inverspirit | 105 | 21000 | Melee | Vanish Slowness II |
✽ Water: Weakness ❋ Air: Damage ✦ Thunder: Damage, Defense ✤ Earth: Defense |
Eldritch Outlook Token | Eldritch Outlook |

|
Inverspirit | 105 | 21000 | Melee | Vanish Weakness II |
✽ Water: Weakness ❋ Air: Damage ✦ Thunder: Damage, Defense ✤ Earth: Defense |
Eldritch Outlook Token | Eldritch Outlook |
Room 3
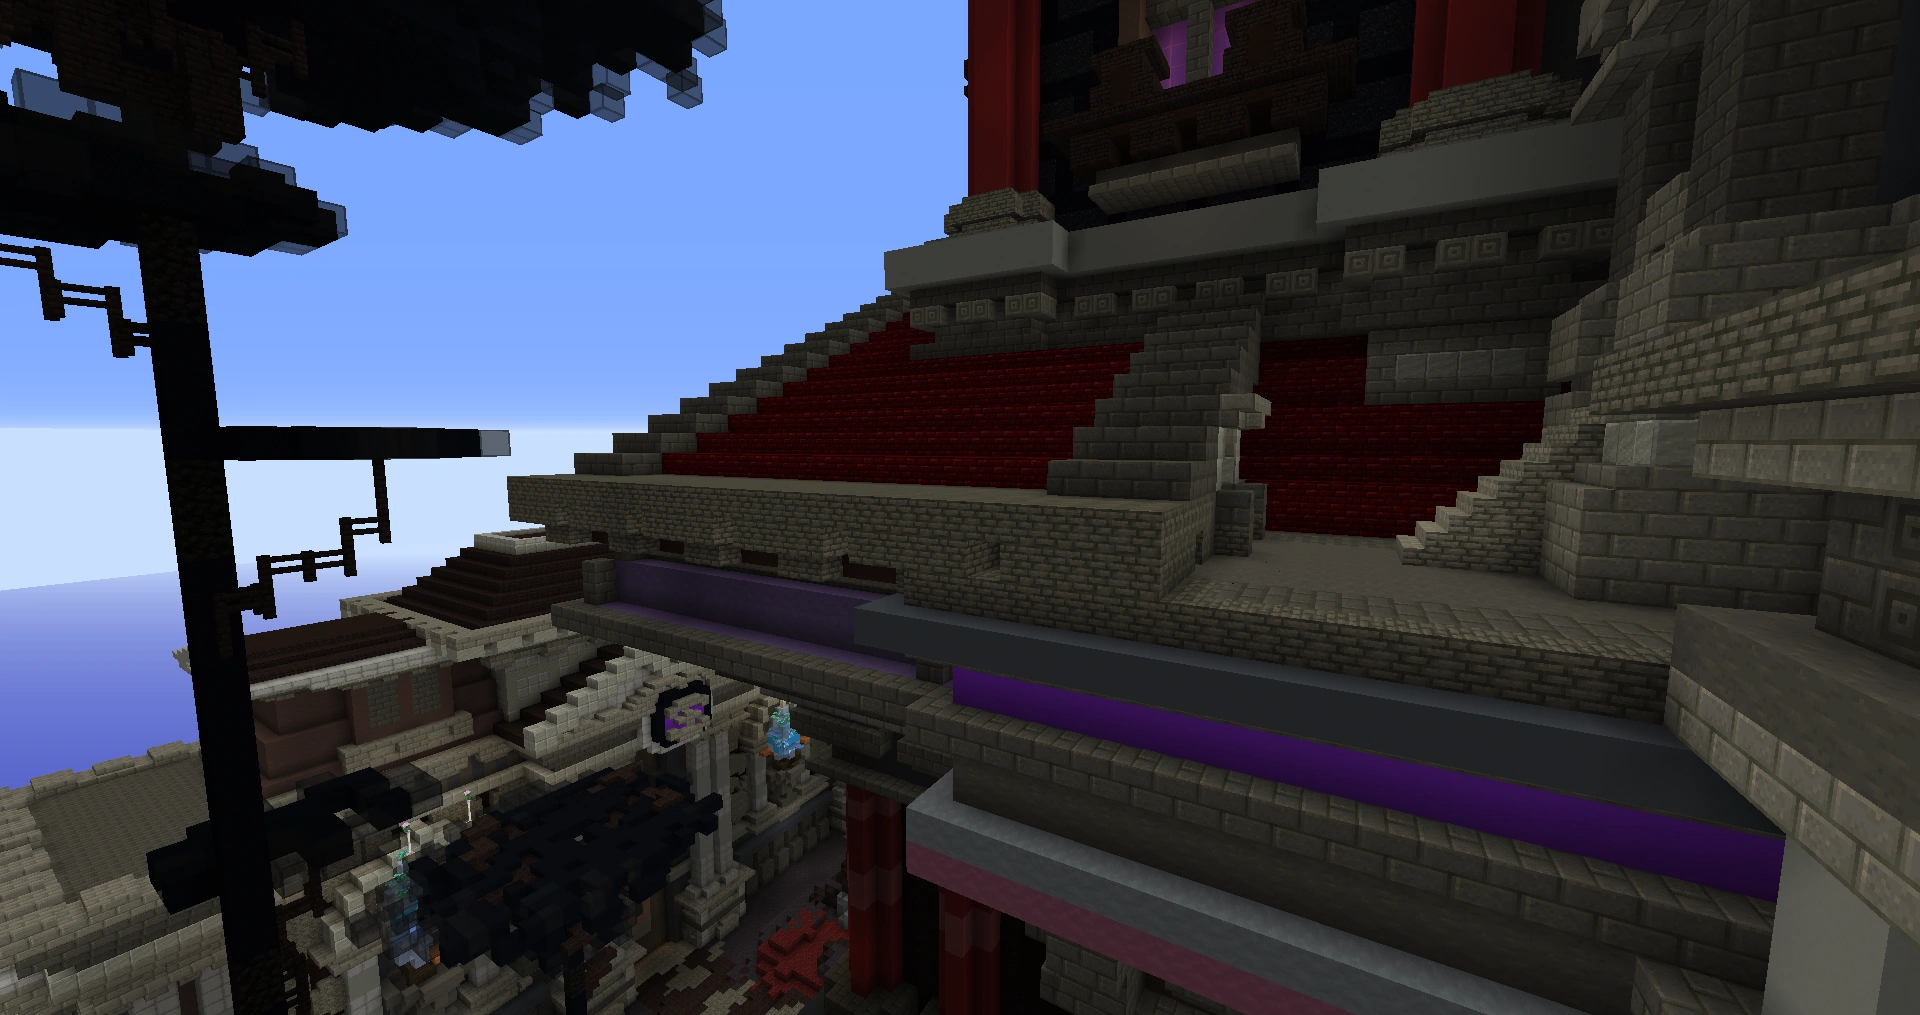
The next area will open up to a balcony on one of the ledges of the gigantic building of The Eldritch Outlook, where the Silent Expanse can be seen far below. Enter the doorway on the top of the small flight of stairs to go back into the building and to the next room.
Room 4

The next room will be a long bridge floating above an enormous colorful maelstrom in a giant void. The goal is to get to the gateway at the other side of the bridge without getting knocked off by any of the mobs that spawn on the bridge. If you get knocked off, you will fall into the maelstrom.
| Image | Name | Level | Health | AI Type | Abilities | Elemental Stats | Drops | Location |
|---|---|---|---|---|---|---|---|---|

|
Taker | 101 | 58500 | Melee | Pull | ✹ Fire: Damage ❋ Air: Damage ✽ Water: Damage ✤ Earth: Damage ✦ Thunder: Damage |
- | Eldritch Outlook |
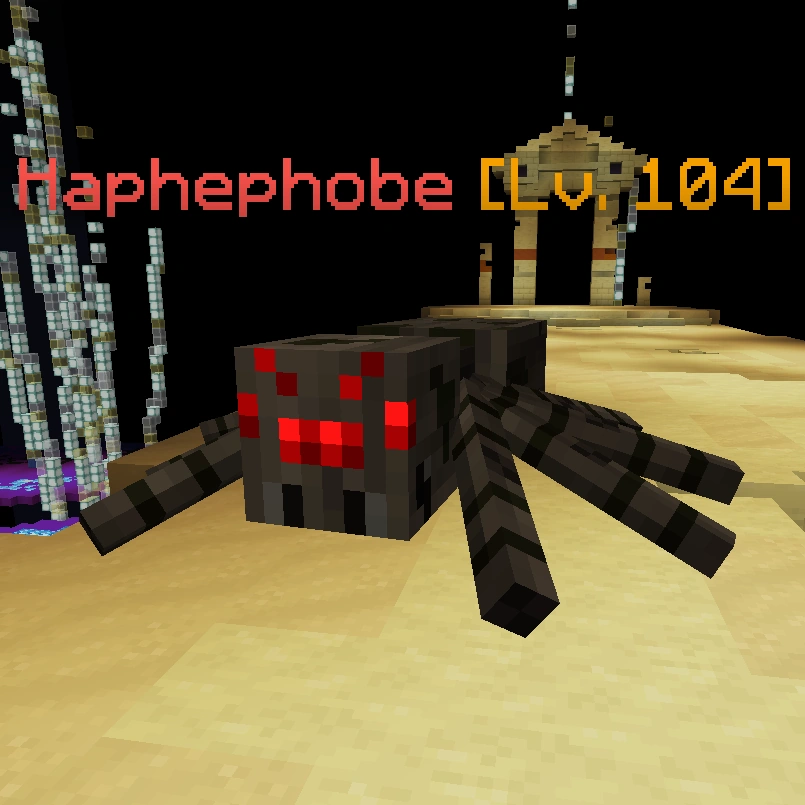
|
Haphephobe | 104 | 31000 | Melee | Push | - | 3 Haphephiles | Eldritch Outlook |
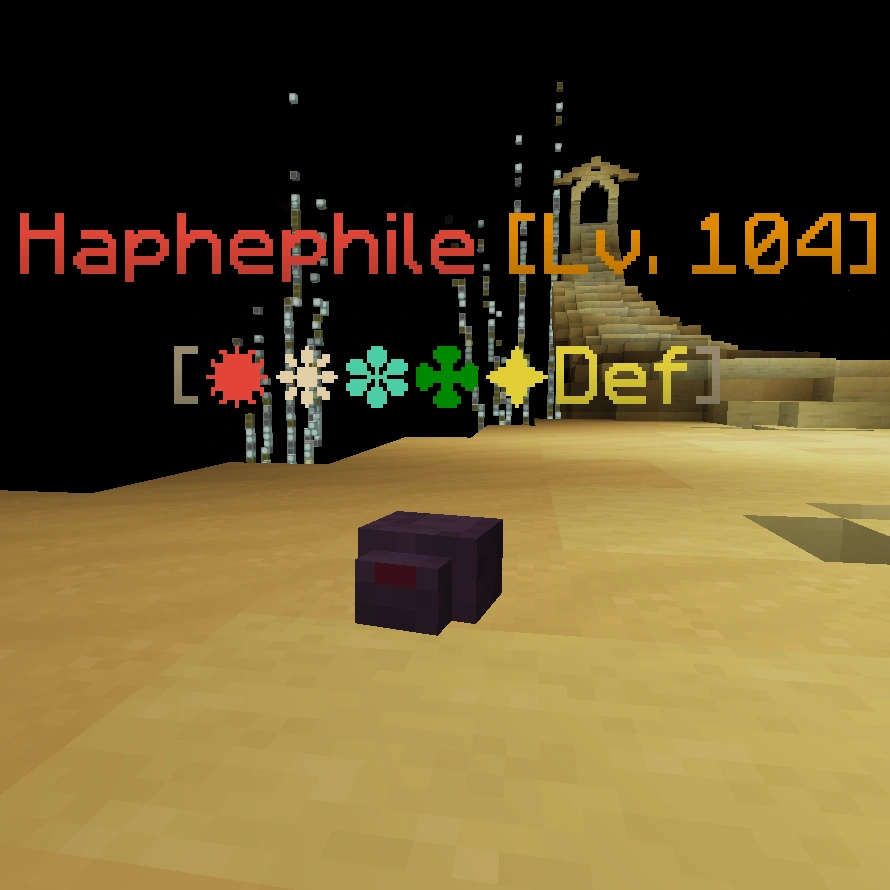
|
Haphephile | 104 | 7300 | Melee | - | ✹ Fire: Defence ❋ Air: Defence ✽ Water: Defence ✤ Earth: Defence ✦ Thunder: Defence |
- | Haphephobe |
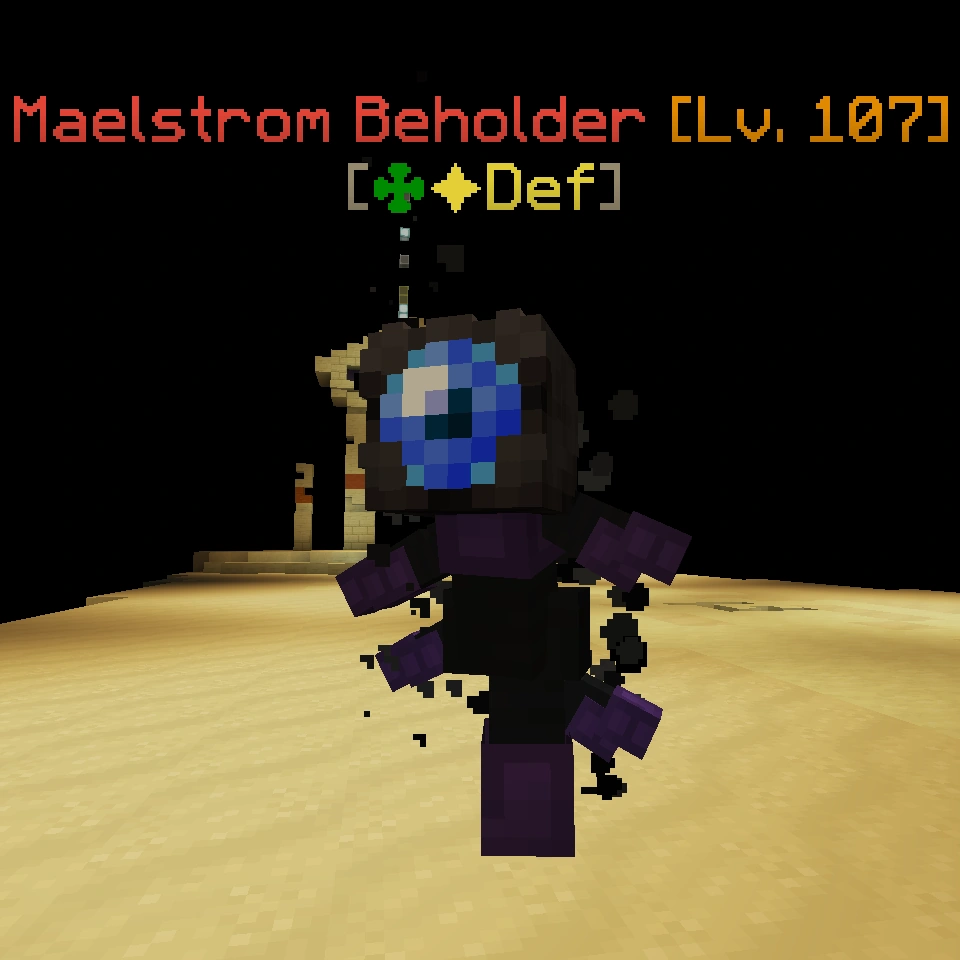
|
Maelstrom Beholder | 107 | 70000 | Ranged | - | ✤ Earth: Defense ✦ Thunder: Defense |
- | Eldritch Outlook |
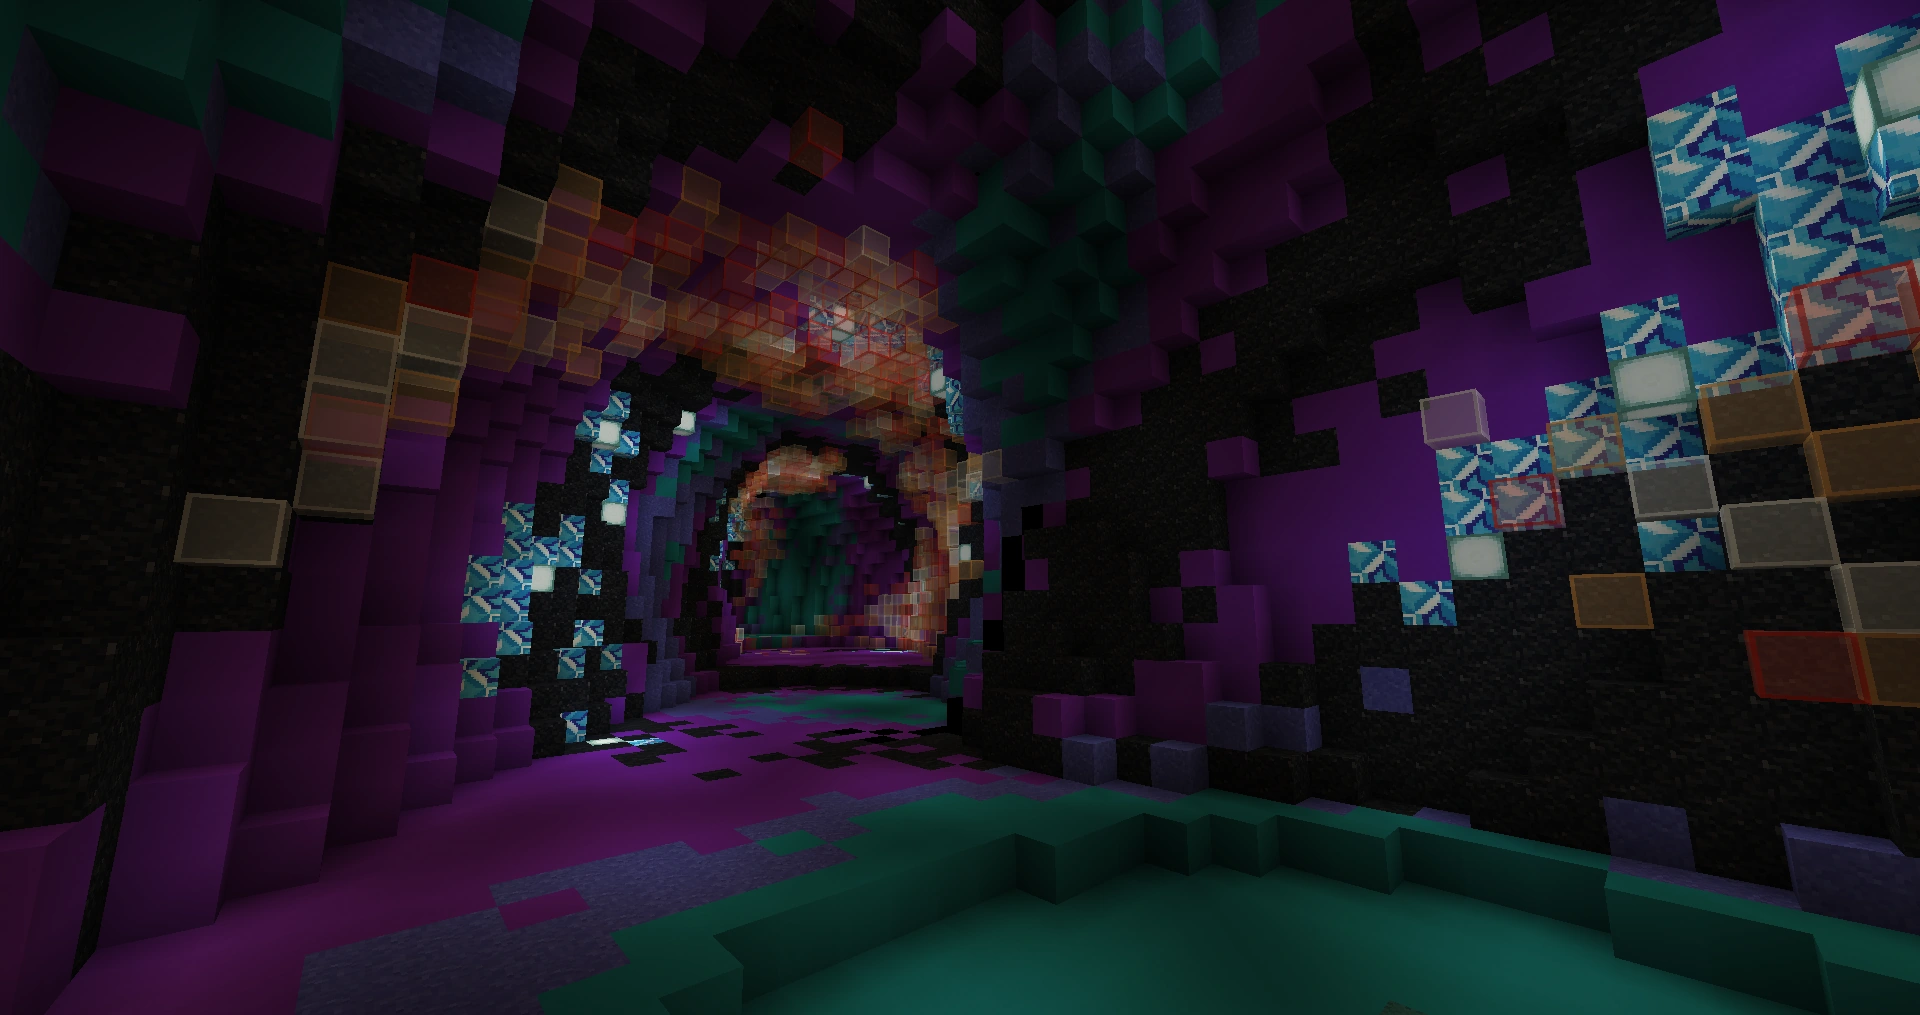
When the player falls into the maelstrom, they will be transported through the colorful tunnel of the maelstrom, where they will encounter other mobs inside. By going through this tunnel to the end they will stand on the beacon and teleport back to the start of the bridge outside of the maelstrom.
| Image | Name | Level | Health | AI Type | Abilities | Elemental Stats | Drops | Location |
|---|---|---|---|---|---|---|---|---|

|
Unstable Phenomenon | 107 | 35000 | Melee | Tp Explode Charge Pull |
✤ Earth: Weakness ✹ Fire: Damage ❋ Air: Damage ✽ Water: Damage ✦ Thunder: Damage |
- | Eldritch Outlook |
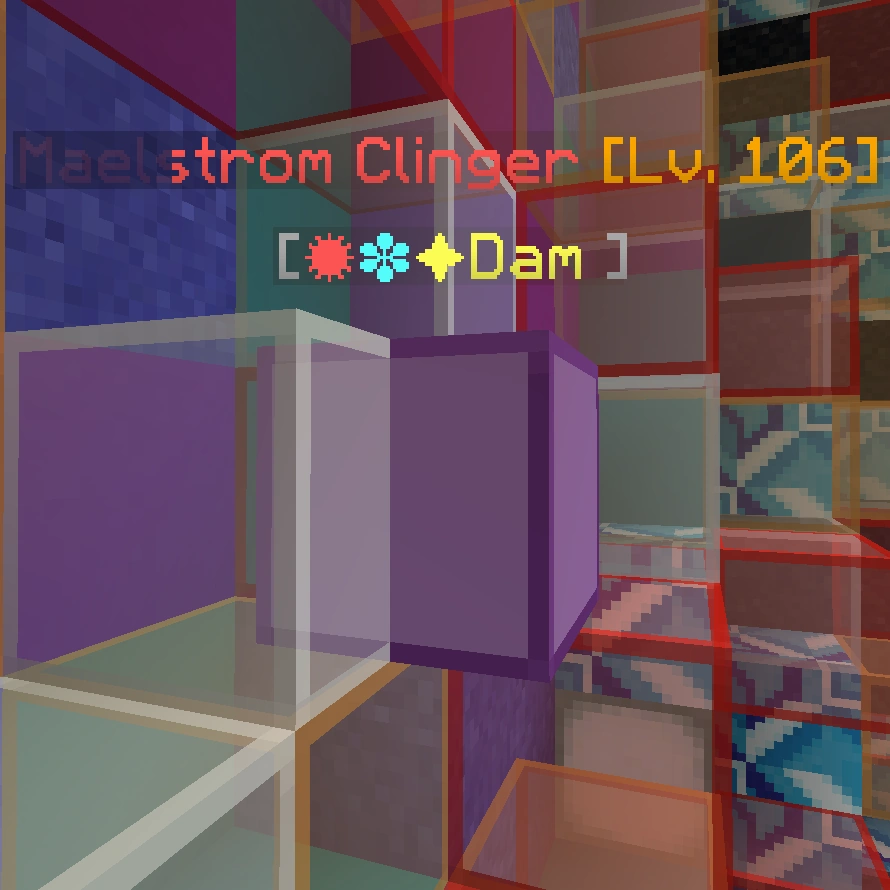
|
Maelstrom Clinger | 106 | 100000 | Ranged | Arrow Storm | ✹ Fire: Damage ✽ Water: Damage ✦ Thunder: Damage |
- | Eldritch Outlook |

|
Swirling Vortex | 109 | 35500 | Ranged | Explode Pull Self-Destruct |
✹ Fire: Weakness, Damage ❋ Air: Weakness, Damage ✽ Water: Weakness ✤ Earth: Weakness ✦ Thunder: Weakness, Damage |
- | Eldritch Outlook |
Room 5
The player will find themselves at the bottom of a spiral staircase. Travelling upwards to bring them once again to the outside of the Eldritch Outlook, standing on another balcony with pillars and looking out to the Silent Expanse. Enter the door at the back to go back into the building.
Room 6
There are 9 rooms in this section, and the player will spawn in Room A. The goal is to get to Room I. In each room, you must kill the main enemy and turn in the token to advance to an adjacent room.
| Image | Name | Level | Health | AI Type | Abilities | Elemental Stats | Drops | Location |
|---|---|---|---|---|---|---|---|---|
| File:Shimmerstar.png | Shimmerstar | 100 | 18000 | Melee | - | ✦ Thunder: Damage | - | Eldritch Outlook |
| File:ReversionCatalyst(A).png | Reversion Catalyst (Room A) |
101 | 60000 | Ranged | Heal Weakness II |
✤ Earth: Weakness ✽ Water: Damage, Defense ✦ Thunder: Damage |
Eldritch Outlook Token | Eldritch Outlook |
.png)
| Image | Name | Level | Health | AI Type | Abilities | Elemental Stats | Drops | Location |
|---|---|---|---|---|---|---|---|---|
| File:FlickeringShimmerstar(B).png | Flickering Shimmerstar (Room B) |
101 | 6675 | Melee | - | ✦ Thunder: Damage | Scalecore (Room B) |
Eldritch Outlook |
| File:Scalecore(B).png | Scalecore (Room B) |
101 | 28050 | Melee | - | ❋ Air: Damage, Defense ✦ Thunder: Damage |
- | Flickering Shimmerstar (Room B) |
| File:ReversionCatalyst(B).png | Reversion Catalyst (Room B) |
103 | 62500 | Ranged | Vanish Tp |
❋ Air: Weakness ✦ Thunder: Damage, Defense |
Eldritch Outlook Token | Eldritch Outlook |
.png)
.png)
.png)
| Image | Name | Level | Health | AI Type | Abilities | Elemental Stats | Drops | Location |
|---|---|---|---|---|---|---|---|---|
| File:FlickeringShimmerstar(C).png | Flickering Shimmerstar (Room C) |
101 | 18750 | Melee | - | ✦ Thunder: Damage | Scalecore (Room C) |
Eldritch Outlook |
| File:Scalecore(C).png | Scalecore (Room C) |
101 | 16000 | Melee | Slowness I Weakness I |
❋ Air: Damage ✦ Thunder: Damage, Defense |
- | Flickering Shimmerstar (Room C) |
| File:ReversionCatalyst(C).png | Reversion Catalyst (Room C) |
103 | 62500 | Melee | Vanish Push |
✦ Thunder: Weakness ✽ Water: Damage, Defense |
Eldritch Outlook Token | Eldritch Outlook |
.png)
.png)
.png)
| Image | Name | Level | Health | AI Type | Abilities | Elemental Stats | Drops | Location |
|---|---|---|---|---|---|---|---|---|
| File:FlakingScalecore(D).png | Flaking Scalecore (Room D) |
102 | 19275 | Ranged | Self-Destruct | ❋ Air: Damage, Defense ✦ Thunder: Damage |
Dark Core (Room D) |
Eldritch Outlook |
| File:DarkCore(D).png | Dark Core (Room D) |
102 | 9650 | Melee | - | ✦ Thunder: Weakness ✤ Earth: Damage, Defense |
- | Flickering Shimmerstar (Room D) |
| File:ReversionCatalyst(D).png | Reversion Catalyst (Room D) |
105 | 83500 | Melee | Vanish Multihit |
✽ Water: Weakness ✦ Thunder: Damage, Defense ✹ Fire: Defense |
Eldritch Outlook Token | Eldritch Outlook |
.png)
.png)
.png)
| Image | Name | Level | Health | AI Type | Abilities | Elemental Stats | Drops | Location |
|---|---|---|---|---|---|---|---|---|
| File:FlakingScalecore(E).png | Flaking Scalecore (Room E) |
102 | 9800 | Ranged | Heal | ❋ Air: Damage, Defense ✦ Thunder: Damage |
Dark Core (Room E) |
Eldritch Outlook |
| File:DarkCore(E).png | Dark Core (Room E) |
102 | 19650 | Melee | - | ✦ Thunder: Weak ✤ Earth: Damage, Defense |
- | Flickering Shimmerstar (Room E) |
| File:ReversionCatalyst(E).png | Reversion Catalyst (Room E) |
105 | 83500 | Melee | Vanish Meteor |
❋ Air: Weakness ✦ Thunder: Damage, Defense ✹ Fire: Defense |
Eldritch Outlook Token | Eldritch Outlook |
.png)
.png)
.png)
| Image | Name | Level | Health | AI Type | Abilities | Elemental Stats | Drops | Location |
|---|---|---|---|---|---|---|---|---|
| File:FlakingScalecore(F).png | Flaking Scalecore (Room F) |
102 | 29000 | Melee | Sloness I Weakness I |
❋ Air: Damage, Defense ✦ Thunder: Damage |
Dark Core (Room F) |
Eldritch Outlook |
| File:DarkCore(F,Charge).png | Dark Core (Room F, Charge Spell) |
102 | 29000 | Melee | Charge | ✦ Thunder: Weak ✤ Earth: Damage, Defense |
- | Flaking Scalecore (Room F) |
| File:DarkCore(F,Push).png | Dark Core (Room F, Push Spell) |
102 | 29000 | Melee | Push | ✦ Thunder: Weak ✤ Earth: Damage, Defense |
- | Flaking Scalecore (Room F) |
| File:ReversionCatalyst(F).png | Reversion Catalyst (Room F) |
105 | 83500 | Ranged | Vanish Push |
❋ Air: Weakness ✽ Water: Damage, Defense ✦ Thunder: Damage |
Eldritch Outlook Token | Eldritch Outlook |
.png)
.png)
.png)
.png)
| Image | Name | Level | Health | AI Type | Abilities | Elemental Stats | Drops | Location |
|---|---|---|---|---|---|---|---|---|
| File:DistortingCore(G).png | Distorting Core (Room G) |
103 | 8515 | Ranged | Charge | ✦ Thunder: Weakness ✤ Earth: Damage, Defense |
Core Expulsion (Room G) |
Eldritch Outlook |
| File:CoreExplusion(G).png | Core Expulsion (Room G) |
103 | 15000 | Melee | Self-Destruct | ✤ Earth: Weakness, Damage ✦ Thunder: Damage |
- | Distorting Core (Room G) |
| File:ReversionCatalyst(G).png | Reversion Catalyst (Room G) |
107 | 88000 | Melee | Vanish Flamethrower |
✤ Earth: Weakness ✹ Fire: Damage, Defense ✦ Thunder: Damage, Defense |
Eldritch Outlook Token | Eldritch Outlook |
.png)
.png)
.png)
| Image | Name | Level | Health | AI Type | Abilities | Elemental Stats | Drops | Location |
|---|---|---|---|---|---|---|---|---|
| File:DistortingCore(H).png | Distorting Core (Room H) |
103 | 9925 | Melee | Tp | ✦ Thunder: Weakness ✤ Earth: Damage, Defense |
Core Expulsion (Room G) |
Eldritch Outlook |
| File:CoreExpulsion(H,Charge).png | Core Expulsion (Room H, Charge Spell) |
103 | 15000 | Melee | Charge Pull |
❋ Air: Weakness ✤ Earth: Damage ✦ Thunder: Damage |
- | Distorting Core (Room H) |
| File:CoreExpulsion(H,Pull).png | Core Expulsion (Room H, Pull Spell) |
103 | 15000 | Melee | Pull | ❋ Air: Weakness ✤ Earth: Damage ✦ Thunder: Damage |
- | Distorting Core (Room H) |
| File:ReversionCatalyst(H).png | Reversion Catalyst (Room H) |
107 | 88000 | Ranged | Tp | ✦ Thunder: Weakness ✹ Fire: Damage, Defense ✽ Water: Damage, Defense |
Eldritch Outlook Token | Eldritch Outlook |
.png)
.png)
.png)
.png)
| Image | Name | Level | Health | AI Type | Abilities | Elemental Stats | Drops | Location |
|---|---|---|---|---|---|---|---|---|
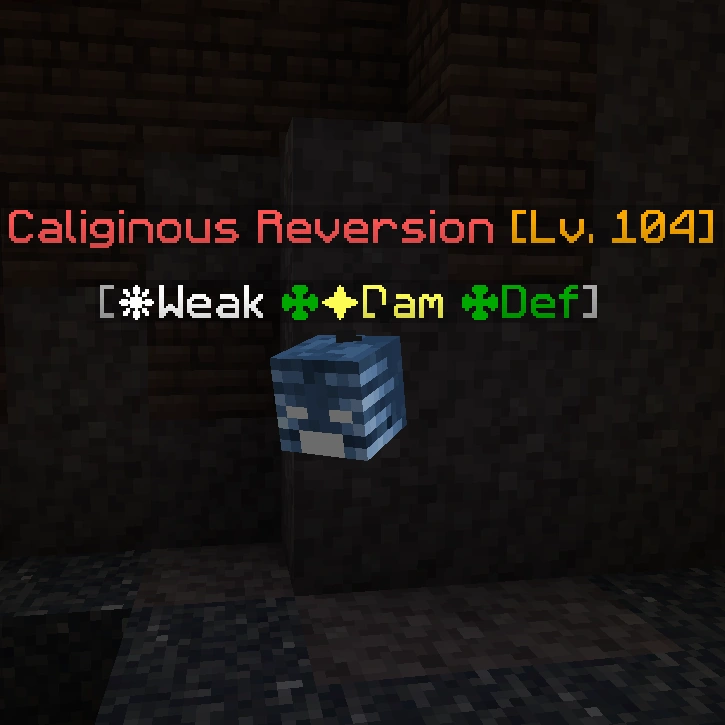
|
Caliginous Reversion (Air) |
104 | 21000 | Ranged | Tp | ❋ Air: Weakness ✤ Earth: Damage, Defense ✦ Thunder: Damage |
- | Eldritch Outlook |
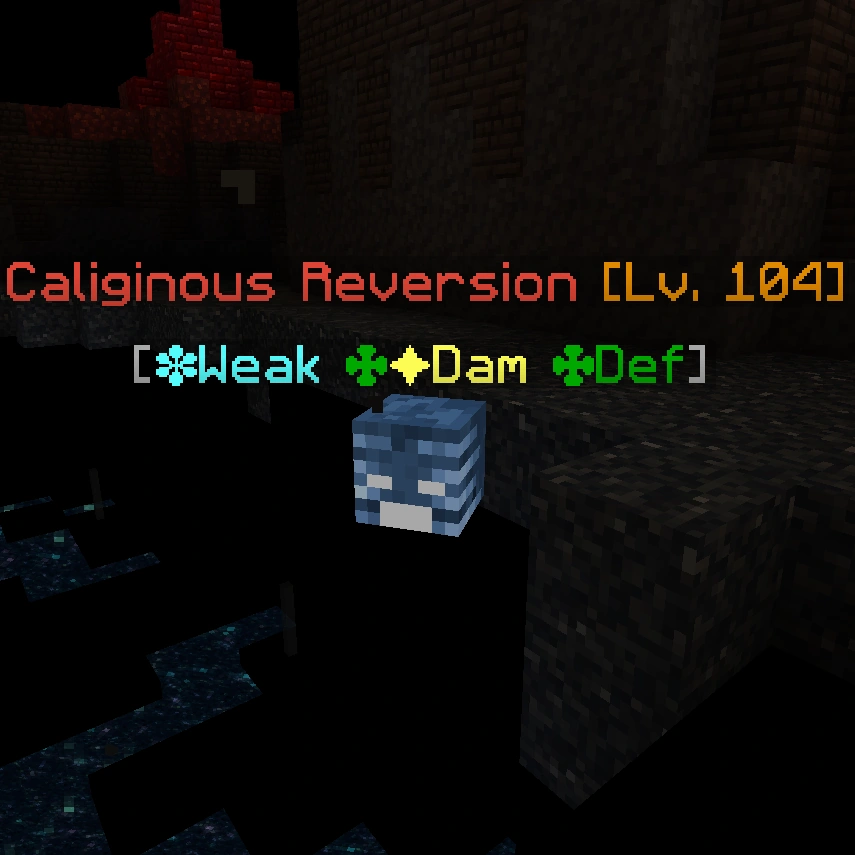
|
Caliginous Reversion (Water) |
104 | 21000 | Ranged | Charge | ✽ Water: Weakness ✤ Earth: Damage, Defense ✦ Thunder: Damage |
- | Eldritch Outlook |
| File:ReversionCatalyst(I).png | Reversion Catalyst (Room I) |
109 | 112500 | Melee | Tp Flamethrower |
✹ Fire: Damage, Defense ✽ Water: Damage, Defense ✦ Thunder: Damage, Defense |
Eldritch Outlook Token | Eldritch Outlook |
.png)
Room 7
The player once again placed on a balcony overlooking the Eldritch Outlook. Walking into the doorway to the player's left will transfer them to the next room.
Room 8
The player is placed in a room with parkour. The blocks that the player must jump on are invisible, the glowstone on the floor far down below projecting where the platforms are in the air. After each set of parkour is done, there will be an entrance at the end that will transport the player to the next parkour. Going through the third entrance brings the player out of the parkour room.
Room 9
Once more the player is placed onto an area overlooking the Eldritch Outlook. Simply walk forwards and click the button to advance to the boss room.
Boss Room
The final boss at the very top of the Eldritch Outlook is The Eye, which is considered by many to be the most complicated and difficult boss fight as of 1.19.
Trivia
- The boss arena where The Eye is fought becomes more corrupted as the battle progresses.